안녕하세요 늑대양 입니다

Terraform 관련 기초 스터디(Terraform 101 Study)를 참여하게 되어 해당 내용들을 주차별로 정리하고자 합니다.
해당 스터디는 CloudNet@ 팀의 Gasida 님이 호스트를 맡아 주셨으며,
https://gasidaseo.notion.site/CloudNet-Blog-c9dfa44a27ff431dafdd2edacc8a1863
CloudNet@ Blog | Notion
CloudNet@ 팀에서 Cloud Infra & Network 기술에 대한 정보를 공유하는 블로그 입니다.
gasidaseo.notion.site
스터디 메인 교재는 "테라폼으로 시작하는 IaC" 도서를 기준으로 진행 됩니다.
https://www.yes24.com/Product/Goods/119179333
테라폼으로 시작하는 IaC - 예스24
“현업에서 요구하는 진짜 IaC 사용법”테라폼으로 배우는 인프라 운영의 모든 것IaC는 효율적인 데브옵스와 클라우드 자동화 구축을 위해 꼭 필요한 기술로 각광받고 있다. 그중에서도 테라폼
www.yes24.com
아래의 내용은 7주차 - OpenTofu 내용을 다루고 있습니다.
벌써 마지막 주차라니..
7주차 - OpenTofu
OpenTofu 소개
The open source infrastructure as code tool.
Previously named OpenTF, OpenTofu is a fork of Terraform that is open-source, community-driven, and managed by the Linux Foundation.
Main URL: https://opentofu.org/
OpenTofu
The open source infrastructure as code tool.
opentofu.org
ChatGPT - OpenTofu
- OpenTofu는 이전에 OpenTF로 알려졌던 오픈 소스 인프라스트럭처 코드(Infrastructure as Code, IaC) 도구입니다.
- OpenTofu는 인프라를 코드로 정의하고 관리할 수 있게 해주며, 클라우드 인프라의 배포 및 관리를 자동화하는 데 사용됩니다.
- 이 도구는 Terraform과 유사한 기능을 제공하며, 특히 Terraform의 오픈 소스 커뮤니티에서 파생된 프로젝트입니다.
주요 특징 및 기능:
코드로 인프라 정의
- OpenTofu는 선언적 구문을 사용하여 인프라를 정의할 수 있습니다.
- 이를 통해 복잡한 인프라 설정을 텍스트 파일로 관리하고 버전 컨트롤 시스템을 통해 추적할 수 있습니다.
다양한 프로바이더 지원
- AWS, Azure, Google Cloud 등 다양한 클라우드 서비스 제공자와의 통합을 지원합니다.
- 이를 통해 여러 클라우드 환경을 한꺼번에 관리할 수 있습니다.
상태 관리
- OpenTofu는 인프라의 현재 상태를 관리하고, 변경 사항을 추적합니다.
- 이를 통해 인프라 변경 시 계획(Plan)과 적용(Apply) 단계에서의 차이를 명확히 볼 수 있습니다.
모듈성
- 모듈을 사용하여 인프라 설정을 재사용 가능하게 만들 수 있습니다.
- 이는 코드의 재사용성과 유지 보수성을 높이는 데 큰 도움이 됩니다.
커뮤니티 주도 개발
- OpenTofu는 커뮤니티에 의해 개발 및 유지 관리됩니다.
- 이는 다양한 사용 사례를 반영한 기능 향상 및 버그 수정을 보다 빠르게 할 수 있다는 장점이 있습니다.
역사 및 배경
- OpenTofu는 원래 OpenTF라는 이름으로 시작되었으며, HashiCorp의 Terraform에서 파생된 프로젝트입니다.
- Terraform은 강력한 IaC 도구로 널리 사용되고 있지만, 라이선스 변경 등과 같은 이유로 일부 커뮤니티 멤버들이 오픈 소스 정신을 지키기 위해 OpenTofu 프로젝트를 시작하게 되었습니다.
사용 사례
클라우드 인프라 자동화
- OpenTofu를 사용하여 클라우드 리소스를 자동으로 배포하고 관리할 수 있습니다.
버전 관리
- 인프라 설정 파일을 Git과 같은 버전 관리 시스템에 저장하여 변경 이력을 추적하고 협업할 수 있습니다.
지속적 통합/배포(CI/CD)
- OpenTofu를 CI/CD 파이프라인에 통합하여 인프라 변경 사항을 자동으로 테스트하고 배포할 수 있습니다.
요약
- OpenTofu는 Terraform 사용자들에게 익숙한 환경을 제공하면서도, 오픈 소스의 자유로움과 커뮤니티 중심의 발전을 지향하는 프로젝트입니다.
- 이를 통해 보다 개방적이고 협력적인 IaC 생태계를 만들고자 합니다.
Docs - Getting started
URL: https://opentofu.org/docs/intro/
Getting started | OpenTofu
OpenTofu is an infrastructure as code tool that lets you build, change, and version cloud and on-prem resources safely and efficiently.
opentofu.org
What is OpenTofu?
- OpenTofu is an infrastructure as code tool that lets you define both cloud and on-prem resources in human-readable configuration files that you can version, reuse, and share.
- You can then use a consistent workflow to provision and manage all of your infrastructure throughout its lifecycle.
- OpenTofu can manage low-level components like compute, storage, and networking resources, as well as high-level components like DNS entries and SaaS features.
How does OpenTofu work?
- The OpenTofu community have already written thousands of providers to manage many different types of resources and services.
- You can find all publicly available providers on the Public OpenTofu Registry, including Amazon Web Services (AWS), Azure, Google Cloud Platform (GCP), Kubernetes, Helm, GitHub, Splunk, DataDog, and many more.
- The core OpenTofu workflow consists of three stages:
- Write:
- You define resources, which may be across multiple cloud providers and services.
- For example, you might create a configuration to deploy an application on virtual machines in a Virtual Private Cloud (VPC) network with security groups and a load balancer.
- Plan:
- OpenTofu creates an execution plan describing the infrastructure it will create, update, or destroy based on the existing infrastructure and your configuration.
- Apply:
- On approval, OpenTofu performs the proposed operations in the correct order, respecting any resource dependencies.
- For example, if you update the properties of a VPC and change the number of virtual machines in that VPC, OpenTofu will recreate the VPC before scaling the virtual machines.
- Write:
Why OpenTofu?
URL: https://opentofu.org/docs/intro/#why-opentofu
Getting started | OpenTofu
OpenTofu is an infrastructure as code tool that lets you build, change, and version cloud and on-prem resources safely and efficiently.
opentofu.org
- Manage any infrastructure
- Track your infrastructure
- Automate changes
- Standardize configurations
- Collaborate
FAQ
URL: https://opentofu.org/faq/
FAQ | OpenTofu
OpenTofu is a Terraform fork, created as an initiative of Gruntwork, Spacelift, Harness, Env0, Scalr, and others, in response to HashiCorp’s switch from an open-source license to the BUSL. The initiative has many supporters, all of whom are listed here.
opentofu.org
OpenTofu와 Terraform의 차이점은 무엇인가요?
- 기술적인 측면에서 OpenTofu 1.6.x는 Terraform 1.6.x와 기능적으로 매우 유사합니다. 앞으로는 프로젝트 기능 세트가 갈라질 것입니다.
- 또 다른 주요 차이점은 OpenTofu는 오픈 소스라는 점이며, 그 목표는 단일 회사가 로드맵을 지시할 수 없는 협력적인 방식으로 추진되는 것입니다.
Terraform의 드롭인 대체품으로 OpenTofu를 사용할 수 있나요? OpenTofu는 프로덕션 사용에 적합할까요?
- 지금 당장, OpenTofu는 Terraform 버전 1.5.x 및 대부분 1.6.x와 호환되므로 Terraform의 드롭인 대체품입니다. 호환성을 보장하기 위해 코드를 변경할 필요가 없습니다.
- 자세한 내용은 마이그레이션 가이드를 참조하세요 : Terraform 1.5 이하, 1.6, 1.7, 1.8 버전별 마이그레이션 가이드 제공
OpenTofu가 기존 상태 파일과 호환되나요?
- OpenTofu는 Terraform 버전 1.5.x로 생성된 파일까지 기존 상태 파일을 지원합니다.
OpenTofu는 Terraform이 협력하는 모든 공급업체와 호환됩니까?
- OpenTofu는 자체 공급자가 없습니다. Terraform 공급자는 라이선스를 변경하지 않았으며 그러한 변경 가능성은 사실상 0입니다.
- OpenTofu는 현재 Terraform 공급자와 함께 작동하지만 별도의 레지스트리를 사용합니다.
OpenTofu 설치
Install OpenTofu URL: https://opentofu.org/docs/intro/install/
Installing OpenTofu | OpenTofu
Learn how to install OpenTofu.
opentofu.org
Tenv 소개
URL: https://tofuutils.github.io/tenv/
tenv
OpenTofu / Terraform / Terragrunt and Atmos version manager
tofuutils.github.io
Github URL: https://github.com/tofuutils/tenv
GitHub - tofuutils/tenv: OpenTofu / Terraform / Terragrunt and Atmos version manager
OpenTofu / Terraform / Terragrunt and Atmos version manager - tofuutils/tenv
github.com
- Versatile version management: Easily switch between different versions of OpenTofu, Terraform, Terragrunt and Atmos.
- Semver 2.0.0 Compatibility: Utilizes go-version for semantic versioning and use the HCL parser to extract required version constraint from OpenTofu/Terraform/Terragrunt files (see required_version and Terragrunt hcl).
- Signature verification: Supports cosign (if present on your machine) and PGP (via gopenpgp), see signature support.
- Intuitive installation: Simple installation process with Homebrew and manual options.
- To manage each binary you can use tenv <tool> <command>. Below is a list of tools and commands that use actual subcommands
| tool (alias) | env vars | env vars github link | description |
| tofu (opentofu) | TOFUENV_ | https://github.com/tofuutils/tenv#tofu-env-vars | https://opentofu.org/ |
| tf (terraform) | TFENV_ | https://github.com/tofuutils/tenv#tf-env-vars | https://www.terraform.io/ |
| tg (terragrunt) | TG_ | https://github.com/tofuutils/tenv#tg-env-vars | https://terragrunt.gruntwork.io/ |
| at (atmos) | ATMOS_ | https://github.com/tofuutils/tenv#atmos-env-vars | https://atmos.tools/ |
Tenv (openTofu) 설치 및 확인
macOS 기준으로 작성
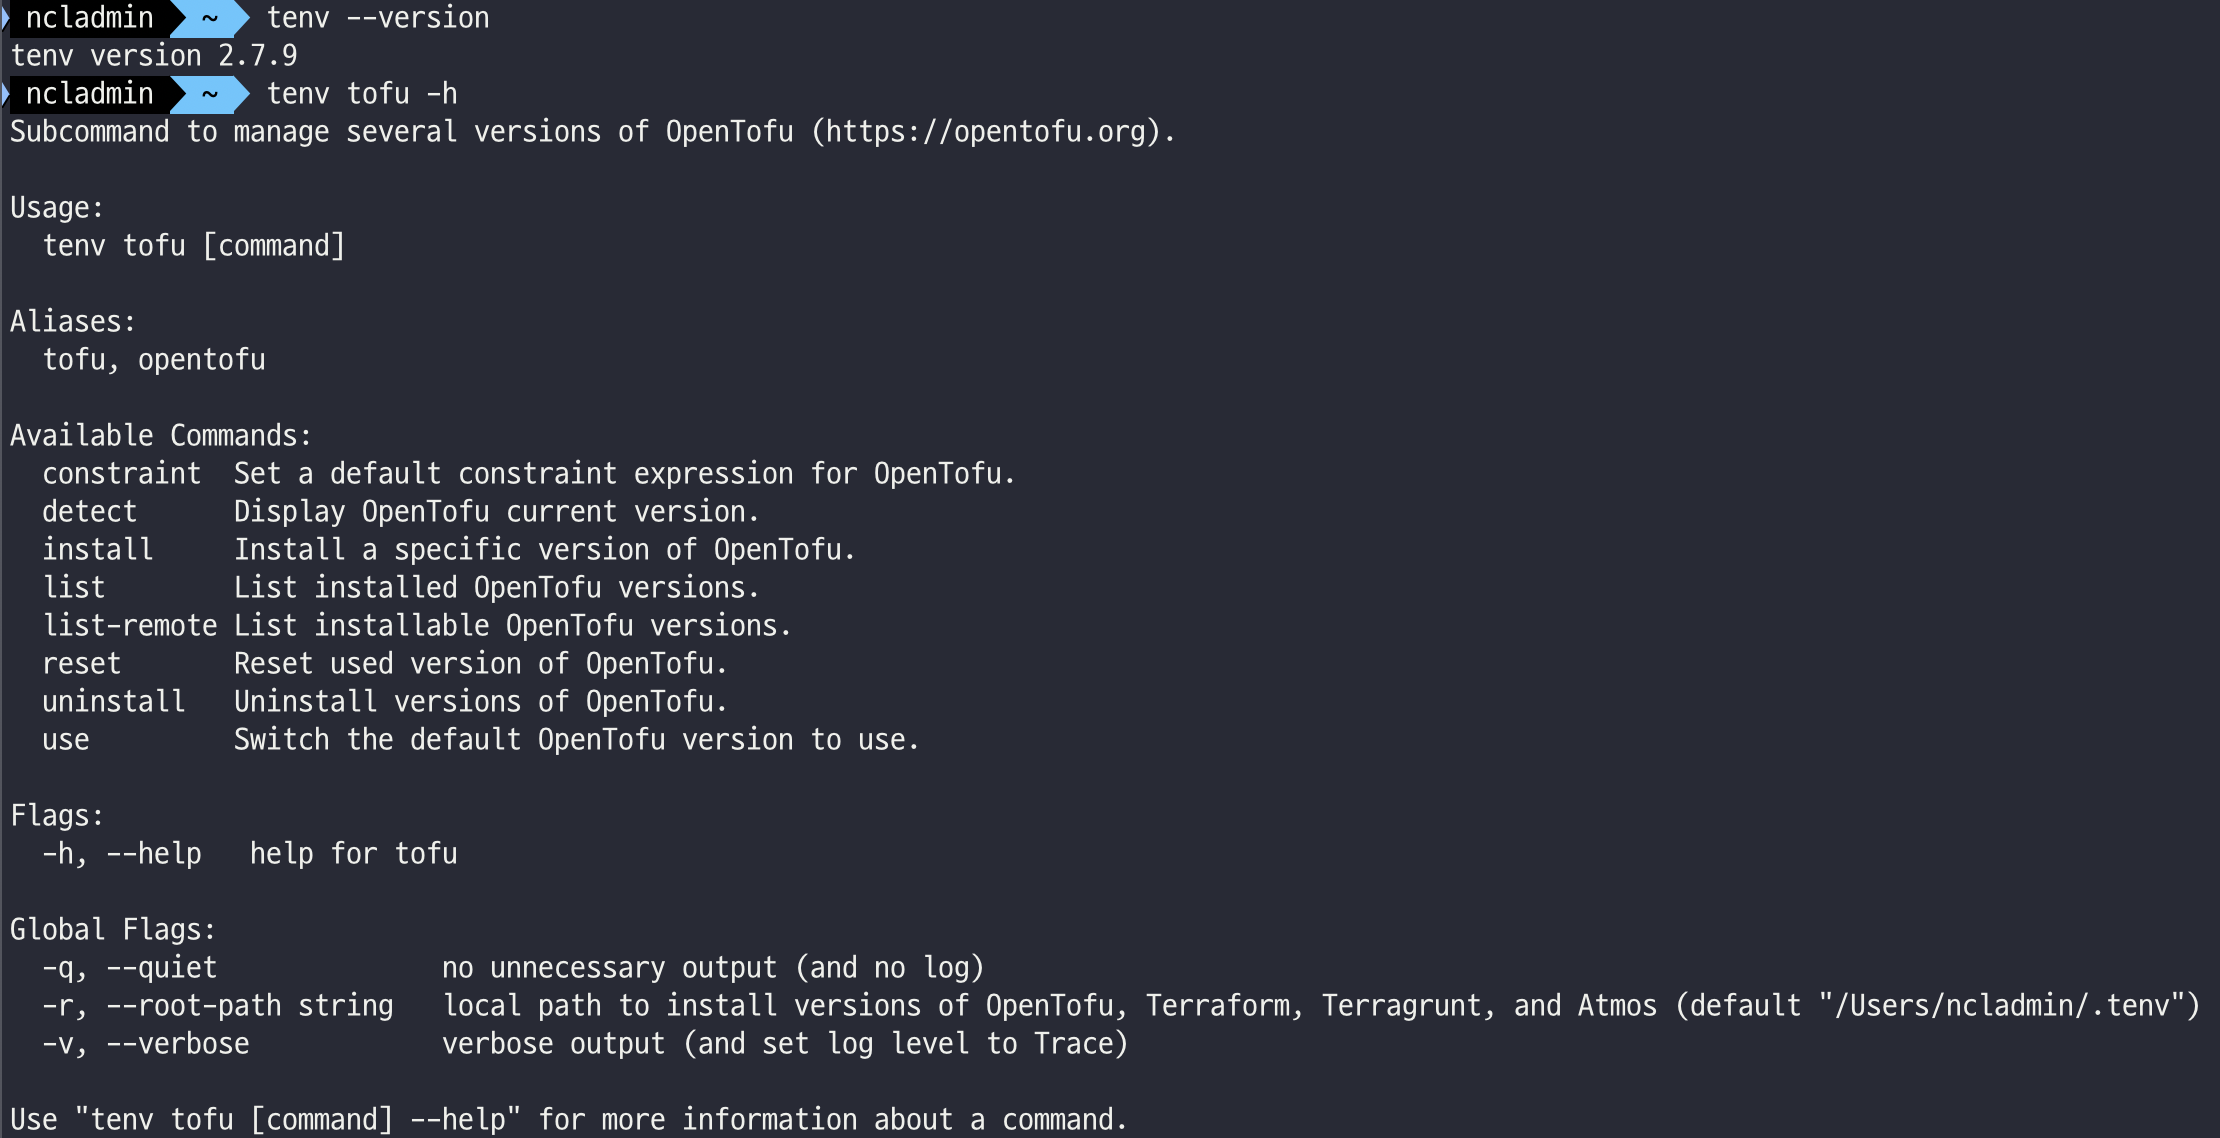
Tenv 설치 및 확인
# (옵션) tfenv 제거
brew remove tfenv

# Tenv 설치
## brew install cosign # 설치 권장
brew install tenv
tenv --version
tenv -h
tenv tofu -h
which tenv

# (옵션) Install shell completion
tenv completion zsh > ~/.tenv.completion.zsh
echo "source '~/.tenv.completion.zsh'" >> ~/.zshrc
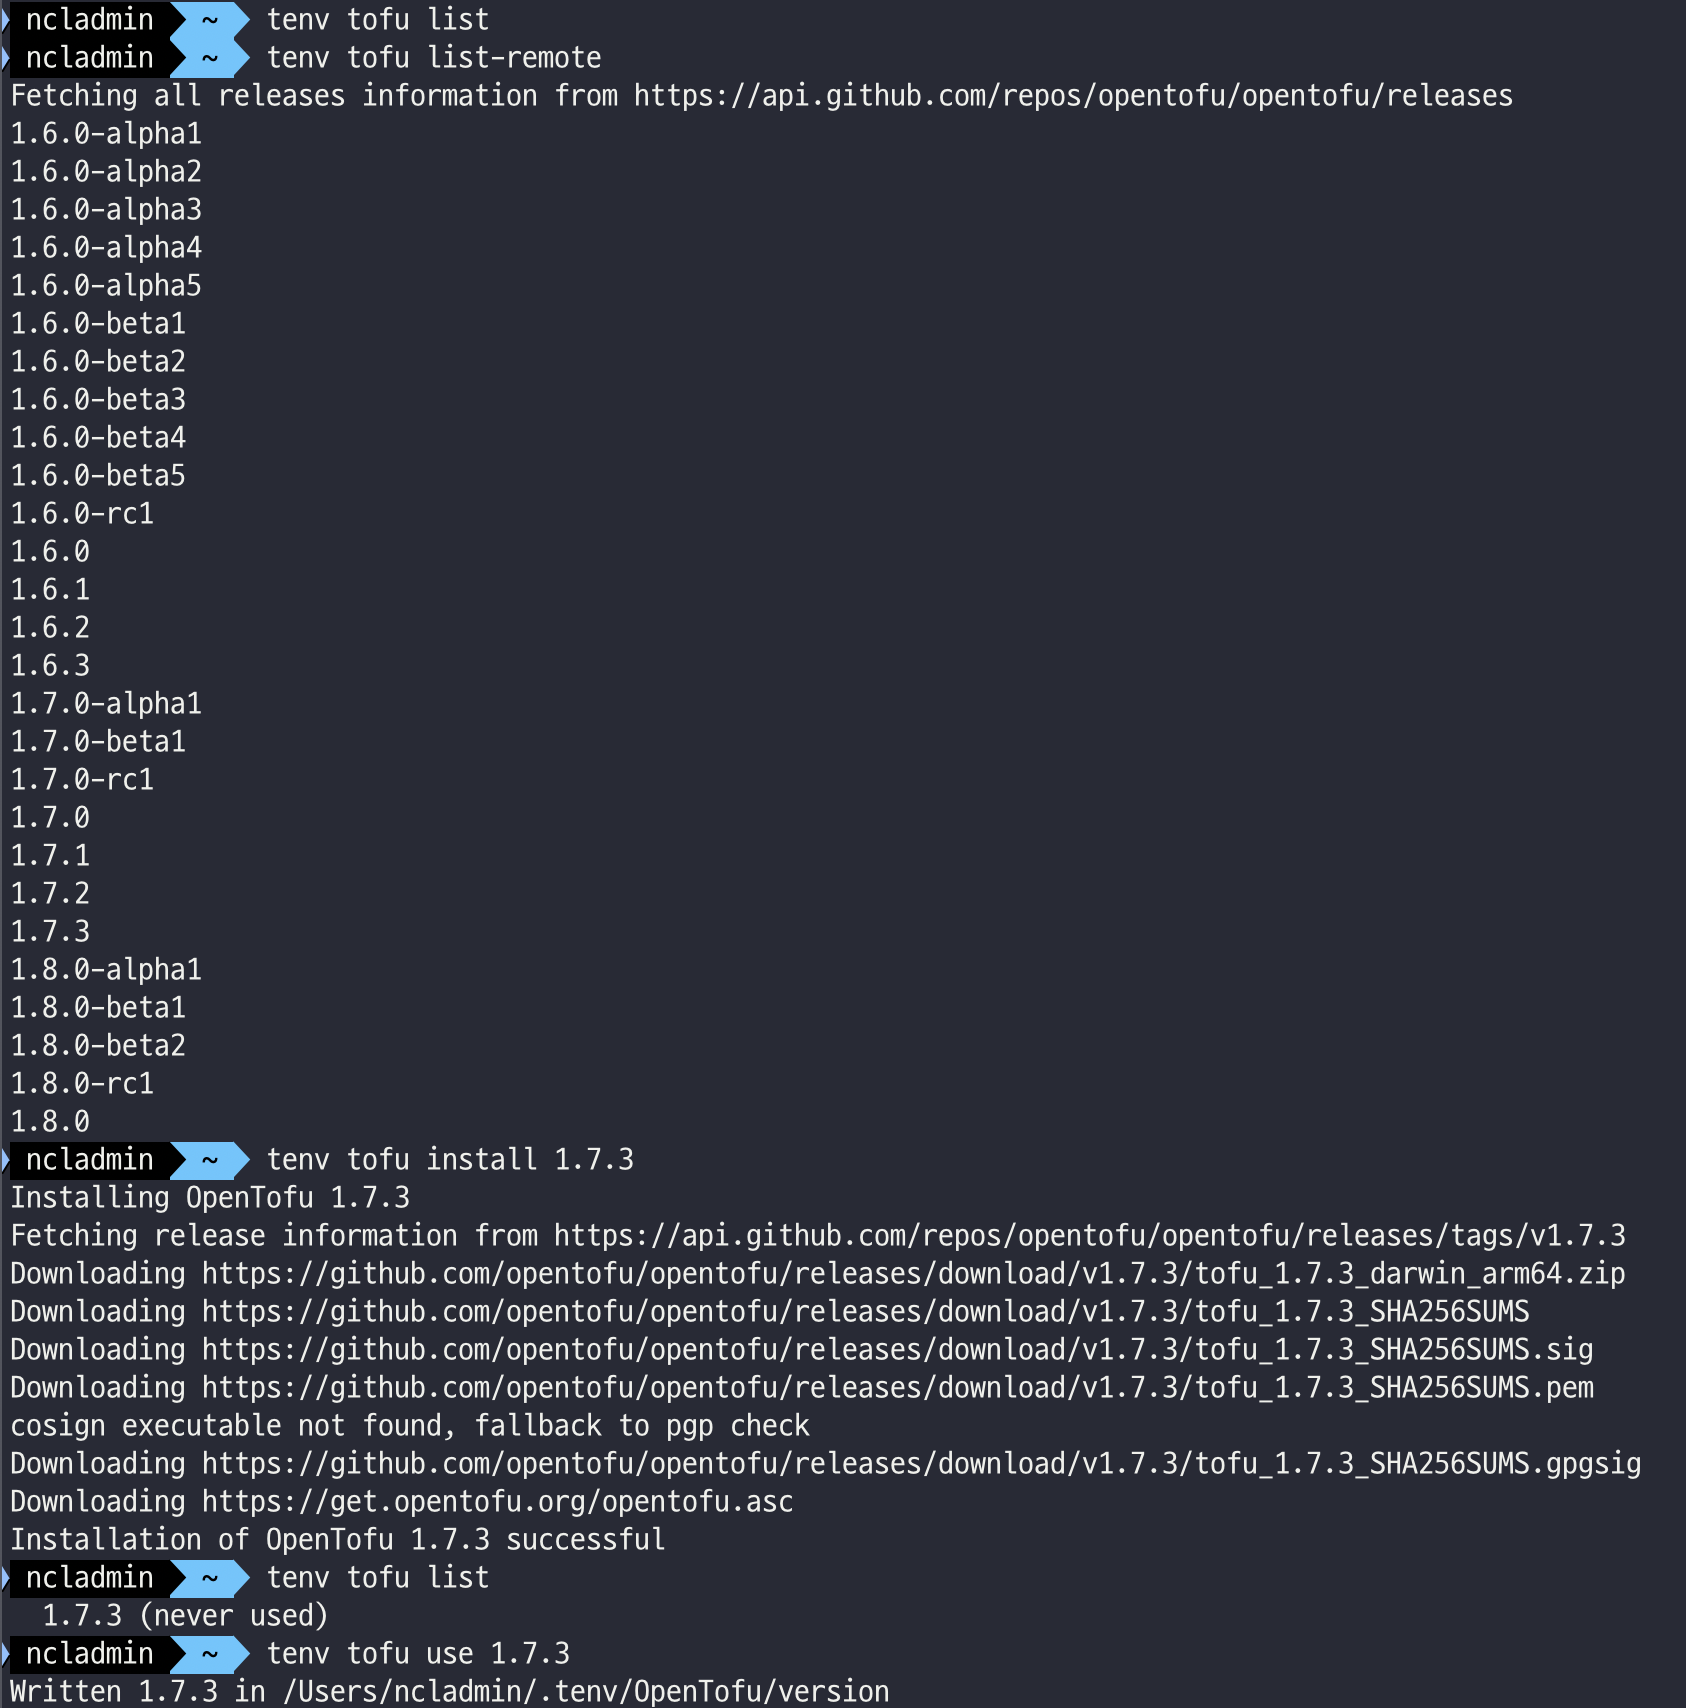
Tofu 설치 및 확인
#
tenv tofu -h
tenv tofu list
tenv tofu list-remote

# 설치
tenv tofu install 1.7.3
tenv tofu list
tenv tofu use 1.7.3
tenv tofu detect

# tofu 확인
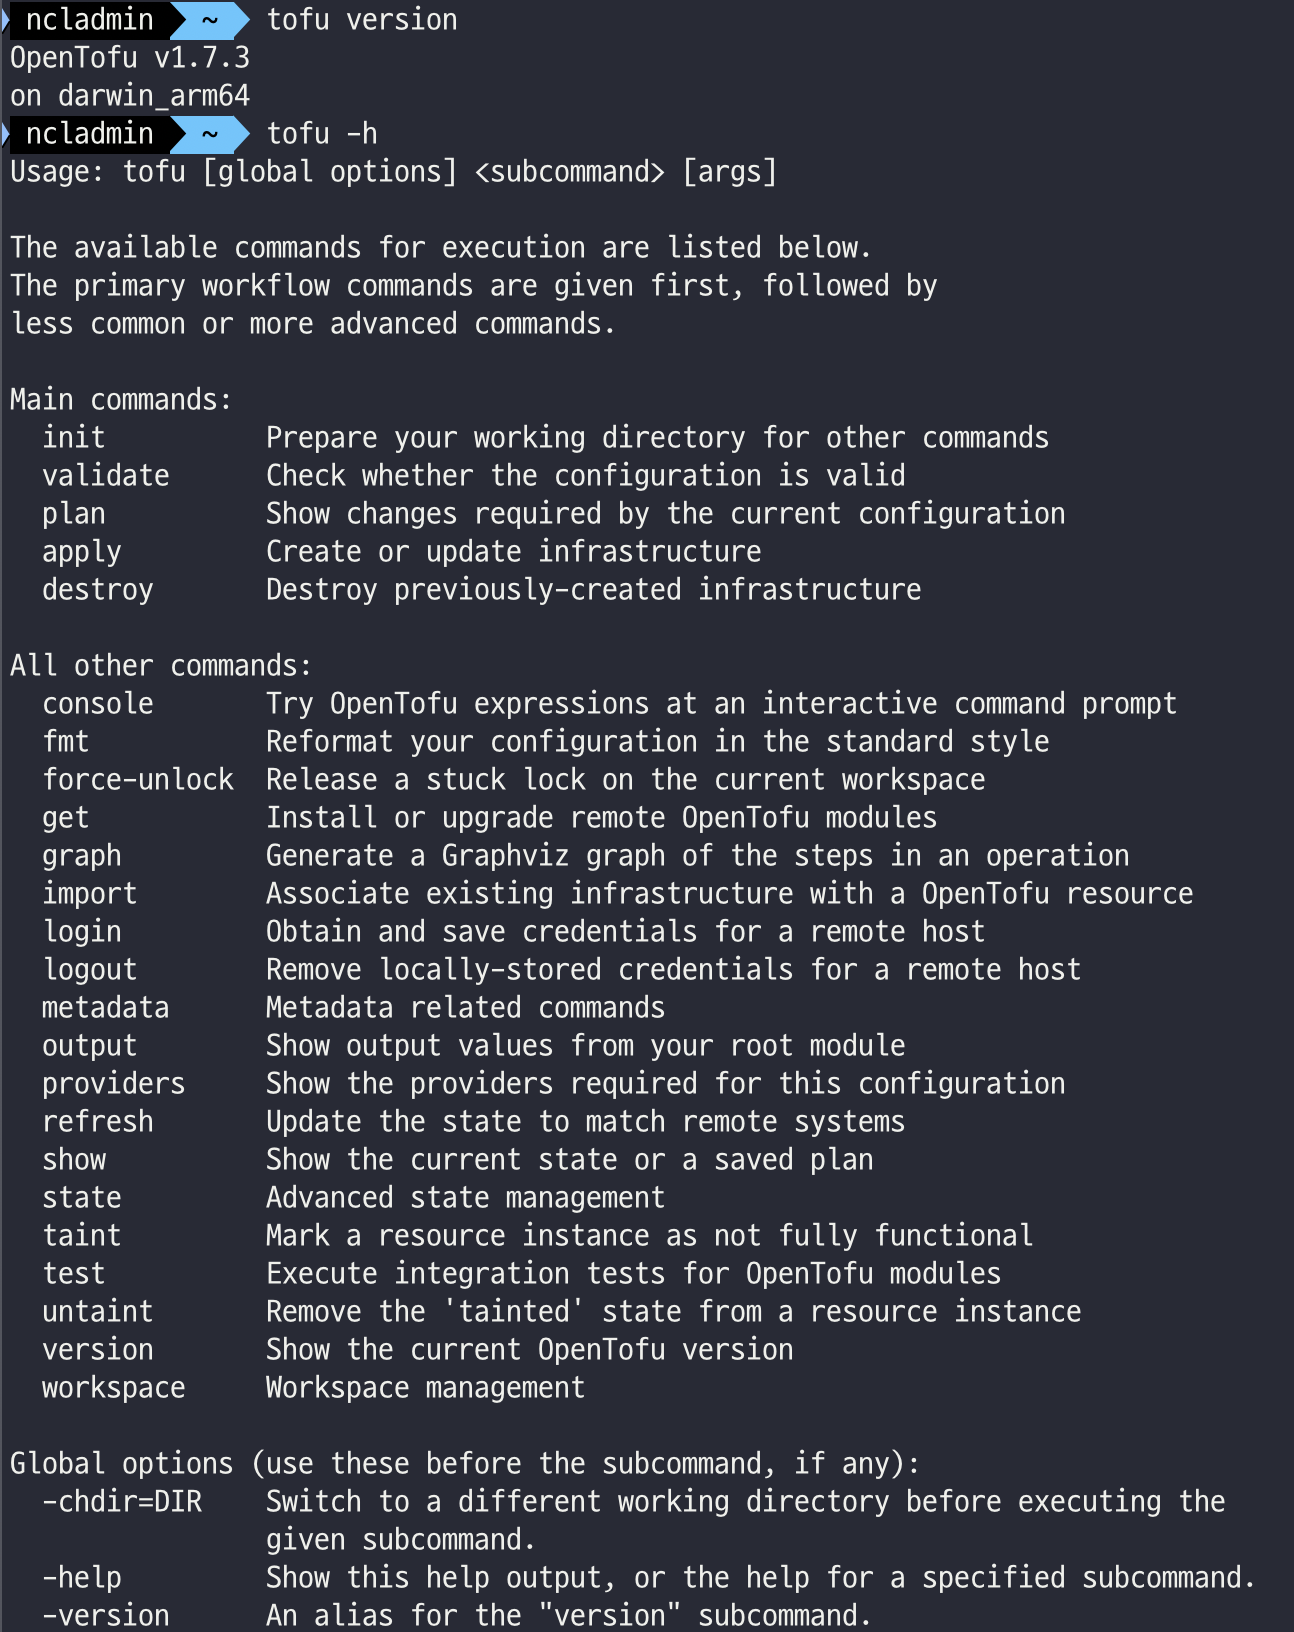
tofu -h
tofu version
OpenTofu 1.7.0
실습 참고용 youtube series URL: https://www.youtube.com/watch?v=CQkUszVlemE&list=PLcTwvG0VZZTcrILMJDvLOMrrMcWlXFUla
[실습] Provider-defined functions
URL: https://opentofu.org/docs/intro/whats-new/#provider-defined-functions
What's new in OpenTofu 1.8? | OpenTofu
Learn all about the new features in OpenTofu 1.8.
opentofu.org
Functions 종류
URL: https://opentofu.org/docs/language/functions/
Functions | OpenTofu
An introduction to the functions which can be used to transform and combine values in expressions.
opentofu.org
- Functions 종류 : Built-in Functions, Provider-defined Functions
- OpenTofu iterates through the required_providers block and queries the specified providers for any functions they wish to register.
- Functions are added to the current module's context under provider::<provider_name>::<function_name>.
- Provider aliases are also supported under provider::<provider_name>::<provider_alias>::<function_name>.
- Functions are scoped to the module that requires the provider and are not inherited by child modules.
- The new Terraform Plugin SDK added support for provider-defined functions that you can use directly in OpenTofu. This is a significant improvement over using data sources as provider-defined functions don't increase the size of your state file and require less code to write.
[실습] 따라하기
URL: https://library.tf/providers/northwood-labs/corefunc/latest/docs/functions/str_snake
OpenTofu and Terraform registry
library.tf
URL: https://library.tf/providers/northwood-labs/corefunc/latest/docs/functions/str_camel
OpenTofu and Terraform registry
library.tf
# 신규 디렉토리 생성 및 main.tf 파일 생성
mkdir 8.1 && cd 8.1
touch main.tf

# main.tf
terraform {
  required_providers {
    corefunc = {
      source = "northwood-labs/corefunc"
      version = "1.4.0"
    }
  }
}

provider "corefunc" {
}

output "test" {
  value = provider::corefunc::str_snake("Hello world!")
  # Prints: hello_world
}


# 실행 후 확인

# 초기화
tofu init

# 프로바이더 정보 확인
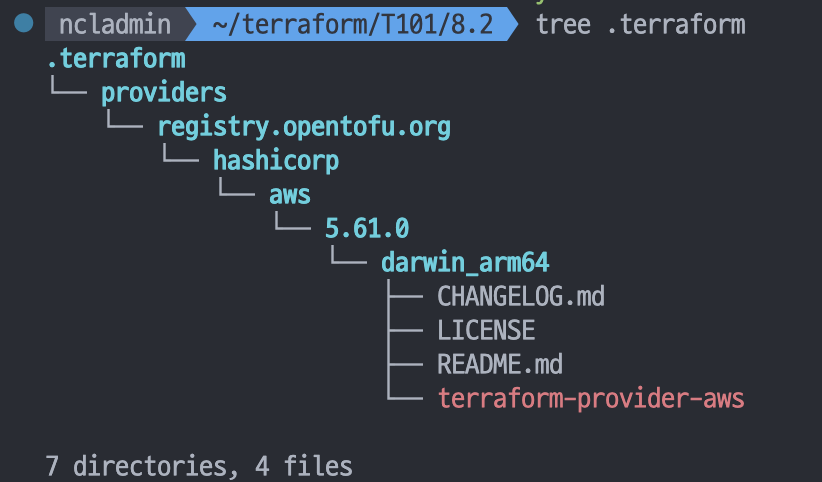
tree .terraform
.terraform
└── providers
    └── registry.opentofu.org
        └── northwood-labs
            └── corefunc

# Plan
tofu plan
...
Changes to Outputs:
  + test = "hello_world"

# Apply
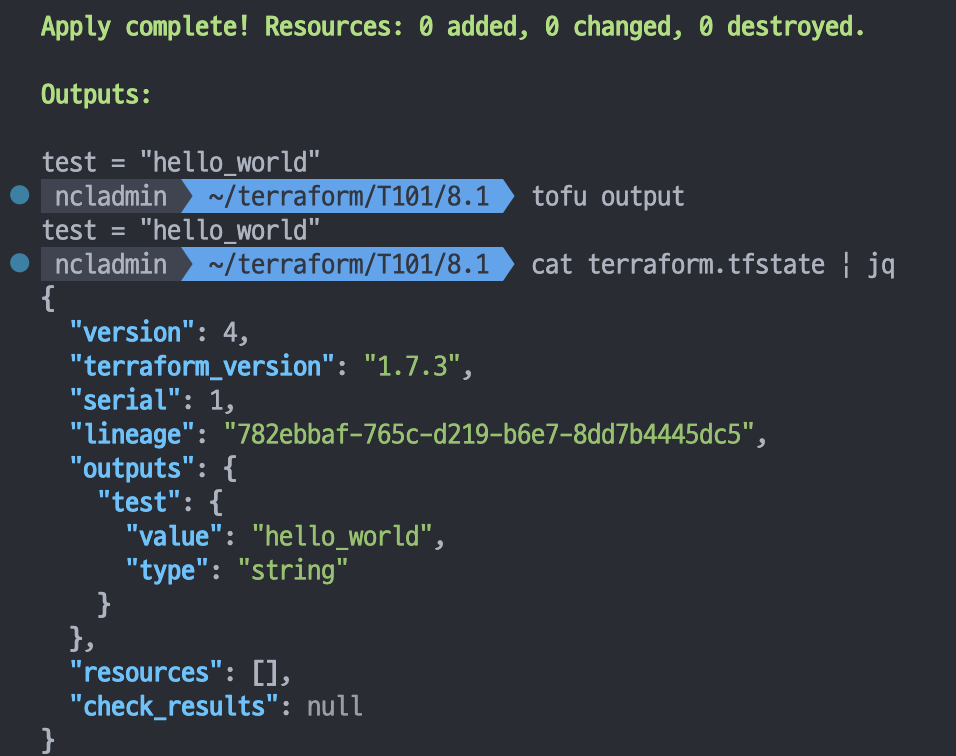
tofu apply
...
 Enter a value: yes
...
Outputs:
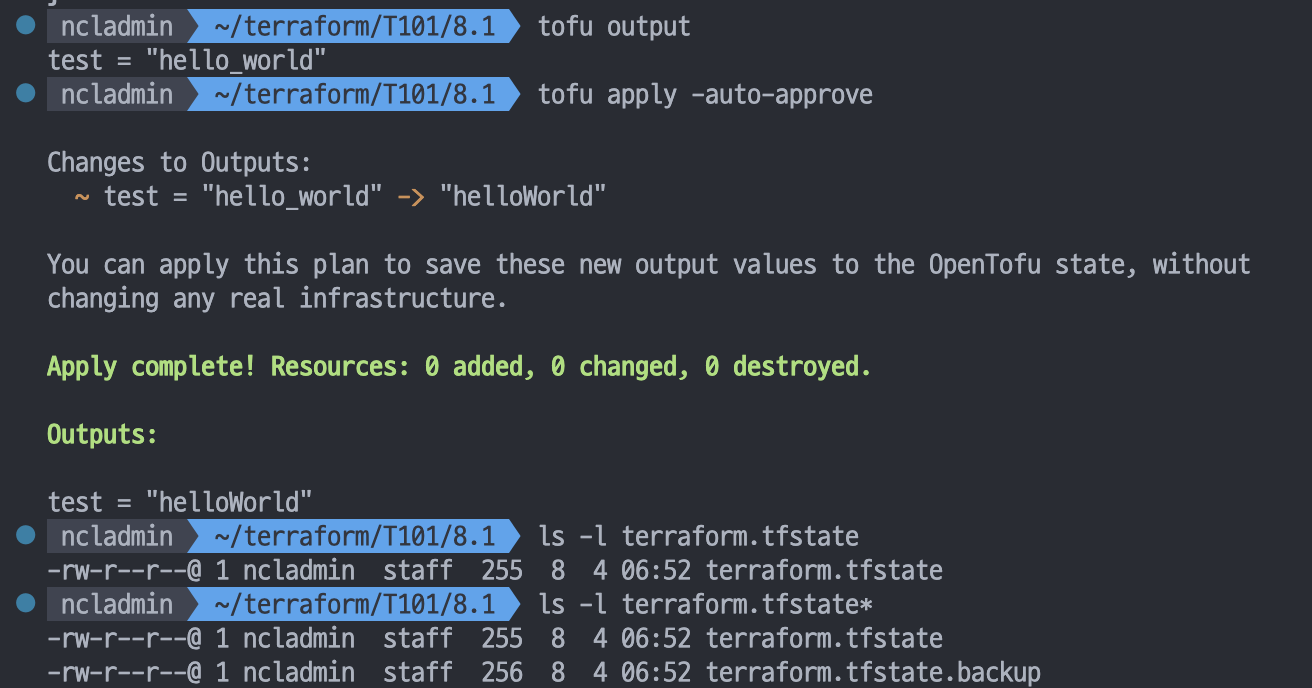
test = "hello_world"

# output
tofu output

# tfstate 파일 확인 : VSCODE에서 열어보기
cat terraform.tfstate | jq
[실습] Loopable import blocks
URL: https://opentofu.org/docs/intro/whats-new/#loopable-import-blocks
What's new in OpenTofu 1.8? | OpenTofu
Learn all about the new features in OpenTofu 1.8.
opentofu.org
- Import : Use the import block to import existing infrastructure resources into OpenTofu, bringing them under OpenTofu's management. - Link
- You can add an import block to any OpenTofu configuration file. A common pattern is to create an imports.tf file, or to place each import block beside the resource block it imports into.
import {
  to = aws_instance.example
  id = "i-abcd1234"
}

resource "aws_instance" "example" {
  name = "hashi"
  # (other resource arguments...)
}
- The import block has the following arguments:
- to - The instance address this resource will have in your state file.
- id - A string with the import ID of the resource.
- provider (optional) - An optional custom resource provider, see The Resource provider Meta-Argument for details.
- for_each (optional) - Import several resources by iterating over a map or a set. See Importing multiple resources below.
- Importing multiple resources
- You can import multiple resources with one import block by using a for_each expression.
- This expression accepts a set, a tuple or a map and provides the each.key and each.value variables to access the individual elements.
[실습] 따라하기
# 디렉토리 생성 및 main.tf 파일 생성
mkdir 8.2 && cd 8.2
touch main.tf

# main.tf
data "aws_ami" "ubuntu" {
    most_recent = true

    filter {
        name   = "name"
        values = ["ubuntu/images/hvm-ssd/ubuntu-jammy-22.04-amd64-server-*"]
    }

    filter {
        name   = "virtualization-type"
        values = ["hvm"]
    }

    owners = ["099720109477"] # Canonical
}

variable "instance_tags" {
  type = list(string)
  default = ["web", "app"]
}

resource "aws_instance" "this" {
  count = length(var.instance_tags)
  ami                    = data.aws_ami.ubuntu.id
  instance_type          = "t3.micro"

  tags = {
    Name = var.instance_tags[count.index]
  }
}

# 문제 상황 재연 : tfstate 파일 삭제
rm -rf .terraform* terraform.tfstate*
tree

# EC2 확인 : ID 메모
aws ec2 describe-instances --query 'Reservations[*].Instances[*].{InstanceID:InstanceId,PublicIP:PublicIpAddress,Name:Tags[?Key==`Name`]|[0].Value}' --output json | jq -r '.[][] | "\(.InstanceID)\t\(.PublicIP)\t\(.Name)"'
i-0e2d4475790337a81     13.125.183.90   web
i-00a4daebb71942280     3.38.152.103    app


# main.tf 파일 수정
data "aws_ami" "ubuntu" {
    most_recent = true

    filter {
        name   = "name"
        values = ["ubuntu/images/hvm-ssd/ubuntu-jammy-22.04-amd64-server-*"]
    }

    filter {
        name   = "virtualization-type"
        values = ["hvm"]
    }

    owners = ["099720109477"] # Canonical
}

variable "instance_ids" {
  type = list(string)
  default = ["i-0e2d4475790337a81", "i-00a4daebb71942280"]
}

variable "instance_tags" {
  type = list(string)
  default = ["web", "app"]
}

resource "aws_instance" "this" {
  count = length(var.instance_tags)
  ami                    = data.aws_ami.ubuntu.id
  instance_type          = "t3.micro"

  tags = {
    Name = var.instance_tags[count.index]
  }
}

import {
  for_each = { for idx, item in var.instance_ids : idx => item }
  to = aws_instance.this[tonumber(each.key)]
  id = each.value
}
# 실행 후 확인
# 초기화
tofu init -json
tree .terraform

#
tofu apply -auto-approve
Plan: 2 to import, 0 to add, 0 to change, 0 to destroy.
aws_instance.this[1]: Importing... [id=i-00a4daebb71942280]
aws_instance.this[1]: Import complete [id=i-00a4daebb71942280]
aws_instance.this[0]: Importing... [id=i-0e2d4475790337a81]
aws_instance.this[0]: Import complete [id=i-0e2d4475790337a81]

# 확인
tofu state ls
tofu show

# tfstate 파일 확인 : VSCODE에서 열어보기
cat terraform.tfstate | jq
[실습] State file encryption - Local
URL: https://opentofu.org/docs/intro/whats-new/#state-encryption
What's new in OpenTofu 1.8? | OpenTofu
Learn all about the new features in OpenTofu 1.8.
opentofu.org
- State and Plan Encryption - Link
- OpenTofu는 로컬 스토리지와 백엔드를 사용할 때 모두 휴면 상태 및 계획 파일을 암호화하는 것을 지원합니다. 또한 terraform_remote_state데이터 소스와 함께 암호화를 사용할 수도 있습니다.
- OpenTofu supports encrypting state and plan files at rest, both for local storage and when using a backend. In addition, you can also use encryption with the terraform_remote_state data source.
- OpenTofu는 로컬 스토리지와 백엔드를 사용할 때 모두 휴면 상태 및 계획 파일을 암호화하는 것을 지원합니다. 또한 terraform_remote_state데이터 소스와 함께 암호화를 사용할 수도 있습니다.
- 기본 코드 예시
terraform {
  encryption {
    key_provider "some_key_provider" "some_name" {
      # Key provider options here
    }

    method "some_method" "some_method_name" {
      # Method options here
      keys = key_provider.some_key_provider.some_name
    }

    state {
      # Encryption/decryption for state data
      method = method.some_method.some_method_name
    }

    plan {
      # Encryption/decryption for plan data
      method = method.some_method.some_method_name
    }

    remote_state_data_sources {
      # See below
    }
  }
}
[초기설정] 신규 프로젝트
If you are setting up a new project and do not yet have a state file, this sample configuration will get you started with passphrase-based encryption:
terraform {
  encryption {
    ## Step 1: Add the desired key provider:
    key_provider "pbkdf2" "mykey" {
      # Change this to be at least 16 characters long:
      passphrase = "changeme!"
    }
    ## Step 2: Set up your encryption method:
    method "aes_gcm" "new_method" {
      keys = key_provider.pbkdf2.mykey
    }

    state {
      ## Step 3: Link the desired encryption method:
      method = method.aes_gcm.new_method

      ## Step 4: Run "tofu apply".

      ## Step 5: Consider adding the "enforced" option:
      # enforced = true
    }

    ## Step 6: Repeat steps 3-5 for plan{} if needed.
  }
}
[초기설정] 기존 프로젝트
When you first configure encryption on an existing project, your state and plan files are unencrypted. OpenTofu, by default, refuses to read them because they could have been manipulated. To enable reading unencrypted data, you have to specify an unencrypted method:
terraform {
  encryption {
    ## Step 1: Add the unencrypted method:
    method "unencrypted" "migrate" {}

    ## Step 2: Add the desired key provider:
    key_provider "pbkdf2" "mykey" {
      # Change this to be at least 16 characters long:
      passphrase = "changeme!"
    }

    ## Step 3: Add the desired encryption method:
    method "aes_gcm" "new_method" {
      keys = key_provider.pbkdf2.mykey
    }

    state {
      ## Step 4: Link the desired encryption method:
      method = method.aes_gcm.new_method

      ## Step 5: Add the "fallback" block referencing the
      ## "unencrypted" method.
      fallback {
        method = method.unencrypted.migrate
      }

      ## Step 6: Run "tofu apply".

      ## Step 7: Remove the "fallback" block above and
      ## consider adding the "enforced" option:
      # enforced = true
    }

    ## Step 8: Repeat steps 4-8 for plan{} if needed.
  }
}
Rolling back encryption
암호화 → 평문으로 마이그레이션
unencrypted를 사용하여 암호화되지 않은 상태 및 계획 파일로 마이그레이션
terraform {
  encryption {
    ## Step 1: Leave the original encryption method unchanged:
    method "some_method" "old_method" {
      ## Parameters for the old method here.
    }

    # Step 2: Add the unencrypted method here:
    method "unencrypted" "migrate" {}

    state {
      ## Step 3: Disable or remove the "enforced" option:
      enforced = false

      ## Step 4: Move the original encryption method into the "fallback" block:
      fallback {
        method = method.some_method.old_method
      }

      ## Step 5: Reference the unencrypted method as your primary "encryption" method.
      method = method.unencrypted.migrate
    }

    ## Step 6: Run "tofu apply".

    ## Step 7: Remove the "state" block once the migration is complete.

    ## Step 8: Repeat steps 3-7 for plan{} if needed.
  }
}
Key providers:
- PBKDS2
- PBKDF2 키 제공자는 AES-GCM과 같은 암호화 방법에 대한 키를 생성하기 위해 긴 패스프레이즈를 사용 가능
- AWS KMS
- GCP KMS
- OpenBao(experimental)
terraform {
  encryption {
    key_provider "pbkdf2" "foo" {
      # Specify a long / complex passphrase (min. 16 characters)
      passphrase = "correct-horse-battery-staple"

      # Adjust the key length to the encryption method (default: 32)
      key_length = 32

      # Specify the number of iterations (min. 200.000, default: 600.000)
	    ## The work factor for PBKDF2 is implemented through an iteration count, which should set differently based on the internal hashing algorithm used.
			## PBKDF2-HMAC-SHA1: 1,300,000 iterations
			## PBKDF2-HMAC-SHA256: 600,000 iterations
			## PBKDF2-HMAC-SHA512: 210,000 iterations
      iterations = 600000

      # Specify the salt length in bytes (default: 32)
      salt_length = 32

      # Specify the hash function (sha256 or sha512, default: sha512)
      hash_function = "sha512"
    }
  }
}
| Option | Description | Min. | Default |
| passphrase (required) | Enter a long and complex passphrase. | 16 chars. | - |
| key_length | Number of bytes to generate as a key. | 1 | 32 |
| iterations | Number of iterations. See https://cheatsheetseries.owasp.org/cheatsheets/Password_Storage_Cheat_Sheet.html#pbkdf2 for recommendations. | 200.000 | 600.000 |
| salt_length | Length of the salt for the key derivation. | 1 | 32 |
| hash_function | Specify either sha256 or sha512 to use as a hash function. sha1 is not supported. | N/A | sha512 |
- AWS: AWS 키 제공자는 AWS KMS 로 키 생성
암호화 암호 서명 - AWS Key Management Service - AWS
닫기 이 다이어그램은 AWS Key Management Service의 주요 기능 및 사용 가능한 다른 AWS 서비스와의 통합을 보여줍니다. 3개의 섹션이 표시됩니다. 첫 번째 섹션에는 AWS KMS 아키텍처 아이콘 그림이 포함
aws.amazon.com
terraform {
  encryption {
    key_provider "aws_kms" "basic" {
      kms_key_id = "a4f791e1-0d46-4c8e-b489-917e0bec05ef"
      region = "us-east-1"
      key_spec = "AES_256"
    }
  }
}
| Option | Description | Min. | Default |
| kms_key_id | https://docs.aws.amazon.com/kms/latest/developerguide/concepts.html#key-id. | 1 | - |
| key_spec | https://docs.aws.amazon.com/kms/latest/developerguide/concepts.html#key-spec. Adapt this to your encryption method (e.g. AES_256). | 1 | - |
[실습] 따라하기
# 디렉토리 생성 및 기존 main.tf 파일 복사
# backend.tf 파일 생성

mkdir 8.3 && cd 8.3
cp ../8.2/main.tf .
touch backend.tf

# backend.tf
terraform {
  encryption {
    key_provider "pbkdf2" "my_passphrase" {
      ## Enter a passphrase here:
      passphrase = "ChangeIt_123abcd"
    }

    method "aes_gcm" "my_method" {
      keys = key_provider.pbkdf2.my_passphrase
    }

    ## Remove this after the migration:
    method "unencrypted" "migration" {
    }

    state {
      method = method.aes_gcm.my_method

      ## Remove the fallback block after migration:
      fallback{
        method = method.unencrypted.migration
      }
      ## Enable this after migration:
      #enforced = true
    }
  }
}
# 실행 후 확인
#
tofu init -json | jq
tree .terraform

# import 실행
tofu apply -auto-approve
tofu state list
tofu show

# tfstate 파일 확인 : VSCODE에서 열어보기
cat terraform.tfstate | jq
# 좀 더 강력한 보안 정책 적용
# 암호화 되지 않은 환경 변수가 저장 되는 것을 차단

terraform {
    encryption {
        state {
            enforced = true
        }
        plan {
            enforced = true
        }
    }
}

# bakcend.tf
terraform {
  encryption {
    key_provider "pbkdf2" "my_passphrase" {
      ## Enter a passphrase here:
      passphrase = "ChangeIt_123abcd"
    }

    method "aes_gcm" "my_method" {
      keys = key_provider.pbkdf2.my_passphrase
    }

    ## Remove this after the migration:
    method "unencrypted" "migration" {
    }

    state {
      method = method.aes_gcm.my_method

      ## Remove the fallback block after migration:
      fallback{
        method = method.unencrypted.migration
      }
      # Enable this after migration:
      enforced = true
    }
  }
}

# 실행 후 확인
#
tofu apply -auto-approve

# tfstate 파일 확인 : VSCODE에서 열어보기
cat terraform.tfstate | jq
# Rolling back encryption : 암호화 → 평문으로 마이그레이션

# backend.tf 파일 수정
terraform {
  encryption {
    key_provider "pbkdf2" "my_passphrase" {
      ## Enter a passphrase here:
      passphrase = "ChangeIt_123abcd"
    }

    method "aes_gcm" "my_method" {
      keys = key_provider.pbkdf2.my_passphrase
    }

    ## Remove this after the migration:
    method "unencrypted" "migration" {
    }

    state {
      method = method.unencrypted.migration

      ## Remove the fallback block after migration:
      fallback{
        method = method.aes_gcm.my_method
      }
      # Enable this after migration:
      enforced = false
    }
  }
}

# 실행 후 확인
#
tofu apply -auto-approve

# tfstate 파일 확인 : VSCODE에서 열어보기
cat terraform.tfstate | jq
[실습] State file encryption - AWS KMS
[사전 준비] AWS S3 버킷 생성
#
aws s3 mb s3://<각자 유일한 S3 버킷명 이름> --region ap-northeast-2
aws s3 mb s3://gasida-t101 --region ap-northeast-2

# 확인
aws s3 ls
AWS KMS 소개
URL: https://aws.amazon.com/ko/kms/features/
기능 | AWS Key Management Service(KMS) | Amazon Web Services(AWS)
aws.amazon.com
- 암호화는 키를 사용해 평문을 암호문으로 변환하는 프로세스다
- 동일한 키를 사용해 암호문을 평문으로 변환할 수 있는데, 이를 복호화라고 한다
- AWS 키 관리 서비스 KMS는 공유 하드웨어 보안 모듈HSM 을 사용하면서 암호화키를 생성하고 관리할 수 있게 도와준다
- CloudHSM은 AWS 내에서 암호화키를 관리할 수 있지만 보안 강화를 위해 전용 HSM을 사용할 수 있는 서비스다
- 용어 변경 참고 : 기존 Customer Master Key (CMK) → AWS KMS key 혹은 KMS key 로 변경 - 링크
[사전 준비] AWS KMS 생성 및 실습
# 대칭 키 생성 후 평문 파일을 암호화 및 복호화

# 키 생성(기본값)
# aws kms create-key --description "my text encrypt descript demo"
CREATE_KEY_JSON=$(aws kms create-key --description "my text encrypt descript demo")
echo $CREATE_KEY_JSON | jq

# 키 ID확인
KEY_ID=$(echo $CREATE_KEY_JSON | jq -r ".KeyMetadata.KeyId")
echo $KEY_ID

# 키 alias 생성
export ALIAS_SUFFIX=<각자 닉네임>
export ALIAS_SUFFIX=gasida
aws kms create-alias --alias-name alias/$ALIAS_SUFFIX --target-key-id $KEY_ID

# 생성한 별칭 확인 : 키 ID 메모하두기, 아래 테라폼 코드에서 사용
aws kms list-aliases
aws kms list-aliases --query "Aliases[?AliasName=='alias/<각자 닉네임>'].TargetKeyId" --output text
aws kms list-aliases --query "Aliases[?AliasName=='alias/gasida'].TargetKeyId" --output text
c0bfc529-1ede-44f3-a7e5-ae60814c1ca1

# CMK로 평문을 암호화해보기
echo "Hello 123123" > secrect.txt
aws kms encrypt --key-id alias/$ALIAS_SUFFIX --cli-binary-format raw-in-base64-out --plaintext file://secrect.txt --output text --query CiphertextBlob | base64 --decode > secrect.txt.encrypted

# 암호문 확인
cat secrect.txt.encrypted

# 복호화해보기
aws kms decrypt --ciphertext-blob fileb://secrect.txt.encrypted --output text --query Plaintext | base64 --decode
Hello 123123
# 8.3 디렉토리에 backend.tf 파일 수정

# backend.tf
terraform {
  backend "s3" {
    bucket = "gasida-t101" # 각자 자신의 S3 버킷명
    key = "terraform.tfstate"
    region = "ap-northeast-2"
    encrypt = true
  }

  encryption {
    key_provider "aws_kms" "kms" {
      kms_key_id = "c0bfc529-1ede-44f3-a7e5-ae60814c1ca1" # 각자 자신의 KMS ID
      region = "ap-northeast-2"
      key_spec = "AES_256"
    }

    method "aes_gcm" "my_method" {
      keys = key_provider.aws_kms.kms
    }

    ## Remove this after the migration:
    method "unencrypted" "migration" {
    }

    state {
      method = method.aes_gcm.my_method

      ## Remove the fallback block after migration:
      fallback{
        method = method.unencrypted.migration
      }
      # Enable this after migration:
      #enforced = false
    }
  }
}
# 실행 및 확인
# 로컬 tfstate 파일 제거
rm -rf .terraform* terraform.tfstate*
tree

#
tofu init
Initializing the backend...

Successfully configured the backend "s3"! OpenTofu will automatically
use this backend unless the backend configuration changes.
...

#
tree .terraform
.terraform
├── providers
│   └── registry.opentofu.org
│       └── hashicorp
│           └── aws
│               └── 5.60.0
│                   └── darwin_arm64 -> /Users/gasida/.terraform.d/plugin-cache/registry.opentofu.org/hashicorp/aws/5.60.0/darwin_arm64
└── terraform.tfstate

#
cat .terraform/terraform.tfstate | jq

# import 실행
tofu apply -auto-approve
tofu state list
tofu show
ls -l terraform.tfstate*

# 원격 백엔드에 저장된 tfstate 파일 확인 및 로컬에 다운로드
aws s3 ls s3://<각자 자신의 S3 버킷명> --recursive
aws s3 cp s3://<각자 자신의 S3 버킷명>/terraform.tfstate .

aws s3 ls s3://gasida-t101 --recursive
aws s3 cp s3://gasida-t101/terraform.tfstate .

# 다운받은 tfstate 파일 확인 : VSCODE에서 열어보기
cat terraform.tfstate | jq
[실습] Removed block
The removed block lets you remove a resource from the state file but keep it on the infrastructure
URL: https://opentofu.org/docs/language/resources/syntax/#removing-resources
# You can test it by creating a resource first:
resource "local_file" "test" {
  content = "Hello world!"
  filename = "test.txt"
}

# After applying, you can replace the resource with a removed block:
removed {
  from = local_file.test
}

# After the next apply, you will see that the local_file.test resource no longer exists in your state file,
# but the test.txt file should still exist on your disk. You can now remove the removed block safely.
[실습] 따라하기
# 8.4 디렉토리 생성, main.tf 파일 복사
mkdir 8.4 && cd 8.4
cp ../8.3/main.tf .

# main.tf
data "aws_ami" "ubuntu" {
    most_recent = true

    filter {
        name   = "name"
        values = ["ubuntu/images/hvm-ssd/ubuntu-jammy-22.04-amd64-server-*"]
    }

    filter {
        name   = "virtualization-type"
        values = ["hvm"]
    }

    owners = ["099720109477"] # Canonical
}

variable "instance_ids" {
  type = list(string)
  default = ["i-0e2d4475790337a81", "i-00a4daebb71942280"] # 각자 자신의 EC2 ID를 기입 할 것
}

variable "instance_tags" {
  type = list(string)
  default = ["web", "app"]
}

resource "aws_instance" "this" {
  count = length(var.instance_tags)
  ami                    = data.aws_ami.ubuntu.id
  instance_type          = "t3.micro"

  tags = {
    Name = var.instance_tags[count.index]
  }
}

import {
  for_each = { for idx, item in var.instance_ids : idx => item }
  to = aws_instance.this[tonumber(each.key)]
  id = each.value
}

resource "aws_ssm_parameter" "this" {
  count = length(var.instance_tags)
  name  = var.instance_tags[count.index]
  type  = "String"
  value = aws_instance.this[count.index].id
}
# 실행 및 확인
#
tofu init
tree .terraform

# 2개 리소스는 import , 2개 리소스는 생성
tofu apply -auto-approve
Plan: 2 to import, 2 to add, 0 to change, 0 to destroy.
aws_instance.this[0]: Importing... [id=i-0e2d4475790337a81]
aws_instance.this[0]: Import complete [id=i-0e2d4475790337a81]
aws_instance.this[1]: Importing... [id=i-00a4daebb71942280]
aws_instance.this[1]: Import complete [id=i-00a4daebb71942280]
aws_ssm_parameter.this[1]: Creating...
aws_ssm_parameter.this[0]: Creating...
aws_ssm_parameter.this[1]: Creation complete after 0s [id=app]
aws_ssm_parameter.this[0]: Creation complete after 0s [id=web]

#
tofu state ls
tofu show
tofu state show 'aws_ssm_parameter.this[0]'
tofu state show 'aws_ssm_parameter.this[1]'

# tfstate 파일 확인 : VSCODE에서 열어보기
cat terraform.tfstate | jq
...
      "type": "aws_ssm_parameter",
      "name": "this",
      "provider": "provider[\"registry.opentofu.org/hashicorp/aws\"]",
      "instances": [
        {
          "index_key": 0,
          "schema_version": 0,
          "attributes": {
            "allowed_pattern": "",
            "arn": "arn:aws:ssm:ap-northeast-2:911283464785:parameter/web",
            "data_type": "text",
            "description": "",
            "id": "web",
            "insecure_value": null,
            "key_id": "",
            "name": "web",
            "overwrite": null,
            "tags": null,
            "tags_all": {},
            "tier": "Standard",
            "type": "String",
            "value": "i-0e2d4475790337a81",
...

# parameters 정보 확인
aws ssm describe-parameters | jq
aws ssm get-parameter --name "web"
aws ssm get-parameter --name "web" --query "Parameter.Value" --output text
aws ssm get-parameter --name "app"
aws ssm get-parameter --name "app" --query "Parameter.Value" --output text
# main.tf 수정
# 파라미터 스토어 리소스만 tfstate 에서 제거하고, AWS 상에는 유지 하게 설정

data "aws_ami" "ubuntu" {
    most_recent = true

    filter {
        name   = "name"
        values = ["ubuntu/images/hvm-ssd/ubuntu-jammy-22.04-amd64-server-*"]
    }

    filter {
        name   = "virtualization-type"
        values = ["hvm"]
    }

    owners = ["099720109477"] # Canonical
}

variable "instance_ids" {
  type = list(string)
  default = ["i-0e2d4475790337a81", "i-00a4daebb71942280"]
}

variable "instance_tags" {
  type = list(string)
  default = ["web", "app"]
}

resource "aws_instance" "this" {
  count = length(var.instance_tags)
  ami                    = data.aws_ami.ubuntu.id
  instance_type          = "t3.micro"

  tags = {
    Name = var.instance_tags[count.index]
  }
}

import {
  for_each = { for idx, item in var.instance_ids : idx => item }
  to = aws_instance.this[tonumber(each.key)]
  id = each.value
}

# resource "aws_ssm_parameter" "this" {
#   count = length(var.instance_tags)
#   name  = var.instance_tags[count.index]
#   type  = "String"
#   value = aws_instance.this[count.index].id
# }

removed {
  from = aws_ssm_parameter.this
}


# 실행 및 확인
#
tofu apply -auto-approve
...
  # aws_ssm_parameter.this[0] will be removed from the OpenTofu state but will not be destroyed
  # aws_ssm_parameter.this[1] will be removed from the OpenTofu state but will not be destroyed
...

# parameters 정보 확인
aws ssm describe-parameters | jq

#
tofu state ls

# tfstate 파일 확인 : VSCODE에서 열어보기
cat terraform.tfstate | jq
...
Tofu test
URL: https://opentofu.org/docs/cli/commands/test/
- The tofu test command lets you test your OpenTofu configuration by creating real infrastructure and checking that the required conditions (assertions) are met. Once the test is complete, OpenTofu destroys the resources it created.
- Usage : tofu test [options]
- This command will execute all *.tftest.hcl files in the current directory or in a directory called tests.
- You can customize this behavior using the options below.
- Consider the following simple example which creates a test.txt file from main.tf and then checks that the main code has successfully performed its job from main.tftest.hcl.
- Tofu now reads the .**tfvars** file from the tests folder.
# main.tf
resource "local_file" "test" {
  filename = "${path.module}/test.txt"
  content  = "Hello world!"
}

# main.tftest.hcl
run "test" {
  assert {
    condition     = file(local_file.test.filename) == "Hello world!"
    error_message = "Incorrect content in ${local_file.test.filename}."
  }
}
[실습] 따라하기
# 8.5 디렉토리 및 하위 디렉토리 생성
mkdir 8.5 && cd 8.5
touch main.tf
mkdir tests
touch tests/main.tftest.hcl
touch tests/terraform.tfvars

# main.tf
variable "test" {
  type = string
}

resource "local_file" "this" {
  filename = "${path.module}/test.txt"
  content  = var.test
}

# tests/main.tftest.hcl 작성
run "test" {
  assert {
    condition     = file(local_file.this.filename) == var.test
    error_message = "Incorrect content in file"
  }
}
# 실행 후 확인
#
tofu init
tree .terraform

# Test 실행
tofu test

# Test 실행
tofu test -var 'test=t101'

# test/terraform.tfvars 파일 작성
test = "t101-study-end"

# 실행 후 확인
# Test 실행
tofu test

# Apply 확인
tofu apply -auto-approve
tofu state list
cat test.txt
실습 리소스 삭제
AWS EC2 삭제
# 8.2 디렉토리 이동 후 삭제
# 8.4
cd 8.2

# 리소스 삭제
tofu apply -destroy -auto-approve

# running 상태 EC2만 출력 : EC2 삭제 확인
aws ec2 describe-instances --query "Reservations[*].Instances[*].{PublicIPAdd:PublicIpAddress,InstanceName:Tags[?Key=='Name']|[0].Value,Status:State.Name}" --filters Name=instance-state-name,Values=running --output text
SSM 파라미터 삭제
# 확인
aws ssm describe-parameters

# 삭제
aws ssm delete-parameters --names "web" "app"

# 확인
aws ssm describe-parameters
S3 버킷 삭제
#
aws s3 rm s3://<각자 자신의 S3 버킷명> --recursive
aws s3 rb s3://<각자 자신의 S3 버킷명>

aws s3 rm s3://gasida-t101 --recursive
aws s3 rb s3://gasida-t101

#
aws s3 ls
KMS 키 비활성 및 삭제 예약
URL: https://docs.aws.amazon.com/ko_kr/kms/latest/developerguide/deleting-keys.html
AWS KMS keys 삭제 - AWS Key Management Service
이 페이지에 작업이 필요하다는 점을 알려 주셔서 감사합니다. 실망시켜 드려 죄송합니다. 잠깐 시간을 내어 설명서를 향상시킬 수 있는 방법에 대해 말씀해 주십시오.
docs.aws.amazon.com
# 생성한 키 ID 변수 지정
KEY_ID=$(echo $CREATE_KEY_JSON | jq -r ".KeyMetadata.KeyId")

# 키 비활성화
aws kms disable-key --key-id $KEY_ID

# 키 삭제 예약 : 대기 기간(7일)
aws kms schedule-key-deletion --key-id $KEY_ID --pending-window-in-days 1 # 최소 7일 이상 필요
aws kms schedule-key-deletion --key-id $KEY_ID --pending-window-in-days 7
OpenTofu 1.8.0
URL: https://opentofu.org/blog/opentofu-1-8-0/
OpenTofu 1.8.0 is out with Early Evaluation, Provider Mocking, and a Coder-Friendly Future | OpenTofu
OpenTofu 1.8.0 is now available with early variable/locals evaluation, provider mocking for tests, and a future that makes every-day Tofu code a lot simpler.
opentofu.org
- Variables and Locals allowed in module sources and backend configurations (with limitations) (#1718)
- Added support to new .tofu extensions to allow tofu-specific overrides of .tf files (#1738)
- Added support for override_resource, override_data and override_module blocks in testing framework. (#1499)
- Added support for mock_provider, mock_resource and mock_data blocks in testing framework. (#1772)
- Deprecation: use_legacy_workflow has been removed from the S3 backend-backend
1.8.0 설정
#
tenv tofu list
tenv tofu list-remote

# 설치
tenv tofu install 1.8.0
tenv tofu list
tenv tofu use 1.8.0
tenv tofu detect

# tofu 확인
tofu -h
tofu version
Early variables / locals evaluation
URL: https://opentofu.org/blog/opentofu-1-8-0-beta1/#early-variablelocals-evaluation
Get ready for OpenTofu Beta 1.8.0 | OpenTofu
Hey there, OpenTofu community! We've been working hard to refine the 1.8.0-alpha1 with your feedback! A few rough edges have been polished and a few new features have been added.
opentofu.org
지금까지 Terraform 101 Study 7주차 내용이었습니다.
테라폼을 학습하시는 분들에게 도움이 되었으면 좋을 것 같습니다 😉
항상 긴 글 읽어주셔서 감사드립니다.
두 달간 진행된 스터디를 잘 마무리지어 기쁘네요
항상 건강 챙기시고 행복하세요
감사합니다 😍
'Terraform' 카테고리의 다른 글
| Terraform 101 Study - 6주차 (0) | 2024.07.27 |
|---|---|
| Terraform 101 Study - 5주차 (0) | 2024.07.12 |
| Terraform 101 Study - 4주차 (0) | 2024.07.07 |
| Terraform 101 Study - 3주차 (0) | 2024.06.30 |
| Terraform 101 Study - 2주차 (0) | 2024.06.23 |

