안녕하세요 늑대양 입니다

Terraform 관련 기초 스터디(Terraform 101 Study)를 참여하게 되어 해당 내용들을 주차별로 정리하고자 합니다.
해당 스터디는 CloudNet@ 팀의 Gasida 님이 호스트를 맡아 주셨으며,
https://gasidaseo.notion.site/CloudNet-Blog-c9dfa44a27ff431dafdd2edacc8a1863
CloudNet@ Blog | Notion
CloudNet@ 팀에서 Cloud Infra & Network 기술에 대한 정보를 공유하는 블로그 입니다.
gasidaseo.notion.site
스터디 메인 교재는 "테라폼으로 시작하는 IaC" 도서를 기준으로 진행 됩니다.
https://www.yes24.com/Product/Goods/119179333
테라폼으로 시작하는 IaC - 예스24
“현업에서 요구하는 진짜 IaC 사용법”테라폼으로 배우는 인프라 운영의 모든 것IaC는 효율적인 데브옵스와 클라우드 자동화 구축을 위해 꼭 필요한 기술로 각광받고 있다. 그중에서도 테라폼
www.yes24.com
아래의 내용은 5주차 - Module & Runner 내용을 다루고 있습니다.
5주차 - Module & Runner
Module:
모듈은 테라폼 구성의 집합.
테라폼으로 관리하는 대상의 규모가 커지고 복잡해져 생긴 문제를 보완하고 관리 작업을 수월하게 하기 위한 방안으로 활용
https://developer.hashicorp.com/terraform/language/modules
Modules Overview - Configuration Language | Terraform | HashiCorp Developer
Modules are containers for multiple resources that are used together in a configuration. Find resources for using, developing, and publishing modules.
developer.hashicorp.com
- 루트 모듈(Root Module): 테라폼을 실행하고 프로비저닝하는 최상위 모듈
- 자식 모듈(Chile Module): 루트 모듈의 구성에서 호출되는 외부 구성 집합
- 관리성:
- 모듈은 서로 연관 있은 구성의 묶음이며, 원하는 구성요소를 단위별로 쉽게 찾고 업데이트 가능
- 모듈은 다른 구성에서 쉽게 하나의 덩어리로 추가하거나 삭제 가능
- 또한 모듈이 업데이트되면 이 모듈을 사용하는 모든 구성에서 일관된 변경 작업을 진행 가능
- 캡슐화:
- 테라폼 구성 내에서 각 모듈은 논리적으로 묶여져 독립적으로 프로비저닝 및 관리되며, 그 결과는 은닉성을 갖춰 필요한 항목만을 외부에 노출
- 재사용성:
- 구성을 처음부터 작성하는 것에는 시간과 노력이 필요하며, 작성 중간에 디버깅과 오류를 수정하는 반복 작업이 발생
- 테라폼 구성을 모듈화하면 이후에 비슷한 프로비저닝에 이미 검증된 구성을 바로 사용 가능
- 일관성 & 표준화:
- 테라폼 구성 시, 모듈을 활용하는 워크플로는 구성의 일관성을 제공하고 서로 다른 환경과 프로젝트에도 이미 검증한 모듈을 적용해 복잡한 구성과 보안 사고 방지 가능
6.1 모듈 작성 기본 원칙
기본 원칙: 모듈은 대부분의 프로그래밍 언어에서 쓰이는 라이브러리나 패키지와 역할이 비슷하다
- 모듈 디렉터리는 terraform-<프로바이더 이름>-<모듈 이름> 형식 제안
- 해당 형식은 Terraform Cloud, Terraform Enterprise 에서도 사용되는 방식으로
- 1) 디렉터리 또는 레지스트리 이름이 테라폼을 위한 것이고
- 2) 어떤 프로바이더의 리소스를 포함하고 있으며
- 3) 부여된 이름이 무엇인지 판별할 수 있도록 구성
- 테라폼 구성은 궁극적으로 모듈화가 가능한 구조로 작성할 것을 제안
- 처음부터 모듈화를 가정하고 구성파일을 작성하면 단일 루트 모듈이라도 후에 다른 모듈이 호출할 것을 예상하고 구조화 가능
- 작성자는 의도한 리소스 묶음을 구상한 대로 논리적인 구조로 그룹화 가능
- 각각의 모듈을 독립적으로 관리하기를 제안
- 리모트 모듈을 사용하지 않더라도 처음부터 모듈화가 진행된 구성들은 루트 모듈의 하위 파일 시스템에 존재하는 경우가 존재
- 하위 모듈 또한 독립적인 모듈이므로 루트 모듈 하위에 두기보다는 동일한 파일 시스템 레벨에 위치하거나 별도 모듈만을 위한 공간에서 불러오는 것을 권장
- 이러한 구성을 통해, VCS를 통한 관리 수월
- 공개된 테라폼 레지스트리의 모듈을 참고하기를 제안
- 대다수의 테라폼 모듈은 공개된 모듈이 존재하고 거의 모든 인수에 대한 변수 처리, 반복문 적용 리소스, 조건에 따른 리소스 활성/비활성 등을 모범 사례로 공개
- 커스텀 작업을 통해, 프로비저닝하려는 상황에 맞게 참고하는 것을 권장
- 작성된 모듈은 공개 또는 비공개로 게시해 팀 또는 커뮤니티와 공유하기를 제안
- 공유를 통해, 모듈의 사용성을 높이고 피드백을 통해 더 발전된 모듈을 구성할 수 있는 모티브로 작용
- 모듈을 독립적으로 관리하기 위해 디렉터리 구조를 생성할 때, 모듈을 위한 별도 공간을 생성하는 방식으로 진행
- 특정 루트 모듈 하위에 자식 모듈을 구성하는 경우, 단순히 복잡한 코드를 분리하는 용도로 명시되며 종속성이 발생하므로 루트 모듈 사이에 모듈 디렉터리를 지정
6.2 모듈화 해보기
모듈화 소개:
모듈의 기본적 구조는 테라폼 구성으로 입력 변수를 구성하고 결과를 출력하기 위한 구조로 구성
- 모듈화라는 용어는 리소스 구조를 재활용하기 위한 템플릿 작업
- 애플리케이션 개발시에도 자주 사용되는 용어로, 테라폼은 작성된 모듈을 다른 루트 모듈에서 가져와 사용하며, 이를 통해 재사용성과 표준화 구조를 구성 가능
- 기존에 작성된 모듈은 다른 모듈에서 참조해 사용할 수 있으며, 사용 방식은 리소스와 유사함
- 모듈에서 필요한 값은 variable로 선언해 설정하고, 모듈에서 생성된 값 중 외부 모듈에서 참조하고 싶은 값은 output으로 설정
- JAVA 개발 시 getter, setter로 캡슐화된 클래스를 활용하는 것과 유사함
모듈 작성 실습:
하나의 프로비저닝에서 사용자와 패스워드를 여러 번 구성해야 하는 경우를 가상의 시나리오로 삼아 모듈화 실습 진행
- random_pet는 이름을 자동으로 생성하고, random_password는 사용자의 패스워드를 설정한다 - random_pet
- random_password는 random 프로바이더 리소스로 난수 형태로 패스워드를 만들 수 있다.
자식 모듈 작성
- 디렉터리 생성 및 파일 생성
- 06-module-traning/modules/terraform-random-pwgen/
- main.tf
- variable.tf
- output.tf
# 자식 모듈 작성
mkdir -p 06-module-traning/modules/terraform-random-pwgen
cd 06-module-traning/modules/terraform-random-pwgen
touch main.tf variable.tf output.tf

# main.tf
resource "random_pet" "name" {
  keepers = {
    ami_id = timestamp()
  }
}

resource "random_password" "password" {
  length           = var.isDB ? 16 : 10
  special          = var.isDB ? true : false
  override_special = "!#$%*?"
}

# variable.tf
variable "isDB" {
  type        = bool
  default     = false
  description = "패스워드 대상의 DB 여부"
}

# output.tf
output "id" {
  value = random_pet.name.id
}

output "pw" {
  value = nonsensitive(random_password.password.result)
}
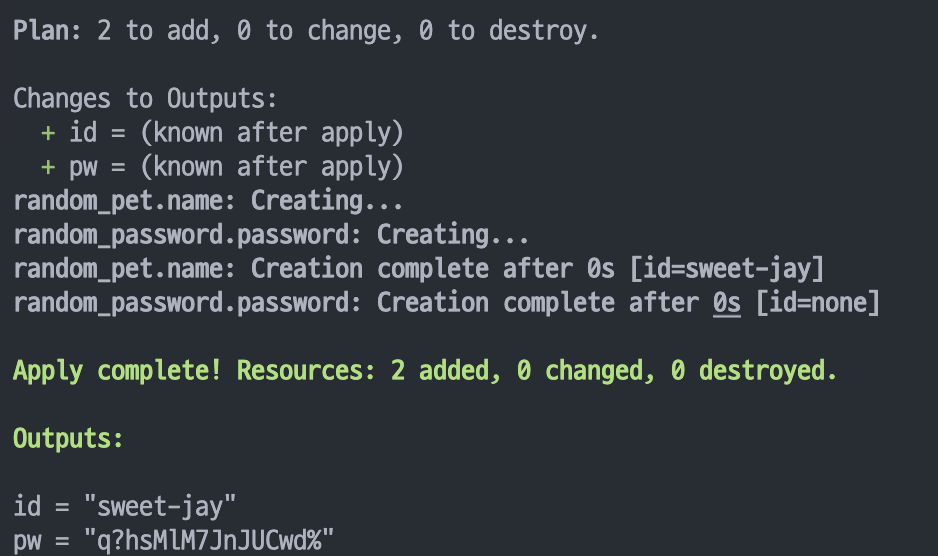
자식 모듈 동작 테스트
# 테라폼 init, plan
terraform init && terraform plan

# 테스트를 위해 apply 시 변수 지정
terraform apply -auto-approve -var=isDB=true

>Apply complete! Resources: 2 added, 0 changed, 0 destroyed.

Outputs:
id = "sweet-jay"
pw = "q?hsMlM7JnJUCwd%"

# 확인
terraform state list

terraform state show random_pet.name
echo "random_pet.name.id" | terraform console
echo "random_pet.name.keepers" | terraform console

terraform state show random_password.password
echo "random_password.password.length" | terraform console
echo "random_password.password.special" | terraform console
cat terraform.tfstate| grep result

# tfstate에 모듈 정보 확인 : VSCODE에서 terraform.tfstate 파일 확인
cat terraform.tfstate | grep module

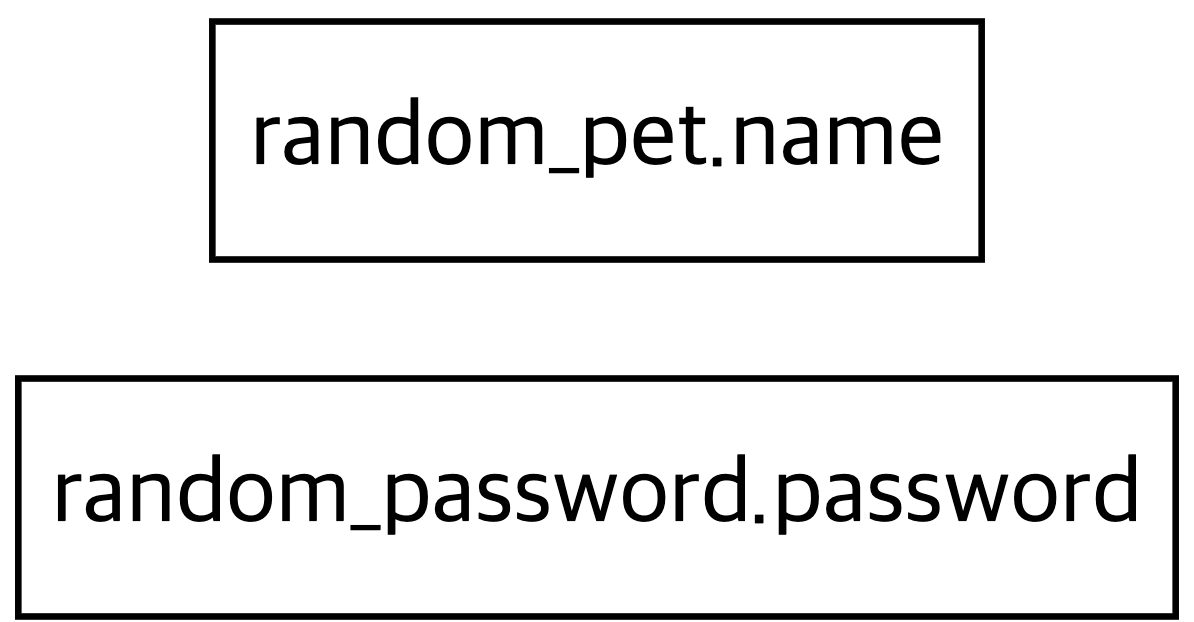
# graph 확인
terraform graph > graph.dot
자식 모듈 호출 실습
- 다수의 리소스를 같은 목적으로 여러 번 반복해서 사용하려면 리소스 수만큼 반복해 구성 파일을 정의해야 하고 이름도 고유하게 설정해줘야 하는 부담이 있지만, 모듈을 활용하면 반복되는 리소스 묶음을 최소화할 수 있다.
- 디렉터리 생성 및 파일 생성
- 06-module-traning/06-01-basic/main.tf
# 디렉터리 및 파일 생성
mkdir -p 06-module-traning/06-01-basic
cd 06-module-traning/06-01-basic
touch main.tf

# main.tf
module "mypw1" {
  source = "../../modules/terraform-random-pwgen"
}

module "mypw2" {
  source = "../../modules/terraform-random-pwgen"
  isDB   = true
}

output "mypw1" {
  value  = module.mypw1
}

output "mypw2" {
  value  = module.mypw2
}
자식 모듈 호출 동작 테스트
# 테라폼 init, plan
terraform init && terraform plan && terraform apply -auto-approve

>Apply complete! Resources: 4 added, 0 changed, 0 destroyed.

Outputs:
mypw1 = {
  "id" = "intense-moray"
  "pw" = "bDBswKkuRh"
}
mypw2 = {
  "id" = "eternal-snipe"
  "pw" = "4bjUD5grt!y%A$?1"
}

# 확인
terraform state list

# tfstate에 모듈 정보 확인 : VSCODE에서 terraform.tfstate 파일 확인
cat terraform.tfstate | grep module

# terraform init 시 생성되는 modules.json 파일 확인
tree .terraform
.terraform
├── modules
│   └── modules.json
...

## 모듈로 묶여진 리소스는 module이라는 정의를 통해 단순하게 재활용하고 반복 사용할 수 있다.
## 모듈의 결과 참조 형식은 module.<모듈 이름>.<output 이름>으로 정의된다.
cat .terraform/modules/modules.json | jq
{
  "Modules": [
    {
      "Key": "",
      "Source": "",
      "Dir": "."
    },
    {
      "Key": "mypw1",
      "Source": "../modules/terraform-random-pwgen",
      "Dir": "../modules/terraform-random-pwgen"
    },
    {
      "Key": "mypw2",
      "Source": "../modules/terraform-random-pwgen",
      "Dir": "../modules/terraform-random-pwgen"
    }
  ]
}

# graph 확인
terraform graph > graph.dot


6.3 모듈 사용 방식
모듈과 프로바이더:
유형 1. 자식 모듈에서 프로바이더 정의
- 모듈에서 사용하는 프로바이더 버전과 구성 상세를 자식 모듈에서 고정하는 방법
- 프로바이더 버전과 구성에 민감하거나, 루트 모듈에서 프로바이더 정의 없이 자식 모듈이 독립적인 구조일 때 고려할 수 있는 방법
- 하지만 동일한 프로바이더가 루트와 자식 양쪽에 또는 서로 다른 자식 모듈에 버전 조건 합의가 안 되면, 오류가 발생하고 모듈에 반복문을 사용할 수 없다는 단점이 있으므로 잘 사용하지 않음
유형 2. 루트 모듈에서 프로바이더 정의(실습 진행)
- 자식 모듈은 루트 모듈의 프로바이더 구성에 종속되는 방식
- 디렉터리 구조로는 분리되어 있지만 테라폼 실행 단계에서 동일 계층으로 해석되므로 프로바이더 버전과 구성은 루트 모듈의 설정 적용
- 프로바이더를 모듈 내, 리소스와 데이터 소스에 일괄 적용하고 자식 모듈에 대한 반복문 사용에 자유로운 것이 장점
- 자식 모듈에 특정 프로바이더 구성의 종속성은 반영할 수 없으므로, 자식 모듈을 프로바이더 조건에 대해 기록하고 자식 모듈을 사용하는 루트 모듈에서 정의하는 프로바이더에 맞게 업데이트 필요
- 동일한 모듈에 사용되는 프로바이더 조건이 다른 경우 각 모듈별로 프로바이더를 맵핑하는 방안
- 리소스와 데이터 소스에 provider 메타인수로 지정하는 방식과 비슷하나 모듈에는 다수의 프로바이더가 사용될 가능성이 있으므로 map 타입으로 구성하는 provider로 정의 진행
루트 모듈에서 프로바이더 정의 실습
모듈 작성:
# 디렉터리 및 파일 생성
mkdir -p 06-module-traning/modules/terraform-aws-ec2/
cd 06-module-traning/modules/terraform-aws-ec2/
touch main.tf variable.tf output.tf
# main.tf
terraform {
  required_providers {
    aws = {
      source = "hashicorp/aws"
    }
  }
}

resource "aws_default_vpc" "default" {}

data "aws_ami" "default" {
  most_recent = true
  owners      = ["amazon"]

  filter {
    name   = "owner-alias"
    values = ["amazon"]
  }

  filter {
    name   = "name"
    values = ["amzn2-ami-hvm*"]
  }
}

resource "aws_instance" "default" {
  depends_on    = [aws_default_vpc.default]
  ami           = data.aws_ami.default.id
  instance_type = var.instance_type

  tags = {
    Name = var.instance_name
  }
}

# variable.tf
variable "instance_type" {
  description = "vm 인스턴스 타입 정의"
  default     = "t2.micro"
}

variable "instance_name" {
  description = "vm 인스턴스 이름 정의"
  default     = "my_ec2"
}

# output.tf
output "private_ip" {
  value = aws_instance.default.private_ip
}
작성된 모듈을 사용할 루트 모듈 작성:
# 루트 모듈 디렉터리 및 파일 생성
mkdir -p 06-module-traning/multi_provider_for_module/
cd 06-module-traning/multi_provider_for_module/
touch main.tf output.tf
# main.tf
provider "aws" {
  region = "ap-southeast-1"
}

provider "aws" {
  alias  = "seoul"
  region = "ap-northeast-2"
}

module "ec2_singapore" {
  source = "../modules/terraform-aws-ec2"
}

module "ec2_seoul" {
  source = "../modules/terraform-aws-ec2"
  providers = {
    aws = aws.seoul
  }
  instance_type = "t3.small"
}
# output.tf
output "module_output_singapore" {
  value = module.ec2_singapore.private_ip
}

output "module_output_seoul" {
  value = module.ec2_seoul.private_ip
}
프로바이더 구성 실행:
#
cd 06-module-traning/multi_provider_for_module/
terraform init
cat .terraform/modules/modules.json | jq

#
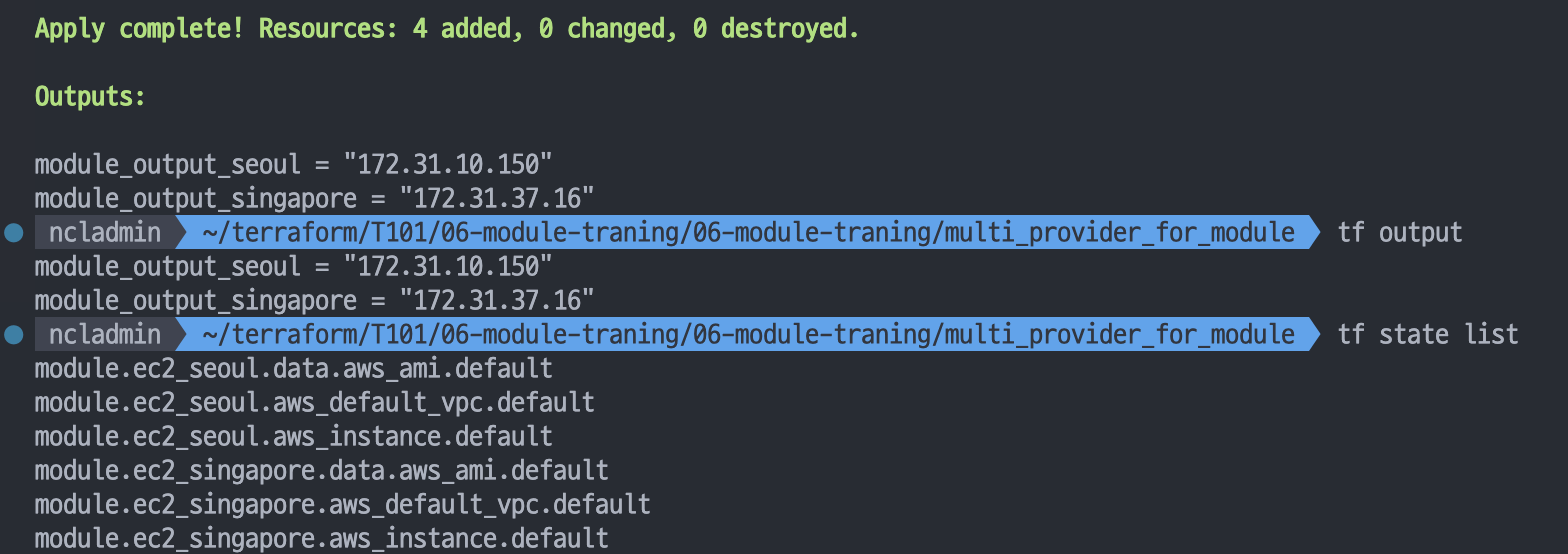
terraform apply -auto-approve
terraform output
terraform state list
terraform state show module.ec2_seoul.data.aws_ami.default
terraform state show module.ec2_singapore.data.aws_ami.default

# tfstate에 모듈 정보 확인 : VSCODE에서 terraform.tfstate 파일 확인
cat terraform.tfstate | grep module

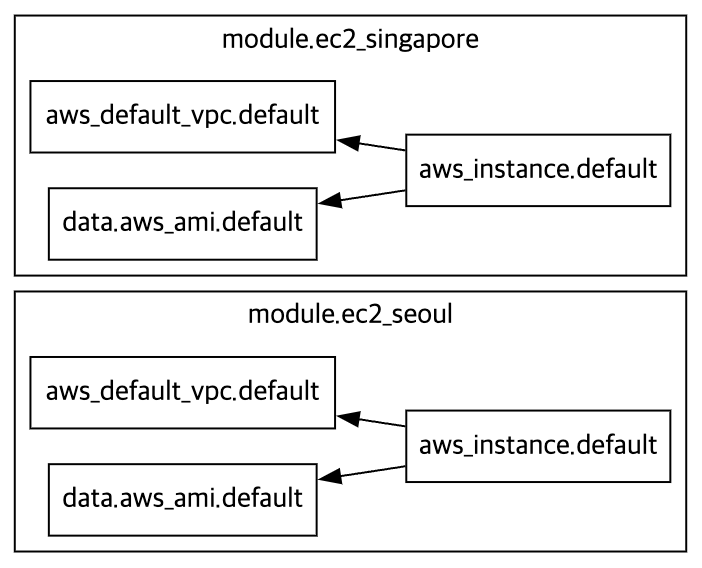
# graph 확인
terraform graph > graph.dot

# aws cli로 ec2 확인
aws ec2 describe-instances --region ap-northeast-2 --query "Reservations[*].Instances[*].{PublicIPAdd:PublicIpAddress,InstanceName:Tags[?Key=='Name']|[0].Value,Status:State.Name}" --filters Name=instance-state-name,Values=running --output text
aws ec2 describe-instances --region ap-southeast-1 --query "Reservations[*].Instances[*].{PublicIPAdd:PublicIpAddress,InstanceName:Tags[?Key=='Name']|[0].Value,Status:State.Name}" --filters Name=instance-state-name,Values=running --output text

# 실습 완료 후 리소스 삭제
terraform destroy -auto-approve
모듈의 반복문:
- 모듈 또한 리소스에서 반복문을 사용하듯 구성 가능
- 모듈이라는 리소스 정의 묶음을 원하는 수량으로 프로비저닝할 수 있으므로, 모듈 없이 구성하는 것과 대비해 리소스 종속성 관리와 유지 보수에 장점 존재
- count를 사용한 반복문 사용은 리소스에서의 사용 방식처럼 module 블록 내에 선언
모듈 반복문 실습:
# 디렉터리 및 파일 생성
mkdir -p 06-module-traning/module_loop_count/
cd 06-module-traning/module_loop_count/
touch main.tf

# main.tf
provider "aws" {
  region = "ap-northeast-2"
}

module "ec2_seoul" {
  count  = 2
  source = "../modules/terraform-aws-ec2"
  instance_type = "t3.small"
}

output "module_output" {
  value  = module.ec2_seoul[*].private_ip
}
모듈 반복문 실행:
#
terraform init
cat .terraform/modules/modules.json | jq

#
terraform apply -auto-approve
terraform output
terraform state list

# tfstate에 모듈 정보 확인 : VSCODE에서 terraform.tfstate 파일 확인
cat terraform.tfstate | grep module

# graph 확인
terraform graph > graph.dot

# aws cli로 ec2 확인
aws ec2 describe-instances --region ap-northeast-2 --query "Reservations[*].Instances[*].{PublicIPAdd:PublicIpAddress,InstanceName:Tags[?Key=='Name']|[0].Value,Status:State.Name}" --filters Name=instance-state-name,Values=running --output text

# 실습 완료 후 리소스 삭제
terraform destroy -auto-approve
모듈 묶음에 일관된 구성과 구조로 프로비저닝이 되는 경우라면 count가 간편한 방안이지만, 동일한 모듈 구성에 필요한 인수 값이 다르다면 for_each 를 활용한다.
# main.tf 파일 수정
locals {
  env = {
    dev = {
      type = "t3.micro"
      name = "dev_ec2"
    }
    prod = {
      type = "t3.medium"
      name = "prod_ec2"
    }
  }
}

module "ec2_seoul" {
  for_each = local.env
  source = "../modules/terraform-aws-ec2"
  instance_type = each.value.type
  instance_name = each.value.name
}

output "module_output" {
  value  = [
    for k in module.ec2_seoul: k.private_ip
  ]
}
#
terraform plan
terraform apply -auto-approve
terraform output
terraform state list

# tfstate에 모듈 정보 확인 : VSCODE에서 terraform.tfstate 파일 확인
cat terraform.tfstate | grep module

# graph 확인
terraform graph > graph.dot

# aws cli로 ec2 확인
aws ec2 describe-instances --region ap-northeast-2 --query "Reservations[*].Instances[*].{PublicIPAdd:PublicIpAddress,InstanceName:Tags[?Key=='Name']|[0].Value,Status:State.Name}" --filters Name=instance-state-name,Values=running --output text

# 실습 완료 후 리소스 삭제
terraform destroy -auto-approve
6.4 모듈 소스 관리
https://developer.hashicorp.com/terraform/language/modules/sources
Module Sources | Terraform | HashiCorp Developer
The source argument tells Terraform where to find child modules's configurations in locations like GitHub, the Terraform Registry, Bitbucket, Git, Mercurial, S3, and GCS.
developer.hashicorp.com
- Module 블록에 정의된 소스 구성으로 모듈의 코드 위치를 정의한다. terraform init을 수행할 때 지정된 모듈을 다운로드 및 사용
- 로컬 디렉터리 경로
- 테라폼 레지스트리 Terraform Registry
- 깃허브 Github
- 비트버킷 Bitbucket
- 깃 Generic Git Repository
- HTTP URLs
- S3 Bucket
- GCS Bucket google cloud storage
- 테라폼 공식 문서 안내와 같이 루트 경로에 모듈을 배치하는 것 외에 패키지 하위 디렉터리 경로를 참조하는 것도 하나의 방안
로컬 디렉터리 경로
- 로컬 경로를 지정할 때는 테라폼 레지스트리와 구분하기 위해 하위 디렉터리는 ./로, 상위 디렉터리는 ../로 시작한다.
- 대상 모듈은 이미 같은 로컬 파일 시스템에 존재하므로 다운로드 없이 바로 사용한다. 앞서 언급한 대로 재사용성이 고려된다면 상위 디렉터리에 별도 관리하는 것을 권장하고, 항상 루트 모듈과 함께 동작해야 하는 경우 하위 디렉터리에 모듈을 정의한다.
- 코드 예시) 작업 환경을 기준으로 하는 로컬 경로 상위에 위치한 모듈 경로 선언
module "local_module" {
  source = "../modules/my_local_module"
}
테라폼 레지스트리
- 테라폼 모듈 레지스트리는 테라폼의 프로토콜을 사용해 모듈을 사용하는 방식이다.
- 공개된 테라폼 모듈을 사용하거나 Terraform Cloud, Terraform Enterprise에서 제공되는 비공개 테라폼 모듈을 사용할 때 설정하는 소스 지정 방식이다.
- 공개된 모듈 - 링크 aws_vpc
- 공개된 테라폼 모듈을 source에 선언할 때는 <네임스페이스>/<이름>/<프로바이더> 형태로 설정한다.
module "vpc" {
  source  = "terraform-aws-modules/vpc/aws"
  version = "5.1.0"
}
깃허브
- 깃의 원격 저장소로 널리 알려진 깃허브는 테라폼 구성에 대한 CI 용도로 사용할 수 있고, 저장된 구성을 테라폼 모듈의 소스로 선언 가능
- 6.3에서 사용한 06-module-traning/modules/terraform-aws-ec2/ 를 깃허브에 업로드하는 과정
- 깃허브에 로그인
- 새로운 깃허브 저장소 생성 [New repository]
- Owner : 원하는 소유자 선택
- Repository name : 예시) terraform-module-repo
- Public 선택
- Add .gitignore의 드롭박스에서 [Terraform]을 선택
- 맨 아래 [Create repository] 클릭
- 해당 저장소에 예시) ‘terraform-aws-ec2’ 디렉터리 생성 후 main.tf , variable.tf, output.tf 추가 후 업로드
# 디렉터리 및 main.tf 파일 작성
mkdir module-source-mygithub
touch main.tf

# main.tf
provider "aws" {
  region = "ap-southeast-1"
}

module "ec2_seoul" {
  source = "github.com/<Owner Name>/terraform-module-repo/terraform-aws-ec2"
  instance_type = "t3.small"
}

#
cd module-source-mygithub
terraform init

# 아래 디렉터리에 깃허브에 있던 파일이 다운로드 되어 있음을 확인
tree .terraform/modules

# 배포
terraform apply -auto-approve
terraform state list

# 실습 완료 후 삭제
terraform destroy -auto-approve
Terraform Runner:

Atlantis
Terraform Pull Request Automation - Running Terraform Workflows with Ease
Atlantis
Atlantis Terraform Pull Request Automation Running Terraform Workflows with Ease
www.runatlantis.io
https://github.com/runatlantis/atlantis
GitHub - runatlantis/atlantis: Terraform Pull Request Automation
Terraform Pull Request Automation. Contribute to runatlantis/atlantis development by creating an account on GitHub.
github.com
https://www.runatlantis.io/blog.html
Welcome to Our Blog | Atlantis
www.runatlantis.io
설치 가이드
This guide is for installing a production-ready instance of Atlantis onto your infrastructure:
- First, ensure your Terraform setup meets the Atlantis requirements
- See Requirements - Atlantis works with most Git hosts and Terraform setups. Read on to confirm it works with yours.
- Git Host : Atlantis integrates with the following Git hosts:
- GitHub (public, private or enterprise)
- GitLab (public, private or enterprise)
- and so on
Terraform State
- Atlantis supports all backend types except for local state.
- We don't support local state because Atlantis does not have permanent storage and it doesn't commit the new statefile back to version control.
Repository Structure
- Atlantis supports any Terraform repository structure, for example:
- Single Terraform Project At Repo Root
.
├── main.tf
└── ...
- Multiple Project Folders
.
├── project1
│   ├── main.tf
|   └── ...
└── project2
    ├── main.tf
    └── ...
- Modules
.
├── project1
│   ├── main.tf
|   └── ...
└── modules
    └── module1
        ├── main.tf
        └── ...
- With modules, if you want project1 automatically planned when module1 is modified you need to create an atlantis.yaml file.
- See atlantis.yaml Use Cases for more details.
https://www.runatlantis.io/docs/repo-level-atlantis-yaml.html#configuring-planning
Repo Level atlantis.yaml Config | Atlantis
www.runatlantis.io
.tfvars Files
.
├── production.tfvars
│── staging.tfvars
└── main.tf
- For Atlantis to be able to plan automatically with .tfvars files, you need to create an atlantis.yaml file to tell it to use -var-file={YOUR_FILE}. See atlantis.yaml Use Cases for more details.
- https://www.runatlantis.io/docs/custom-workflows.html#tfvars-files
Custom Workflows | Atlantis
www.runatlantis.io
Multiple Repos
- Atlantis supports multiple repos as well–as long as there is a webhook configured for each repo.
Terraform Versions
- Atlantis supports all Terraform versions (including 0.12) and can be configured to use different versions for different repositories/projects. See Terraform Versions.
Git Host Access Credentials
- This page describes how to create credentials for your Git host (GitHub, GitLab, Gitea, Bitbucket, or Azure DevOps) that Atlantis will use to make API calls.
Generating an Access Token
- Once you've created a new user (or decided to use an existing one), you need to generate an access token.
GitHub user
- Create a Personal Access Token
- Create the token with repo scope
- Record the access token
Deploy Atlantis into your. infrastructure
https://www.runatlantis.io/docs/deployment
Deployment | Atlantis
www.runatlantis.io
This page covers getting Atlantis up and running in your infrastructure.
Prerequisites
- You have created access credentials for your Atlantis user
- You have created a webhook secret
Architecture Overview
Runtime
- Atlantis is a simple Go app.
- It receives webhooks from your Git host and executes Terraform commands locally.
- There is an official Atlantis Docker image.
Routing
- Atlantis and your Git host need to be able to route and communicate with one another.
- Your Git host needs to be able to send webhooks to Atlantis and Atlantis needs to be able to make API calls to your Git host.
- If you're using a public Git host like github.com, gitlab.com, gitea.com, bitbucket.org, or dev.azure.com then you'll need to expose Atlantis to the internet.
- If you're using a private Git host like GitHub Enterprise, GitLab Enterprise, self-hosted Gitea or Bitbucket Server, then Atlantis needs to be routable from the private host and Atlantis will need to be able to route to the private host.
Data
- Atlantis has no external database. Atlantis stores Terraform plan files on disk.
- If Atlantis loses that data in between a plan and apply cycle, then users will have to re-run plan.
- Because of this, you may want to provision a persistent disk for Atlantis.
Configure Webhooks on your Git host so Atlantis can respond to your pull requests
https://www.runatlantis.io/docs/configuring-webhooks
Configuring Webhooks | Atlantis
www.runatlantis.io
Next Steps
- To verify that Atlantis is receiving your webhooks, create a test pull request to your repo.
- You should see the request show up in the Atlantis logs at an INFO level.
- You'll now need to configure Atlantis to add your Provider Credentials
Configure Provider credentials so Atlantis can actually run Terraform commands
https://www.runatlantis.io/docs/provider-credentials
Provider Credentials | Atlantis
www.runatlantis.io
- Atlantis runs Terraform by simply executing terraform plan and apply commands on the server Atlantis is hosted on.
- Just like when you run Terraform locally, Atlantis needs credentials for your specific provider.
- It's up to you how you provide credentials for your specific provider to Atlantis:
- The Atlantis Helm Chart and AWS Fargate Module have their own mechanisms for provider credentials. Read their docs.
- If you're running Atlantis in a cloud then many clouds have ways to give cloud API access to applications running on them, ex:
- AWS EC2 Roles (Search for "EC2 Role")
- GCE Instance Service Accounts
- Many users set environment variables, ex. AWS_ACCESS_KEY, where Atlantis is running.
- Others create the necessary config files, ex. ~/.aws/credentials, where Atlantis is running.
- Use the HashiCorp Vault Provider to obtain provider credentials.
실습 따라하기
AWS EC2 생성: atlantis 서버 역할
# CloudFormation yaml 파일 다운로드 : 위 노션 파일 클릭 후 다운 로드

# CloudFormation 스택 배포
MYKEYNAME=<각자 자신의 AWS EC2 서울 리전 Keypair 이름>
MYKEYNAME=kp-gasida
aws cloudformation deploy --template-file t101-atlantis-ec2.yaml --stack-name t101 --parameter-overrides KeyName=$MYKEYNAME SgIngressSshCidr=$(curl -s ipinfo.io/ip)/32 --region ap-northeast-2

# [모니터링] CloudFormation 스택 상태
while true; do
  date
  AWS_PAGER="" aws cloudformation list-stacks \
    --stack-status-filter CREATE_IN_PROGRESS CREATE_COMPLETE CREATE_FAILED DELETE_IN_PROGRESS DELETE_FAILED \
    --query "StackSummaries[*].{StackName:StackName, StackStatus:StackStatus}" \
    --output table
  sleep 1
done

# EC2 공인 IP 확인
aws cloudformation describe-stacks --stack-name t101 --query 'Stacks[*].Outputs[0].OutputValue' --output text
AWS EC2 SSH 접속: 기본 정보 확인
# ubuntu EC2에 SSH 접속
ssh -i ~/.ssh/kp-gasida.pem ubuntu@$(aws cloudformation describe-stacks --stack-name t101 --query 'Stacks[*].Outputs[0].OutputValue' --output text)
---------------------------
# 계정 확인
whoami

# aws 자격증명 설정 : (옵션) IAM profile로 설정 -> 단 이경우 tf 파일에 설정 필요
aws --version
aws configure
AWS Access Key ID [None]: ####
AWS Secret Access Key [None]: ####
Default region name [None]: ap-northeast-2
Default output format [None]:

# aws 자격증명 확인
aws s3 ls

# 테라폼 버전 확인
terraform version

#
git version

#
ls -l
./atlantis version
공인 IP 혹은 도메인 노출 설정
# URL 변수 지정
URL="http://$(curl -s ipinfo.io/ip):4141"
echo $URL
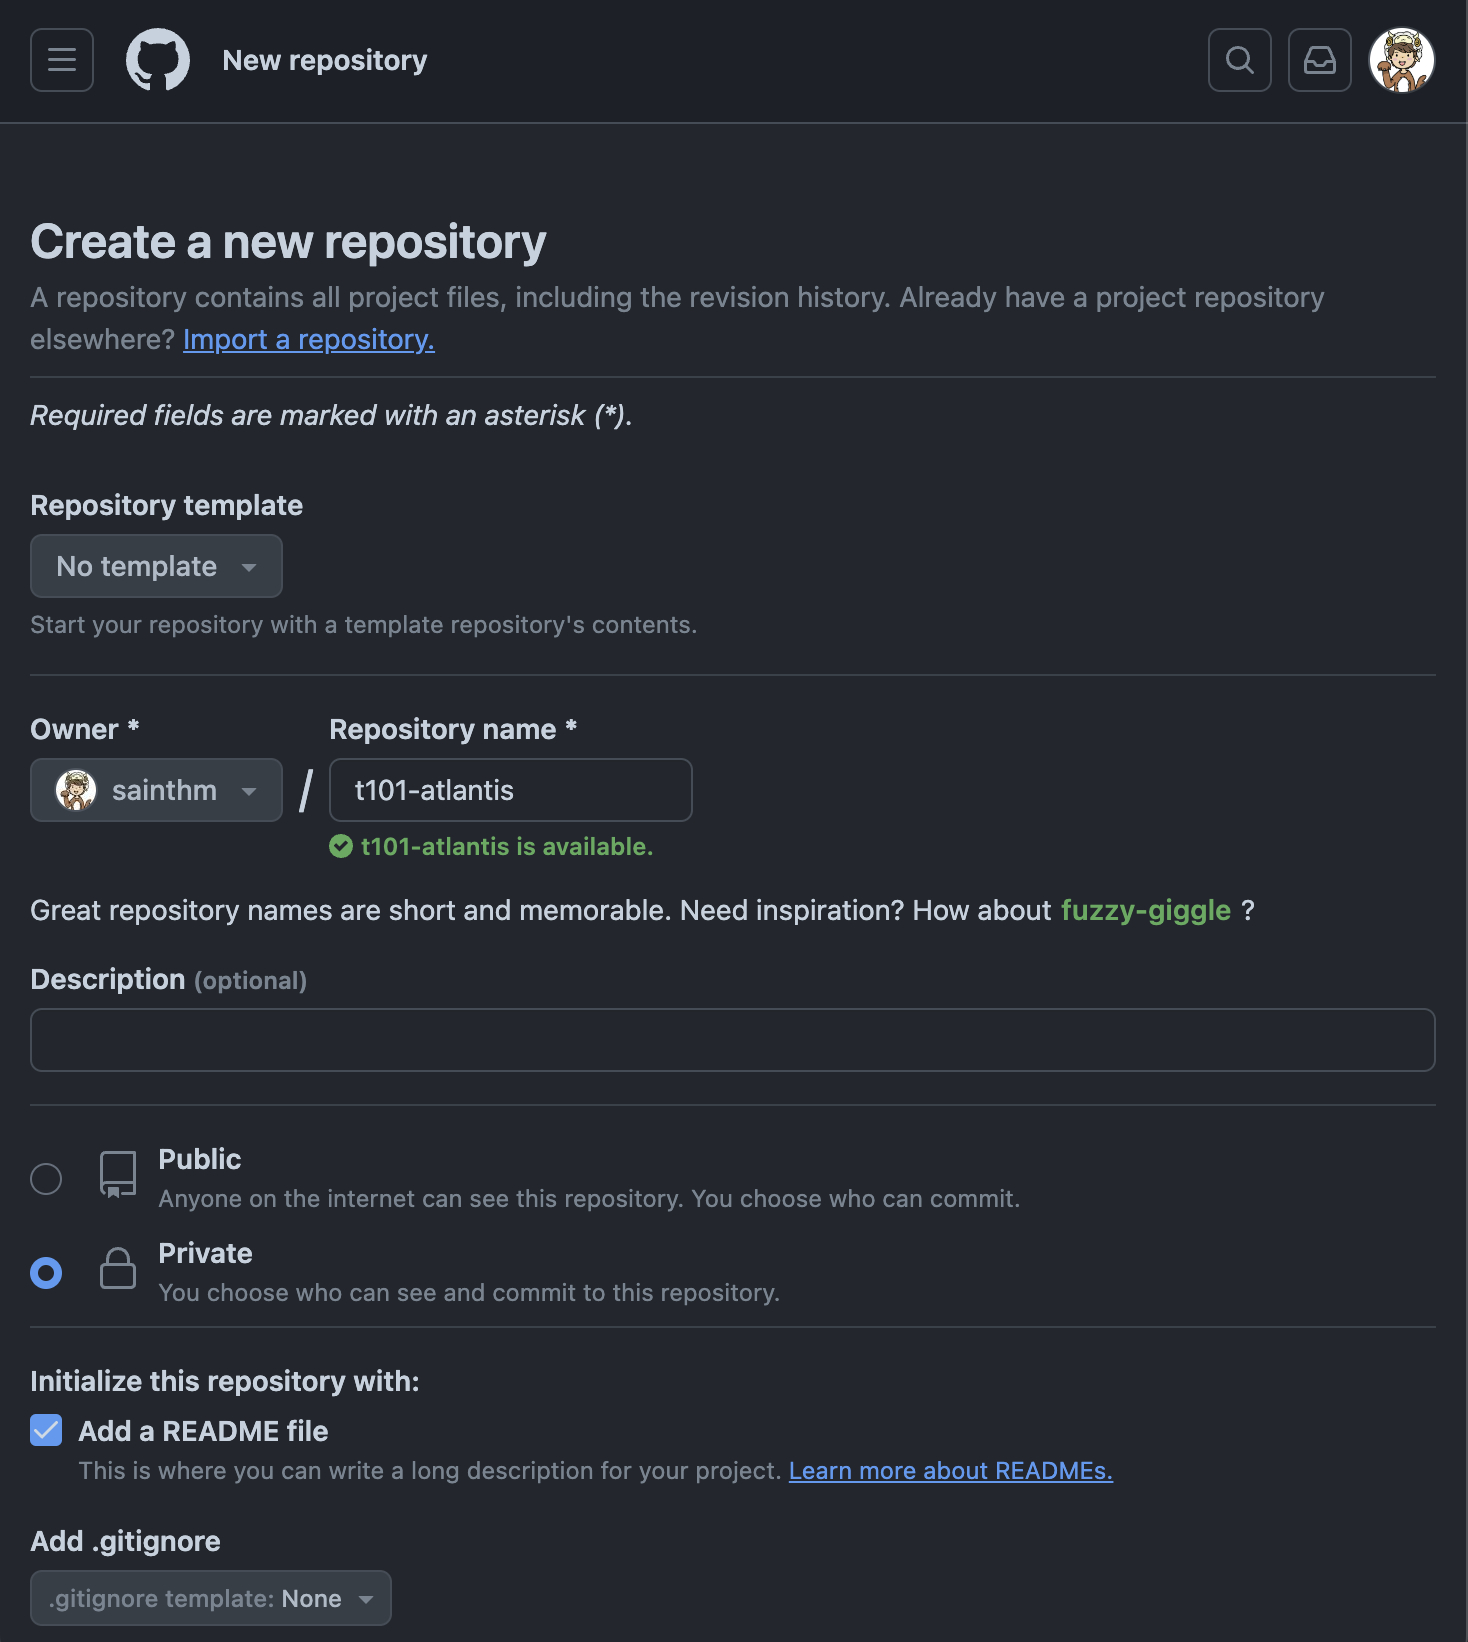
Git Repo (Private) 생성
Git Token 생성
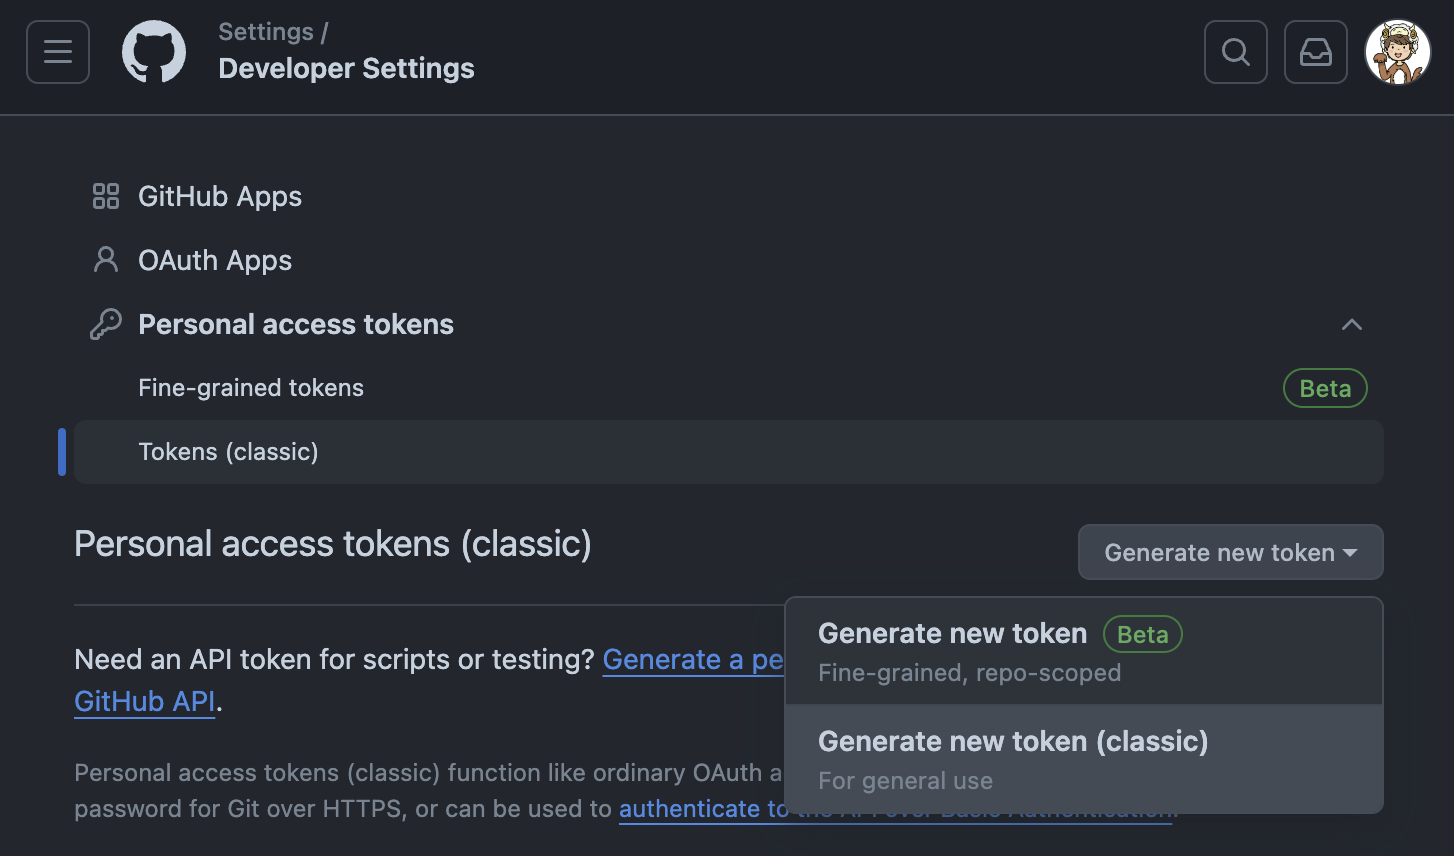
Create an access token for Atlantis
We recommend using a dedicated CI user or creating a new user named @atlantis that performs all API actions, however for testing, you can use your own user.
Here we'll create the access token that Atlantis uses to comment on the pull request and set commit statuses.
GitHub or GitHub Enterprise Access Token
- Create a Personal Access Token
- create a token with repo scope
- set the token as an environment variable
TOKEN="{YOUR_TOKEN}"
Create a webhook secret so Atlantis can validate webhooks
Webhook secrets are actually optional. However they're highly recommended for security.
- Atlantis uses Webhook secrets to validate that the webhooks it receives from your Git host are legitimate.
- One way to confirm this would be to allowlist requests to only come from the IPs of your Git host but an easier way is to use a Webhook Secret.
Generating A Webhook Secret
You can use any random string generator to create your Webhook secret. It should be > 24 characters.
For example:
- Generate via Ruby with ruby -rsecurerandom -e 'puts SecureRandom.hex(32)'
- Generate online with browserling: Generate Random Strings and Numbers
Create a Webhook Secret
- GitHub and GitLab use webhook secrets so clients can verify that the webhooks came from them.
# Create a random string of any length (you can use random.org) and set an environment variable:
SECRET="{YOUR_RANDOM_STRING}"
Add Webhook
- Take the URL that ngrok output and create a webhook in your GitHub, GitLab or Bitbucket repo:
- GitHub or GitHub Enterprise Webhook
- Go to your repo's settings
- Select Webhooks or Hooks in the sidebar
- Click Add webhook
- set Payload URL to your ngrok url with /events at the end. Ex. http://**<EC2공인IP>:4141**/events
- double-check you added /events to the end of your URL.
- set Content type to application/json
- set Secret to your random string
- select Let me select individual events
- check the boxes
- Issue comments
- Pull request reviews
- Pushes
- Pull requests
- leave Active checked
- click Add webhook
Start Atlantis
You're almost ready to start Atlantis, just set two more variables:
USERNAME="{the username of your GitHub, GitLab or Bitbucket user}"
REPO_ALLOWLIST="$YOUR_GIT_HOST/$YOUR_USERNAME/$YOUR_REPO"
REPO_ALLOWLIST="github.com/gasida/t101-cicd"
# ex. REPO_ALLOWLIST="github.com/runatlantis/atlantis"
# If you're using Bitbucket Server, $YOUR_GIT_HOST will be the domain name of your
# server without scheme or port and $YOUR_USERNAME will be the name of the **project** the repo
# is under, **not the key** of the project.
#
URL="http://$(curl -s ipinfo.io/ip):4141"
USERNAME=gasida
TOKEN='###'
SECRET='###'
REPO_ALLOWLIST="github.com/gasida/t101-cicd"

# 변수 설정 확인
echo $URL $USERNAME $TOKEN $SECRET $REPO_ALLOWLIST

# Atlantis 서버 실행
./atlantis server \
--atlantis-url="$URL" \
--gh-user="$USERNAME" \
--gh-token="$TOKEN" \
--gh-webhook-secret="$SECRET" \
--repo-allowlist="$REPO_ALLOWLIST"

# [신규 터미널] 기본 tcp 4141 포트 오픈
ss -tnlp
State      Recv-Q     Send-Q         Local Address:Port         Peer Address:Port    Process
LISTEN     0          4096                       *:4141                    *:*        users:(("atlantis",pid=2089,fd=7))
...

# 웹 접속 확인
URL="http://$(curl -s ipinfo.io/ip):4141"
echo $URL
http://3.38.213.238:4141
실습 자원 삭제
1. CMD 작업
aws cloudformation delete-stack --stack-name t101
aws s3 rm s3://gasida-t101 --recursive
aws s3 rb s3://gasida-t101
2. GitHub Repo 삭제
- Repo → Settings → Delete this repository
3. GitHub Token 삭제
4. 로컬 GitHub 코드 삭제
지금까지 Terraform 101 Study 5주차 내용이었습니다.
테라폼을 학습하시는 분들에게 도움이 되었으면 좋을 것 같습니다 😍
항상 긴 글 읽어주셔서 감사드립니다
좋은 주말 보내세요
감사합니다🤗
'Terraform' 카테고리의 다른 글
| Terraform 101 Study - 7주차 (0) | 2024.07.30 |
|---|---|
| Terraform 101 Study - 6주차 (0) | 2024.07.27 |
| Terraform 101 Study - 4주차 (0) | 2024.07.07 |
| Terraform 101 Study - 3주차 (0) | 2024.06.30 |
| Terraform 101 Study - 2주차 (0) | 2024.06.23 |

