
안녕하세요 늑대양 입니다

Terraform 관련 기초 스터디(Terraform 101 Study)를 참여하게되어 해당 내용들을 주차별로 정리하고자 합니다.
해당 스터디는 CloudNet@ 팀의 Gasida 님이 호스트를 맡아 주셨으며,
https://gasidaseo.notion.site/CloudNet-Blog-c9dfa44a27ff431dafdd2edacc8a1863
CloudNet@ Blog | Notion
CloudNet@ 팀에서 Cloud Infra & Network 기술에 대한 정보를 공유하는 블로그 입니다.
gasidaseo.notion.site
스터디 메인 material 은 "테라폼으로 시작하는 IaC" 도서를 기준으로 진행됩니다.
https://www.yes24.com/Product/Goods/119179333
테라폼으로 시작하는 IaC - 예스24
“현업에서 요구하는 진짜 IaC 사용법”테라폼으로 배우는 인프라 운영의 모든 것IaC는 효율적인 데브옵스와 클라우드 자동화 구축을 위해 꼭 필요한 기술로 각광받고 있다. 그중에서도 테라폼
www.yes24.com
아래의 내용은 3주차 - 기본 사용 3/3 내용을 다루고 있습니다.

3주차 - 기본 사용 3/3
3.9 반복문 (2/2)
for_each
반복문, 선언된 key 값 개수만큼 리소스를 생성
https://developer.hashicorp.com/terraform/language/meta-arguments/for_each
The for_each Meta-Argument - Configuration Language | Terraform | HashiCorp Developer
The for_each meta-argument allows you to manage similar infrastructure resources without writing a separate block for each one.
developer.hashicorp.com
https://developer.hashicorp.com/terraform/tutorials/configuration-language/for-each
Manage similar resources with for each | Terraform | HashiCorp Developer
Provision similar infrastructure components by iterating over a data structure with the for_each argument. Duplicate an entire VPC including a load balancer and multiple EC2 instances for each project defined in a map.
developer.hashicorp.com
The for_each Meta-Argument - Configuration Language | Terraform | HashiCorp Developer
The for_each meta-argument allows you to manage similar infrastructure resources without writing a separate block for each one.
developer.hashicorp.com
- for_each 는 반복(for)을 할 때, 타입 값에 대해 하나하나 each object 로 접근
- each object는 key, value 2개의 속성을 가지고 있습니다.
- each.key — The map key (or set member) corresponding to this instance.
- each.value — The map value corresponding to this instance. (If a set was provided, this is the same as each.key.)
- 하지만 for_each는 모든 타입에 대해 each object로 접근 할 수 없고 map, set타입만 허용합니다.
- map, set타입이 아닌 expression은 map 또는 set으로 타입변환(toset 등)을 해야합니다.
반복문 실습
# for_each example

# Map
resource "azurerm_resource_group" "rg" {
  for_each = tomap({
    a_group       = "eastus"
    another_group = "westus2"
  })
  name     = each.key
  location = each.value
}

# Set of strings
resource "aws_iam_user" "the-accounts" {
  for_each = toset(["Todd", "James", "Alice", "Dottie"])
  name     = each.key
}
# main.tf

resource "local_file" "abc" {
  for_each = {
    a = "content a"
    b = "content b"
  }
  content  = each.value
  filename = "${path.module}/${each.key}.txt"
}

#
terraform init && terraform plan && terraform apply -auto-approve
terraform state list

- for_each가 설정된 블록에서는 each 속성을 사용해 구성을 수정 가능
- each.key : 이 인스턴스에 해당하는 map 타입의 key 값
- each.value : 이 인스턴스에 해당하는 map의 value 값
- 생성되는 리소스의 경우 <리소스 타입>.<이름>[<key>], 모듈의 경우 module.<모듈 이름>[<key>]로 해당 리소스의 값을 참조
- 이 참조 방식을 통해 리소스 간 종속성을 정의하기도 하고 변수로 다른 리소스에서 사용하거나 출력을 위한 결과 값으로 사용
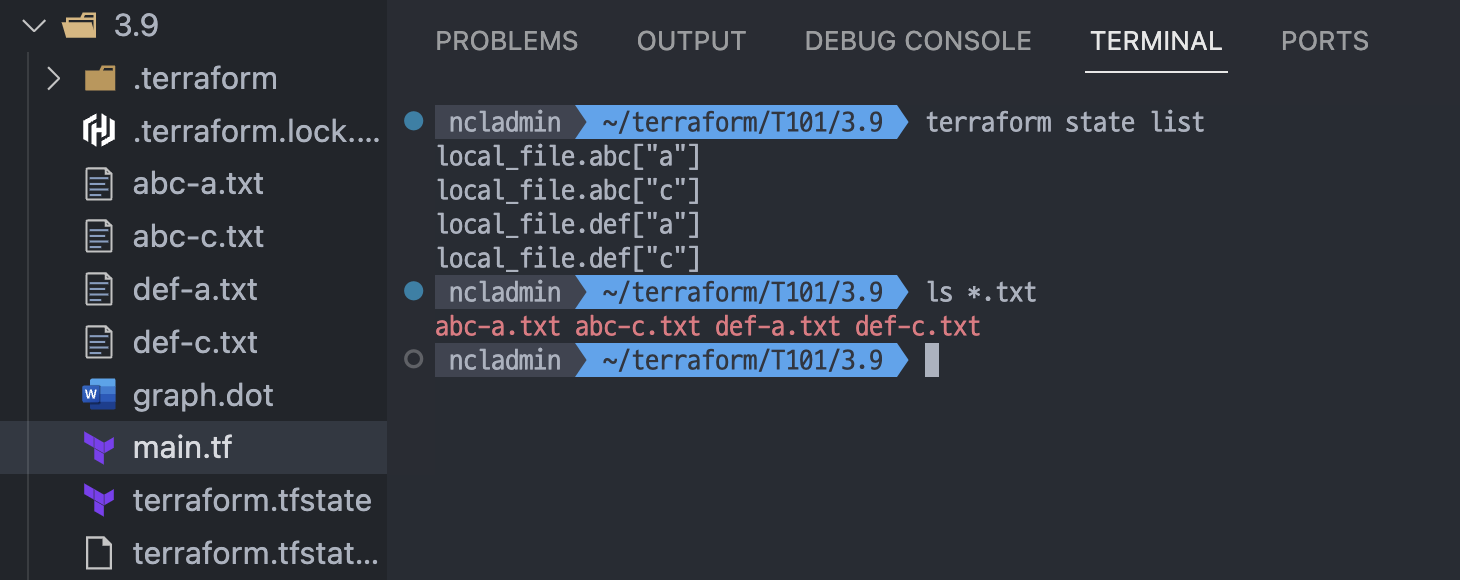
- main.tf 파일 수정
- local_file.abc는 변수의 map 형태의 값을 참조,
- local_file.def의 경우 local_file.abc 도한 결과가 map으로 반환되므로 다시 for_each 구문을 사용 가능
# main.tf
variable "names" {
  default = {
    a = "content a"
    b = "content b"
    c = "content c"
  }
}

resource "local_file" "abc" {
  for_each = var.names
  content  = each.value
  filename = "${path.module}/abc-${each.key}.txt"
}

resource "local_file" "def" {
  for_each = local_file.abc
  content  = each.value.content
  filename = "${path.module}/def-${each.key}.txt"
}

- key 값은 count의 index와는 달리 고유하므로 중간에 값을 삭제한 후, 다시 적용해도 삭제한 값에 대해서만 리소스 삭제
- main.tf 파일 수정 : count 경우와 유사하게 중간 값을 삭제 후 확인
# main.tf
variable "names" {
  default = {
    a = "content a"
    c = "content c"
  }
}

resource "local_file" "abc" {
  for_each = var.names
  content  = each.value
  filename = "${path.module}/abc-${each.key}.txt"
}

resource "local_file" "def" {
  for_each = local_file.abc
  content  = each.value.content
  filename = "${path.module}/def-${each.key}.txt"
}
for_each 데이터 유형
# main.tf
resource "aws_iam_user" "the-accounts" {
  for_each = ["Todd", "James", "Alice", "Dottie"]
  name     = each.key
}

#
terraform init -upgrade && terraform plan
│ Error: Invalid for_each argument
│
│   on main.tf line 2, in resource "aws_iam_user" "the-accounts":
│    2:   for_each = ["Todd", "James", "Alice", "Dottie"]
│
│ The given "for_each" argument value is unsuitable: the "for_each" argument must be a map, or
│ set of strings, and you have provided a value of type tuple.
# main.tf 수정
resource "aws_iam_user" "the-accounts" {
  for_each = toset(["Todd", "James", "Alice", "Dottie"])
  name     = each.key
}

# plan 정상 확인
terraform plan
...
데이터 유형 실습
- 기본 유형
- string : 글자 유형
- number : 숫자 유형
- bool : true 또는 false
- any : 명시적으로 모든 유형이 허용됨을 표시
- 집합 유형
- list [<유형>]: 인덱스 기반 집합
- map (<유형>): 값 = 속성 기반 집합이며 키값 기준 정렬
- set (<유형>): 값 기반 집합이며 정렬 키값 기준 정렬
- object ({<인수 이름>=<유형>, …})
- tuple ([<유형>, …])
- list와 set은 선언하는 형태가 비슷하지만 참조 방식이 인덱스와 키로 각각 차이가 있고, map와 set의 경우 선언된 값이 정렬되는 특징을 가진다.
# main.tf
variable "string_a" {
  default     = "myString"
}

variable "string_b" {
  type        = string
  default     = "myString"
}

# variable "string_c" {
#   type        = string
#   default     = myString
# }


variable "number_a" {
  default = 123
}

variable "number_b" {
  type    = number
  default = 123
}

variable "number_c" {
  default = "123"
}


variable "boolean" {
  default = true
}


# (Array) list , set , tuple - value , [ ] 사용
variable "list_set_tuple_a" {
  default = ["aaa", "bbb", "ccc"]
}

variable "list_set_tuple_b" {
  type    = list(string)
  default = ["bbb", "ccc", "aaa"]
}

variable "list_set_tuple_c" {
  type    = set(string)
  default = ["bbb", "ccc", "aaa"]
}

variable "list_set_tuple_d" {
  default = ["aaa", 1, false]
}

variable "list_set_tuple_e" {
  type    = tuple([string, number, bool])
  default = ["aaa", 1, false]
}


# (Object) map , object - key : value , { } 사용
variable "map_object_a" {
  default = {"a" : "aaa", "b" : "bbb" , "c" : "ccc"}
}

variable "map_object_b" {
  type    = map(string)
  default = {"b" : "bbb" , "c" : "ccc", "a" : "aaa"}
}

variable "map_object_c" {
  default = {"name" : "gasida", "age" : 27 }
}

variable "map_object_d" {
  type = object({ name = string, age = number })
  default = {"name" : "gasida", "age" : 27 }
}

for_each: count 와 비교
# main.tf
resource "local_file" "abc" {
  count    = 3
  content  = "This is filename abc${count.index}.txt"
  filename = "${path.module}/abc${count.index}.txt"
}

#
terraform apply -auto-approve
terraform state list

for_each vs count 와 비교
resource "<PROVIDER>_<TYPE>" "<NAME>" {
  for_each = <COLLECTION>

  [CONFIG ...]
}
- for_each 표현식을 사용하면 리스트 lists, 집합 sets, 맵 maps 를 사용하여 전체 리소스의 여러 복사본 또는 리소스 내 인라인 블록의 여러 복사본, 모듈의 복사본을 생성 가능
- 먼저 for_each 를 사용하여 리소스의 여러 복사본을 만드는 구문
- COLLECTION 은 루프를 처리할 집합 sets 또는 맵 maps
- 리소스에 for_each 를 사용할 때에는 리스트는 지원 X
- 그리고 CONFIG 는 해당 리소스와 관련된 하나 이상의 인수로 구성되는데 CONFIG 내에서 each.key 또는 each.value 를 사용하여 COLLECTION 에서 현재 항목의 키와 값에 접근 가능
- 예를 들어 다음은 for_each 를 사용하여 3명의 IAM 사용자를 생성하는 방법
provider "aws" {
  region = "ap-northeast-2"
}

resource "aws_iam_user" "myiam" {
  for_each = toset(var.user_names)
  name     = each.value
}

variable "user_names" {
  description = "Create IAM users with these names"
  type        = list(string)
  default     = ["gasida", "akbun", "ssoon"]
}

output "all_users" {
  value = aws_iam_user.myiam
}
- var.user_names 리스트를 집합(set)으로 변환하기 위해 toset 사용. for_each 는 리소스에 사용될 때는 set과 map만 지원.
- for_each 가 이 집합을 반복하면 each.value 에서 각 사용자 이름을 사용할 수 있습니다.
- main.tf : 일반적으로는 each.key 는 키/값 쌍 맵에서만 사용가능하지만, 사용자 이름은 each.key 에서도 사용 가능
- for_each 를 사용한 후에는 하나의 리소스 또는 count 를 사용한 것과 같은 리소스 배열이 되는 것이 아니리 리소스 맵 list into a set
#
terraform init -upgrade
terraform plan && terraform apply -auto-approve

# 확인
terraform state list
terraform output
aws iam list-users | jq

# 배포 결과 content만 필터링 확인
cat terraform.tfstate | grep -e key -e name -e "content:"
- all_users 출력 변수가 for_each 의 키, 즉 사용자 이름을 키로 가지며 값이 해당 리소스의 전체 출력인 맵을 포함
- for_each 를 사용해 리소스를 맵으로 처리하면 컬렉션 중간의 항목도 안전하게 제거할 수 있어서, count 로 리소스를 배열 처리보다 이점 존재
- var.user_names 리스트 중간에 값을 제거하고 plan 으로 확인
...
variable "user_names" {
  description = "Create IAM users with these names"
  type        = list(string)
  default     = ["gasida", "ssoon"]
}
...
terraform plan
terraform apply -auto-approve
terraform state list
aws iam list-users | jq

# 배포 결과 content만 필터링 확인
cat terraform.tfstate | grep -e key -e name -e "content:"
cat terraform.tfstate.backup | grep -e key -e name -e "content:"
- 이제 주변 모든 리소스를 옮기지 않고 정확히 목표한 리소스만 삭제가 됩니다.
- 따라서 리소스의 구별되는 여러 복사본을 만들 때는 count 대신 for_each 를 사용하는 것이 바람직합니다.
- 다음 실습을 위해 iam user 삭제
terraform destroy -auto-approve
aws iam list-users | jq
for Expressions
복합 형식 값의 형태를 변환하는 데 사용
- 예를 들어 list 값의 포맷을 변경하거나 특정 접두사 prefix를 추가할 수도 있고, output에 원하는 형태로 반복적인 결과를 표현 가능
- list 타입의 경우 값 또는 인덱스와 값을 반환
- map 타입의 경우 키 또는 키와 값에 대해 반환
- set 타입의 경우 키 값에 대해 반환
- main.tf 파일 수정 : list의 내용을 담는 리소스를 생성, var.name의 내용이 결과 파일에 content로 기록됨
# main.tf
variable "names" {
  default = ["a", "b", "c"]
}

resource "local_file" "abc" {
  content  = jsonencode(var.names) # 결과 : ["a", "b", "c"]
  filename = "${path.module}/abc.txt"
}

output "file_content" {
  value = local_file.abc.content
}
- 실행 후 확인 : jsonencode Function - 링크
- jsonencode encodes a given value to a string using JSON syntax.
#
terraform apply -auto-approve
terraform state list
terraform output --raw file_content | jq

ls *.txt
cat abc.txt ;echo

# 참고 jsonencode Function
terraform console
-----------------
var.names
type(var.names)
jsonencode(var.names)
jsonencode({"hello"="world"})

exit
-----------------
# 목표 : var.name 값을 일괄적으로 대문자로 변환!

# main.tf 파일 수정 : content의 값 정의에 for 구문을 사용하여 내부 값을 일괄적으로 변경

# main.tf
variable "names" {
  default = ["a", "b", "c"]
}

resource "local_file" "abc" {
  content  = jsonencode([for s in var.names : upper(s)]) # 결과 : ["A", "B", "C"]
  filename = "${path.module}/abc.txt"
}

output "file_content" {
  value = local_file.abc.content
}


#
terraform apply -auto-approve
terraform state list
terraform output --raw file_content | jq
ls *.txt
cat abc.txt ;echo

# 참고 jsonencode Function
terraform console
-----------------
jsonencode([for s in var.names : upper(s)])
[for s in var.names : upper(s)]
[for txt in var.names : upper(txt)]

title("hello world")

exit
-----------------
- for 구문을 사용하는 몇 가지 규칙은 다음과 같음
- list 유형의 경우 반환 받는 값이 하나로 되어 있으면 값을, 두 개의 경우 앞의 인수가 인덱스를 반환하고 뒤의 인수가 값을 반환
- 관용적으로 인덱스는 i, 값은 v로 표현
- map 유형의 경우 반환 받는 값이 하나로 되어 있으면 키를, 두 개의 경우 앞의 인수가 키를 반환하고 뒤의 인수가 값을 반환
- 관용적으로 키는 k, 값은 v로 표현
- 결과 값은 for 문을 묶는 기호가 **[ ]**인 경우 tuple로 반환되고 **{ }**인 경우 object 형태로 반환
- object 형태의 경우 키와 값에 대한 쌍은 ⇒ 기호로 구분
- { } 형식을 사용해 object 형태로 결과를 반환하는 경우 키 값은 고유해야 하므로 값 뒤에 그룹화 모드 심볼(…)를 붙여서 키의 중복을 방지(SQL의 group by 문 또는 Java의 MultiValueMap과 같은 개념)
- if 구문을 추가해 조건 부여 가능
- list 유형의 경우 반환 받는 값이 하나로 되어 있으면 값을, 두 개의 경우 앞의 인수가 인덱스를 반환하고 뒤의 인수가 값을 반환
# main.tf 파일 수정 : list 유형에 대한 for 구문 처리의 몇 가지 예를 확인

# main.tf
variable "names" {
  type    = list(string)
  default = ["a", "b"]
}

output "A_upper_value" {
  value = [for v in var.names : upper(v)]
}

output "B_index_and_value" {
  value = [for i, v in var.names : "${i} is ${v}"]
}

output "C_make_object" {
  value = { for v in var.names : v => upper(v) }
}

output "D_with_filter" {
  value = [for v in var.names : upper(v) if v != "a"]
}


# 실행 후 확인
terraform apply -auto-approve
terraform state list

#
terraform output
terraform output A_upper_value
terraform output D_with_filter

#
terraform console
-----------------
var.names
type(var.names)

# 리턴 타입 tuple : 값 v
[for v in var.names : upper(v)]
type([for v in var.names : upper(v)])

# 리턴 타입 tuple : 인덱스 i, 값 v
[for i, v in var.names : "${i} is ${v}"]
type([for i, v in var.names : "${i} is ${v}"])

# 리턴 타입 object : object 형태의 경우 키와 값에 대한 쌍은 ⇒ 기호로 구분
{ for v in var.names : v => upper(v) }
type({ for v in var.names : v => upper(v) })

# 조건문 활용 : f 구문을 추가해 조건 부여 가능
[for v in var.names : upper(v) if v != "a"]
type([for v in var.names : upper(v) if v != "a"])

exit
-----------------
# main.tf 파일 수정 : map 유형에 대한 for 구문 처리의 몇 가지 예를 확인

# main.tf
variable "members" {
  type = map(object({
    role = string
  }))
  default = {
    ab = { role = "member", group = "dev" }
    cd = { role = "admin", group = "dev" }
    ef = { role = "member", group = "ops" }
  }
}

output "A_to_tupple" {
  value = [for k, v in var.members : "${k} is ${v.role}"]
}

output "B_get_only_role" {
  value = {
    for name, user in var.members : name => user.role
    if user.role == "admin"
  }
}

output "C_group" {
  value = {
    for name, user in var.members : user.role => name...
  }
}

# 실행 후 확인
#
terraform apply -auto-approve
terraform state list

#
terraform output
terraform output A_to_tupple
terraform output B_get_only_role
terraform output C_group

#
terraform console
-----------------
var.members
type(var.members)

[for k, v in var.members : "${k} is ${v.role}"]
type([for k, v in var.members : "${k} is ${v.role}"])

{for name, user in var.members : name => user.role}
type({for name, user in var.members : name => user.role})

{for name, user in var.members : name => user.role  if user.role == "admin"}

# { } 형식을 사용해 object 형태로 결과를 반환하는 경우 키 값은 고유해야 하므로 값 뒤에 그룹화 모드 심볼(…)를 붙여서 키의 중복을 방지
{for name, user in var.members : user.role => name...}

exit
-----------------
# main.tf

# map 유형에 대한 for 구문 처리의 몇 가지 예를 확인

variable "fruits_set" {
  type        = set(string)
  default     = ["apple", "banana"]
  description = "fruit example"
}

variable "fruits_list" {
  type        = list(string)
  default     = ["apple", "banana"]
  description = "fruit example"
}

variable "fruits_map" {
  type        = map(string)
  default     = {"first": "apple", "second": "banana"}
  description = "fruit example"
}

# 실행 후 확인

#
terraform console
-----------------
var.fruits_set
var.fruits_list
var.fruits_map

type(var.fruits_set)
type(var.fruits_list)
type(var.fruits_map)

#
for item in var.fruits_set: item
[for item in var.fruits_set: item]
type([for item in var.fruits_set: item])

{for item in var.fruits_set: item}
{for key,value in var.fruits_set: key => value}
type({for key,value in var.fruits_set: key => value})

#
for item in var.fruits_list: item
[for item in var.fruits_list: item]
type([for item in var.fruits_list: item])

{for item in var.fruits_list: item}
{for key,value in var.fruits_list: key => value}
{for i, v in var.fruits_list: i => v}
type({for i, v in var.fruits_list: i => v})

#
for item in var.fruits_map: item
[for item in var.fruits_map: item]
type([for item in var.fruits_map: item])

{for item in var.fruits_map: item}
{for key,value in var.fruits_map: key => value}
{for k, v in var.fruits_map: k => v}
type({for k, v in var.fruits_map: k => v})


exit
-----------------
dynamic
리소스 내부 속성 블록을 동적인 블록으로 생성
- count 나 for_each 구문을 사용한 리소스 전체를 여러 개 생성하는 것 이외도 리소스 내에 선언되는 구성 블록을 다중으로 작성해야 하는 경우가 있다.
- 예를 들면 AWS Security Group 리소스 구성에 ingress, egress 요소가 리소스 선언 내부에서 블록 형태로 여러 번 정의되는 경우다.
resource "aws_security_group" "example" {
  name        = "example-security-group"
  description = "Example security group"
  vpc_id.     = aws_vpc.main.id

  ingress {
    from_port   = 22
    to_port     = 22
    protocol    = "tcp"
    cidr_blocks = ["0.0.0.0/0"]
  }

  ingress {
    from_port   = 443
    to_port     = 443
    protocol    = "tcp"
    ipv6_cidr_blocks = ["::/0"]
  }
}
- 리소스 내의 블록 속성(Attributes as Blocks)은 리소스 자체의 반복 선언이 아닌 내부 속성 요소 중 블록으로 표현되는 부분에 대해서만 반복 구문을 사용해야 하므로, 이때 dynamic 블록을 사용해 동적인 블록을 생성 가능
- dynamic 블록을 작성하려면, 기존 블록의 속성 이름을 dynamic 블록의 이름으로 선언하고 기존 블록 속성에 정의되는 내용을 content 블록에 작성
- 반복 선언에 사용되는 반복문 구문은 for_each를 사용한다. 기존 for_each 적용 시 each 속성에 key, value가 적용되었다면 dynamic에서는 dynamic에 지정한 이름에 대해 속성이 부여
- dynamic 블록 활용 예
# 일반적인 블록 속성 반복 적용 시

resource "provider_resource" "name" {
  name = "some_resource"

  some_setting {
    key = a_value
  }

  some_setting {
    key = b_value
  }

  some_setting {
    key = c_value
  }

  some_setting {
    key = d_value
  }
}

# dynamic 블록 적용 시

resource "provider_resource" "name" {
  name = "some_resource"

  dynamic "some_setting" {
    for_each = {
      a_key = a_value
      b_key = b_value
      c_key = c_value
      d_key = d_value
    }

    content {
      key = some_setting.value
    }
  }
}
# main.tf

# archive 프로바이더(링크)의 archive_file에 source 블록 선언을 반복
data "archive_file" "dotfiles" {
  type        = "zip"
  output_path = "${path.module}/dotfiles.zip"

  source {
    content  = "hello a"
    filename = "${path.module}/a.txt"
  }

  source {
    content  = "hello b"
    filename = "${path.module}/b.txt"
  }

  source {
    content  = "hello c"
    filename = "${path.module}/c.txt"
  }
}

# 실행 후 확인
terraform init -upgrade && terraform apply -auto-approve
terraform state list
terraform state show data.archive_file.dotfiles
ls *.zip
unzip dotfiles.zip
ls *.txt
cat a.txt ; echo
# main.tf 파일 수정

# 리소스 내에 반복 선언 구성을 dynamic 블록으로 재구성

variable "names" {
  default = {
    a = "hello a"
    b = "hello b"
    c = "hello c"
  }
}

data "archive_file" "dotfiles" {
  type        = "zip"
  output_path = "${path.module}/dotfiles.zip"

  dynamic "source" {
    for_each = var.names
    content {
      content  = source.value
      filename = "${path.module}/${source.key}.txt"
    }
  }
}

# 실행 후 확인 : 동일한 결과가 기대되어 변경 사항이 없다!
terraform apply -auto-approve
terraform state list
terraform state show data.archive_file.dotfiles
ls *.zip
3.10 조건문
Conditional Expressions
테라폼에서의 조건식은 3항 연산자 형태를 갖는다. 조건은 true 또는 false 로 확인되는 모든 표현식을 사용할 수 있다
#
# <조건 정의> ? <옳은 경우> : <틀린 경우>
var.a != "" ? var.a : "default-a"

# 조건식 형태 권장 사항
var.example ? 12 : "hello"            # 비권장
var.example ? "12" : "hello"          # 권장
var.example ? tostring(12) : "hello"  # 권장
- 일반적으로 비교, 논리 연산자를 사용해 조건을 확인
- 조건식은 ? 기호를 기준으로 왼쪽은 조건이며, 오른쪽은 : 기호를 기준으로 왼쪽이 조건에 대해 true가 반환되는 경우이고 오른쪽이 false가 반환되는 경우
- 다음의 예에서 var.a가 빈 문자열이 아니라면 var.a를 나타내지만, 비어 있을 때는 “default-a”를 반환
- 조건식의 각 조건은 비교 대상의 형태가 다르면 테라폼 실행 시 조건 비교를 위해 형태를 추론하여 자동으로 변환하는데, 명시적인 형태 작성을 권장
- 조건식은 단순히 특정 속성에 대한 정의, 로컬 변수에 대한 재정의, 출력 값에 대한 조건 정의 뿐만 아니라 리소스 생성 여부에 응용할 수 있다. count에 조건식을 결합한 경우 다음과 같이 특정 조건에 따라 리소스 생성 여부를 선택 가능
# main.tf
variable "enable_file" {
  default = true
}

resource "local_file" "foo" {
  count    = var.enable_file ? 1 : 0
  content  = "foo!"
  filename = "${path.module}/foo.bar"
}

output "content" {
  value = var.enable_file ? local_file.foo[0].content : ""
}

#
# 변수 우선순위3 : 환경 변수 (TF_VAR 변수 이름)
export TF_VAR_enable_file=false
export | grep TF_VAR_enable_file

#
terraform init && terraform plan && terraform apply -auto-approve
terraform state list
echo "var.enable_file ? 1 : 0" | terraform console

# 환경 변수 삭제
unset TF_VAR_enable_file
export | grep TF_VAR_enable_file

# 재실행
terraform plan && terraform apply -auto-approve
terraform state list

#
echo "local_file.foo[0]" | terraform console
echo "local_file.foo[0].content" | terraform console
echo "var.enable_file ? 1 : 0" | terraform console
3.11 함수
테라폼은 프로그래밍 언어적인 특성을 가지고 있어서, 값의 유형을 변경하거나 조합할 수 있는 내장 함수를 사용 할 수 있다
https://developer.hashicorp.com/terraform/language/functions
Functions - Configuration Language | Terraform | HashiCorp Developer
An introduction to the built-in functions that you can use to transform and combine values in expressions.
developer.hashicorp.com
3.12 프로비저너
프로비저너는 프로바이더와 비슷하게 ‘제공자’로 해석되나, 프로바이더로 실행되지 않는 커맨드와 파일 복사 같은 역할을 수행
Provisioners are a Last Resort (다른 방안이 안되면, 최후의 수단으로 사용)
- 예를 들어 AWS EC2 생성 후 특정 패키지를 설치해야 하거나 파일을 생성해야 하는 경우, 이것들은 테라폼의 구성과 별개로 동작
- 프로비저너로 실행된 결과는 테라폼의 상태 파일과 동기화되지 않으므로 프로비저닝에 대한 결과가 항상 같다고 보장할 수 없다 ⇒ 선언적 보장 안됨
- 따라서 프로비저너 사용을 최소화하는 것이 좋다. 프로비저너의 종류에는 파일 복사와 명령어 실행을 위한 file, local-exec, remote-exec
- 인프라 배포 후 애플리케이션 설정 할 수 있는 다양한 방법이 있고 장단점이 있음
- 좀 더 견고하고 안정적이며 신뢰할 수 있는 방법이 무엇일까요? - 참고링크 링크
- 테라폼 코드 userdata 사용
- cloud-init 사용
- Packer 활용
- Provisiner Connections 활용
- 별도의 설정 관리 툴 사용(Chef, Habitat, Puppet 등)
- 이전에는 local-exec provisioners를 통해서 ansible과 연동하여 인프라 배포 후 구성관리를 많이하였으나, 최근에 이러한 부분을 개선하기 위해 terraform-provider-ansible이 제공된다고 합니다
- 프로비저너의 경우 리소스 프로비저닝 이후 동작하도록 구성 가능
- 예를 들어 AWS EC2 생성 후 CLI를 통해 별도 작업 수행 상황을 가정
# main.tf

variable "sensitive_content" {
  default   = "secret"
  #sensitive = true
}

resource "local_file" "foo" {
  content  = upper(var.sensitive_content)
  filename = "${path.module}/foo.bar"

  provisioner "local-exec" {
    command = "echo The content is ${self.content}"
  }

  provisioner "local-exec" {
    command    = "abc"
    on_failure = continue
  }

  provisioner "local-exec" {
    when    = destroy
    command = "echo The deleting filename is ${self.filename}"
  }
}


#
terraform init && terraform plan

#
terraform apply -auto-approve

# main.tf
variable "sensitive_content" {
  default   = "secret"
  sensitive = true
}

resource "local_file" "foo" {
  content  = upper(var.sensitive_content)
  filename = "${path.module}/foo.bar"

  provisioner "local-exec" {
    command = "echo The content is ${self.content}"
  }

  provisioner "local-exec" {
    command    = "abc"
    #on_failure = continue
  }

  provisioner "local-exec" {
    when    = destroy
    command = "echo The deleting filename is ${self.filename}"
  }
}
local-exec 프로비저너
테라폼이 실행되는 환경에서 수행할 커맨드를 정의
- 리눅스나 윈도우등 테라폼을 실행하는 환경에 맞게 커맨드를 정의, 아래 사용하는 인수 값
- **command(**필수) : 실행할 명령줄을 입력하며 << 연산자를 통해 여러 줄의 커맨드 입력 가능
- working_dir(선택) : command의 명령을 실행할 디렉터리를 지정해야 하고 상대/절대 경로로 설정
- interpreter(선택) : 명령을 실행하는 데 필요한 인터프리터를 지정하며, 첫 번째 인수로 인터프리터 이름이고 두 번째부터는 인터프리터 인수 값
- environment(선택) : 실행 시 환경 변수 는 실행 환경의 값을 상속받으면, 추가 또는 재할당하려는 경우 해당 인수에 key = value 형태로 설정
# Unix/Linux/macOS
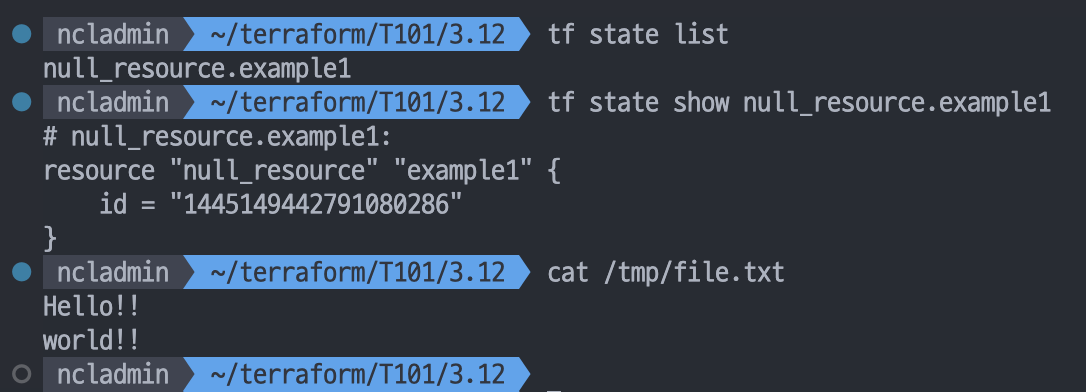
resource "null_resource" "example1" {
provisioner "local-exec" {
command = <<EOF
echo Hello!! > file.txt
echo $ENV >> file.txt
EOF
interpreter = [ "bash" , "-c" ]
working_dir = "/tmp"
environment = {
ENV = "world!!"
}
}
}
# Windows
resource "null_resource" "example1" {
provisioner "local-exec" {
command = <<EOF
Hello!! > file.txt
Get-ChildItem Env:ENV >> file.txt
EOF
interpreter = [ "PowerShell" , "-Command" ]
working_dir = "C:\\windows\temp"
environment = {
ENV = "world!!"
}
}
}
- command의 << 연산자를 통해 다중 라인의 명령을 수행하여 각 환경에 맞는 인터프리터를 지정해 해당 명령을 수행
- Apply 수행 시 이 명령의 실행 위치를 working_dir를 사용해 지정하고 command에서 사용하는 환경 변수에 대해 environment에서 지정
# main.tf

resource "null_resource" "example1" {

  provisioner "local-exec" {
    command = <<EOF
      echo Hello!! > file.txt
      echo $ENV >> file.txt
      EOF

    interpreter = [ "bash" , "-c" ]

    working_dir = "/tmp"

    environment = {
      ENV = "world!!"
    }

  }
}

#
terraform init -upgrade

#
terraform plan && terraform apply -auto-approve
원격지 연결
https://developer.hashicorp.com/terraform/language/resources/provisioners/remote-exec
Provisioner: remote-exec | Terraform | HashiCorp Developer
The `remote-exec` provisioner invokes a script on a remote resource after it is created. This can be used to run a configuration management tool, bootstrap into a cluster, etc. To invoke a local process, see the `local-exec` provisioner instead. The `remot
developer.hashicorp.com
- remote-exec와 file 프로비저너를 사용하기 위해 원격지에 연결할 SSH, WinRM 연결 정의가 필요
- connection 블록 리소스 선언 시, 해당 리소스 내에 구성된 프로비저너에 대해 공통으로 선언되고, 프로비저너 내에 선언되는 경우, 해당 프로비저너에서만 적용
# main.tf
# connection 블록으로 원격지 연결 정의
resource "null_resource" "example1" {

  connection {
    type     = "ssh"
    user     = "root"
    password = var.root_password
    host     = var.host
  }

  provisioner "file" {
    source      = "conf/myapp.conf"
    destination = "/etc/myapp.conf"
  }

  provisioner "file" {
    source      = "conf/myapp.conf"
    destination = "C:/App/myapp.conf"

    connection {
        type     = "winrm"
        user     = "Administrator"
        password = var.admin_password
        host     = var.host
    }
  }
}
file 프로비저너
테라폼을 실행하는 시스템에서 연결 대상으로 파일 또는 디렉터리를 복사하는 데 사용
- 테라폼을 실행하는 시스템에서 연결 대상으로 파일 또는 디렉터리를 복사하는 데 사용
- 사용되는 인수
- source : 소스 파일 또는 디렉터리로, 현재 작업 중인 디렉터리에 대한 상태 경로 또는 절대 경로로 지정할 수 있다. content와 함께 사용할 수 없음
- content : 연결 대상에 복사할 내용을 정의하며 대상이 디렉터리인 경우 tf-file-content 파일이 생성되고, 파일인 경우 해당 파일에 내용이 기록된다. source와 함께 사용할 수 없음
- destination : 필수 항목으로 항상 절대 경로로 지정되어야 하며, 파일 또는 디렉토리
- destination 지정 시 주의해야 할 점은 ssh 연결의 경우 대상 디렉터리가 존재해야 하며, winrm 연결은 디렉터리가 없는 경우 자동으로 생성
- 디렉터리를 대상으로 하는 경우에는 source 경로 형태에 따라 동작에 차이 발생
- destination이 /tmp인 경우 source가 디렉터리로 /foo 처럼 마지막에 /가 없는 경우 대상 디렉터리에 지정한 디렉터리가 업로드되어 연결된 시스템에 /tmp/foo 디렉터리가 업로드
- source가 디렉터리로 /foo/ 처럼 마지막에 /가 포함되는 경우 source 디렉터리 내의 파이란 /tmp 디렉터리에 업로드
# file provisioner example
resource "null_resource" "foo" {

  # myapp.conf 파일이 /etc/myapp.conf 로 업로드
  provisioner "file" {
    source      = "conf/myapp.conf"
    destination = "/etc/myapp.conf"
  }

  # content의 내용이 /tmp/file.log 파일로 생성
  provisioner "file" {
    content     = "ami used: ${self.ami}"
    destination = "/tmp/file.log"
  }

  # configs.d 디렉터리가 /etc/configs.d 로 업로드
  provisioner "file" {
    source      = "conf/configs.d"
    destination = "/etc"
  }

  # apps/app1 디렉터리 내의 파일들만 D:/IIS/webapp1 디렉터리 내에 업로드
  provisioner "file" {
    source      = "apps/app1/"
    destination = "D:/IIS/webapp1"
  }

}
remote-exec 프로비저너
원격지 환경에서 실행할 커맨드와 스크립트를 정의
# remote-exec provisioner example

resource "aws_instance" "web" {
  # ...

  # Establishes connection to be used by all
  # generic remote provisioners (i.e. file/remote-exec)
  connection {
    type     = "ssh"
    user     = "root"
    password = var.root_password
    host     = self.public_ip
  }

  provisioner "file" {
    source      = "script.sh"
    destination = "/tmp/script.sh"
  }

  provisioner "remote-exec" {
    inline = [
      "chmod +x /tmp/script.sh",
      "/tmp/script.sh args",
    ]
  }
}
- 예를 들면 AWS의 EC2 인스턴스를 생성하고 해당 VM에서 명령을 실행하고 패키지를 설치하는 등의 동작을 의미
- 사용하는 인수는 다음과 같고 각 인수는 서로 배타적
- inline : 명령에 대한 목록으로 [ ] 블록 내에 “ “로 묶인 다수의 명령을 , 로 구분해 구성
- script : 로컬의 스크립트 경로를 넣고 원격에 복사해 실행
- scripts : 로컬의 스크립트 경로의 목록으로 [ ] 블록 내에 “ “로 묶인 다수의 스크립트 경로를 , 로 구분해 구성
- script 또는 scripts의 대상 스크립트 실행에 필요한 인수는 관련 구성에서 선언할 수 없으므로 필요할 때 file 프로바이더로 해당 스크립트를 업로드하고 inline 인수를 활용해 스크립트에 인수를 추가
3.13 null_resource 와 terraform_data
테라폼 1.4 버전이 릴리즈되면서 기존 null_resource 리소스를 대체하는 terraform_data 리소스가 추가
null_resource
아무 작업도 수행하지 않는 리소스를 구현
- 이런 리소스가 필요한 이유는 테라폼 프로비저닝 동작을 설계하면서 사용자가 의도적으로 프로비저닝하는 동작을 조율해야 하는 상황이 발생하여, 프로바이더가 제공하는 리소스 수명주기 관리만으로는 이를 해결하기 어려움
- 주로 사용되는 시나리오
- 프로비저닝 수행 과정에서 명령어 실행
- 프로비저너와 함께 사용
- 모듈, 반복문, 데이터 소스, 로컬 변수와 함께 사용
- 출력을 위한 데이터 가공
- 예를 들어 다음의 상황을 가정
- AWS EC2 인스턴스를 프로비저닝하면서 웹서비스를 실행 시키고 싶음
- 웹서비스 설정에는 노출되어야 하는 고정된 외부 IP가 포함된 구성이 필요하다. 따라서 aws_eip 리소스를 생성
- AWS EC2 인스턴스를 프로비저닝하기 위해 aws_instance 리소스 구성 시 앞서 확인한 프로비저너를 활용하여 웹서비스를 실행하고자 함
provider "aws" {
  region = "ap-northeast-2"
}

resource "aws_security_group" "instance" {
  name = "t101sg"

  ingress {
    from_port   = 80
    to_port     = 80
    protocol    = "tcp"
    cidr_blocks = ["0.0.0.0/0"]
  }

  ingress {
    from_port   = 22
    to_port     = 22
    protocol    = "tcp"
    cidr_blocks = ["0.0.0.0/0"]
  }

}

resource "aws_instance" "example" {
  ami                    = "ami-0c9c942bd7bf113a2"
  instance_type          = "t2.micro"
  subnet_id              = "subnet-dbc571b0"
  private_ip             = "172.31.0.100"
  key_name               = "kp-gasida" # 각자 자신의 EC2 SSH Keypair 이름 지정
  vpc_security_group_ids = [aws_security_group.instance.id]

  user_data = <<-EOF
              #!/bin/bash
              echo "Hello, T101 Study" > index.html
              nohup busybox httpd -f -p 80 &
              EOF

  tags = {
    Name = "Single-WebSrv"
  }

}

resource "aws_eip" "myeip" {
  #vpc = true
  instance = aws_instance.example.id
  associate_with_private_ip = "172.31.0.100"
}

resource "null_resource" "echomyeip" {
  provisioner "remote-exec" {
    connection {
      host = aws_eip.myeip.public_ip
      type = "ssh"
      user = "ubuntu"
      private_key =  file("/Users/gasida/.ssh/kp-gasida.pem") # 각자 자신의 EC2 SSH Keypair 파일 위치 지정
      #password = "qwe123"
    }
    inline = [
      "echo ${aws_eip.myeip.public_ip}"
      ]
  }
}

output "public_ip" {
  value       = aws_instance.example.public_ip
  description = "The public IP of the Instance"
}

output "eip" {
  value       = aws_eip.myeip.public_ip
  description = "The EIP of the Instance"
}
- aws_eip가 생성되는 고정된 IP를 할당하기 위해서는 대상인 aws_instance의 id값이 필요
- aws_instance의 프로비저너 동작에서는 aws_eip가 생성하는 속성 값인 public_ip가 필요
# main.tf
# 프로비저너 필요로 설치
terraform plan
terraform init -upgrade

# 실행 : EIP 할당 전 (임시) 유동 공인 IP 출력
terraform plan
terraform apply -auto-approve
...
null_resource.echomyeip (remote-exec): Connected!
null_resource.echomyeip (remote-exec): 13.125.25.238
...
Outputs:
eip = "13.115.13.212"
public_ip = "33.21.123.158"

#
terraform state list
terraform state show aws_eip.myeip
terraform state show aws_instance.example
terraform state show null_resource.echomyeip

# graph 확인 > graph.dot 파일 선택 후 오른쪽 상단 DOT 클릭
terraform graph > graph.dot

# 데이터소스 값 확인
echo "aws_instance.example.public_ip" | terraform console
echo "aws_eip.myeip.public_ip" | terraform console

# 출력된 EC2 퍼블릭IP로 curl 접속 확인
MYIP=$(terraform output -raw eip)
while true; do curl --connect-timeout 1  http://$MYIP/ ; echo "------------------------------"; date; sleep 1; done

# 삭제
terraform destroy -auto-approve
- null_resource는 정의된 속성이 ‘id’가 전부이므로, 선언된 내부의 구성이 변경되더라도 새로운 Plan 과정에서 실행 계획에 포함되지 못함
- 따라서 사용자가 null_resource에 정의된 내용을 강제로 다시 실행하기 위한 인수로 trigger가 제공
- trigger는 임의의 string 형태의 map 데이터를 정의하는데, 정의된 값이 변경되면 null_resource 내부에 정의된 행위를 다시 실행
# trigger 정의와 동작 예제
resource "null_resource" "foo" {
  triggers = {
    ec2_id = aws_instance.bar.id # instance의 id가 변경되는 경우 재실행
  }
  ...생략...
}

resource "null_resource" "bar" {
  triggers = {
    ec2_id = time() # 테라폼으로 실행 계획을 생성할 떄마다 재실행
  }
  ...생략...
}
terraform_data
# main.tf
resource "aws_instance" "web" {
  # ...
}

resource "aws_instance" "database" {
  # ...
}

# A use-case for terraform_data is as a do-nothing container
# for arbitrary actions taken by a provisioner.
resource "terraform_data" "bootstrap" {
  triggers_replace = [
    aws_instance.web.id,
    aws_instance.database.id
  ]

  provisioner "local-exec" {
    command = "bootstrap-hosts.sh"
  }
}

resource "terraform_data" "foo" {
  triggers_replace = [
    aws_instance.foo.id,
    aws_instance.bar.id
  ]

  input = "world"
}

output "terraform_data_output" {
  value = terraform_data.foo.output  # 출력 결과는 "world"
}
- 이 리소스 또한 자체적으로 아무것도 수행하지 않지만 null_resource는 별도의 프로바이더 구성이 필요하다는 점과 비교하여 추가 프로바이더 없이 테라폼 자체에 포함된 기본 수명주기 관리자가 제공된다는 것이 장점
- 사용 시나리오는 기본 null_resourcr와 동일하며 강제 재실행을 위한 trigger_replace와 상태 저장을 위한 input 인수와 input에 저장된 값을 출력하는 output 속성이 제공
- triggers_replace에 정의되는 값이 기존 map 형태에서 tuple로 변경되어 쓰임이 더 간단해졌음
3.14 moved 블록
- 테라폼의 State에 기록되는 리소스 주소의 이름이 변경되면 기존 리소스는 삭제되고 새로운 리소스가 생성됨을 앞서 설명에서 확인
- 하지만 테라폼 리소스를 선언하다 보면 이름을 변경해야 하는 상황이 발생하기도 하는데, 예를 들면 아래와 같음
- 리소스 이름을 변경
- count로 처리하던 반복문을 for_each로 변경
- 리소스가 모듈로 이동하여 참조되는 주소가 변경
- 리소스의 이름은 변경되지만 이미 테라폼으로 프로비저닝된 환경을 그대로 유지하고자 하는 경우 테라폼 1.1 버전부터 moved 블록을 사용 가능
- ‘moved’라는 단어가 의미하는 것처럼 테라폼 State에서 옮겨진 대상의 이전 주소와 새 주소를 알리는 역할을 수행
- moved 블록 이전에는 State를 직접 편집하는 terraform state mv 명령을 사용하여 State를 건드려야 하는 부담이 있었다면, moved 블록은 State에 접근 권한이 없는 사용자라도 변경되는 주소를 리소스 영향 없이 반영 가능
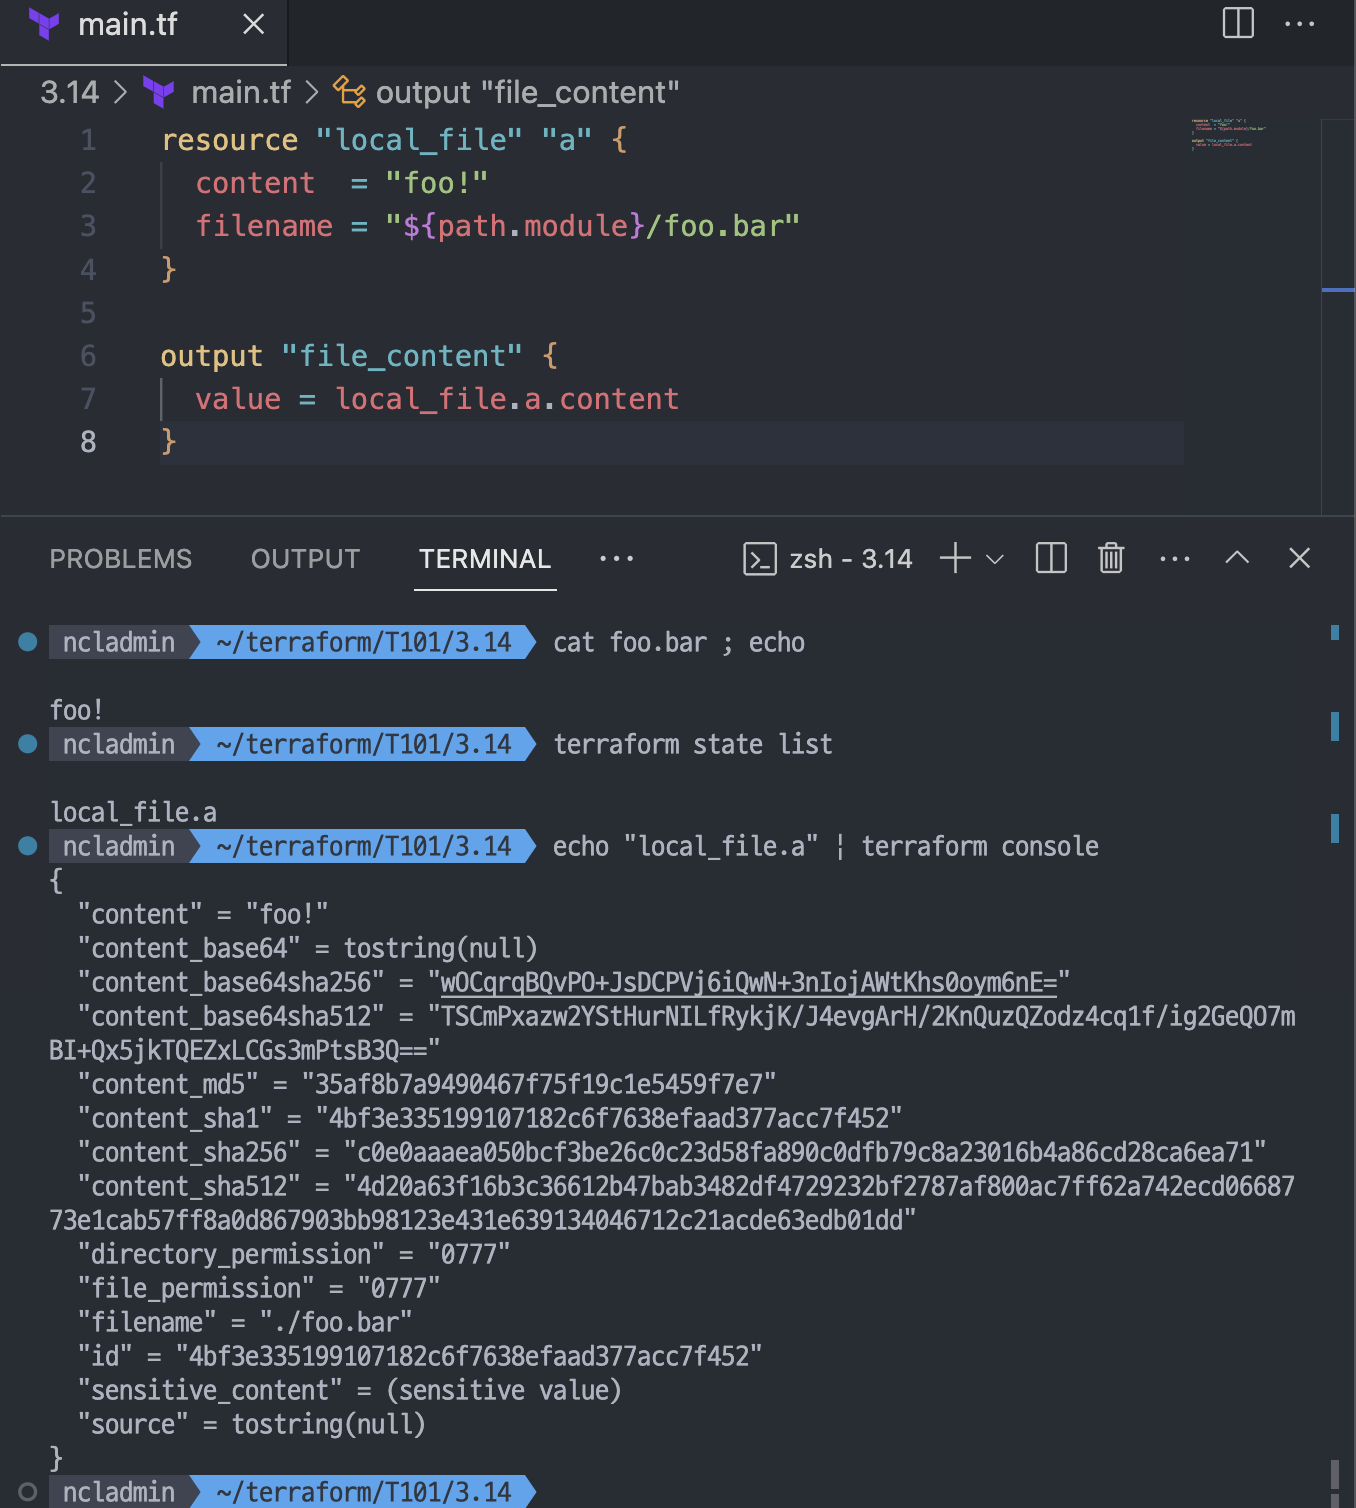
# main.tf
resource "local_file" "b" {
  content  = "foo!"
  filename = "${path.module}/foo.bar"
}

moved {
  from = local_file.a
  to   = local_file.b
}

output "file_content" {
  value = local_file.b.content
}

#
terraform plan
...
Terraform will perform the following actions:

  # local_file.a has moved to local_file.b
    resource "local_file" "b" {
        id                   = "4bf3e335199107182c6f7638efaad377acc7f452"
        # (10 unchanged attributes hidden)
    }

Plan: 0 to add, 0 to change, 0 to destroy.

#
terraform apply -auto-approve
terraform state list
echo "local_file.b" | terraform console
echo "local_file.b.id" | terraform console
"4bf3e335199107182c6f7638efaad377acc7f452"

# mian.tf file refactoring
resource "local_file" "b" {
  content  = "foo!"
  filename = "${path.module}/foo.bar"
}

# moved {
#   from = local_file.a
#   to   = local_file.b
# }

output "file_content" {
  value = local_file.b.content
}
3.15 CLI를 위한 시스템 환경 변수
테라폼은 환경 변수를 통해 실행 방식과 출력 내용에 대한 옵션을 조절할 수 있다
Mac/리눅스/유닉스: export <환경 변수 이름>=<값>
Windows CMD: set <환경 변수 이름>=<값>
Windows PowerShell: $Env:<환경 변수 이름>='<값>'
- 시스템 환경 변수를 설정하면, 영구적으로 로컬 환경에 적용되는 옵션이나 별도 서버 환경에서 실행하기 위한 옵션을 부여 가능
- 이를 통해 로컬 작업 환경과 다른 환경 구성에서만 사용될 특정 옵션을 적용
TF_LOG
테라폼의 stderr 로그에 대한 레벨을 정의
TF_LOG=info terraform plan
...
- trace, debug, info, warn, error, off를 설정할 수 있고 관련 환경 변수가 없는 경우 off 와 동일
- 디버깅을 위한 로그 관련 환경 변수 설명은 아래와 같음
- TF_LOG: 로깅 레벨 지정 또는 해제
- TF_LOG_PATH: 로그 출력 파일 위치 지정
- TF_LOG_CORE: TF_LOG와 별도로 테라폼 자체 코어에 대한 로깅 레벨 지정 또는 해제
- TF_LOG_PROVIDER: TF_LOG와 별도로 테라폼에서 사용하는 프로바이더에 대한 로깅 레벨 지정 또는 해제
- 환경에 맞게 TF_LOG를 info로 설정하고, terraform plan 동작을 실행하면 테라폼 출력에 관련 로그가 출력
TF_INPUT
값을 false 또는 0으로 설정하면 테라폼 실행 시 인수에 -input=false 를 추가한 것과 동일한 수행 결과를 확인
TF_INPUT=0 terraform plan
Error : No value for required variable
- 환경에 맞게 TF_INPUT을 0으로 설정하고 terraform plan 동작 실행하면 입력받는 동작을 수행하지 않으므로 입력 변수를 입력해야 하는 경우 에러가 출력
TF_VAR_name
- TF_VAR_<변수 이름>을 사용하면 입력 시 또는 default로 선언된 변수 값을 대체한다 ← 3.6절에서 확인!
TF_CLI_ARGS / TF_CLI_ARGS_subcommand
테라폼 실행 시 추가할 인수를 정의
# TF_CLI_ARGS="-input=false" terraform apply -auto-approve 는 terraform apply -input=false -auto-approve 와 같다
TF_CLI_ARGS="-input=false" terraform apply -auto-approve
Error: No value for required variable

# TF_CLI_ARGS_apply로 인수를 정의하면 terraform apply 커맨드 수행 시에만 동작한다
export TF_CLI_ARGS_apply="-input=false"
terraform apply -auto-approve
<에러>

terraform plan
<정상 계획 예측 출력>
TF_DATA_DIR
State 저장 백엔드 설정과 같은 작업 디렉터리별 데이터를 보관하는 위치를 지정
TF_DATA_DIR=./.terraform_tmp terraform plan
Error: Required plugins anr not installed
- 이 데이터는 .terraform 디렉터리 위치에 기록되지만 TF_DATA_DIR에 경로가 정의되면 기본 경로를 대체하여 사용
- 일관된 테라폼 사용을 위해서 해당 변수는 실행 시마다 일관되게 적용될 수 있도록 설정하는 것이 중요
- 설정 값이 이전 실행 시에만 적용되는 경우 init 명령으로 수행된 모듈, 아티팩트 등의 파일을 찾지 못함
- 이미 terraform init이 수행된 상태에서 TF_DATA_DIR로 경로를 재지정하고 실행하는 경우 플러그인 설치가 필요하다는 메시지 출력을 확인 가능
지금까지 Terraform 101 Study 3주차 내용이었습니다
테라폼을 학습하시는 분들에게 도움이 되었으면 좋을 것 같습니다 🤗
긴 글 읽어주셔서 감사드립니다
장마가 시작 되었네요!
좋은 주말 보내세요
감사합니다 😍
'Terraform' 카테고리의 다른 글
| Terraform 101 Study - 5주차 (0) | 2024.07.12 |
|---|---|
| Terraform 101 Study - 4주차 (0) | 2024.07.07 |
| Terraform 101 Study - 2주차 (0) | 2024.06.23 |
| Terraform 101 Study - 1주차 (0) | 2024.06.16 |
| [Terraform] 2장. 왜 테라폼인가? (77~82p) (0) | 2021.07.13 |