
안녕하세요 늑대양 입니다

Terraform 관련 기초 스터디(Terraform 101 Study)를 참여하게 되어 해당 내용들을 주차별로 정리하고자 합니다.
해당 스터디는 CloudNet@ 팀의 Gasida 님이 호스트를 맡아 주셨으며,
https://gasidaseo.notion.site/CloudNet-Blog-c9dfa44a27ff431dafdd2edacc8a1863
CloudNet@ Blog | Notion
CloudNet@ 팀에서 Cloud Infra & Network 기술에 대한 정보를 공유하는 블로그 입니다.
gasidaseo.notion.site
스터디 메인 교재는 "테라폼으로 시작하는 IaC" 도서를 기준으로 진행 됩니다.
https://www.yes24.com/Product/Goods/119179333
테라폼으로 시작하는 IaC - 예스24
“현업에서 요구하는 진짜 IaC 사용법”테라폼으로 배우는 인프라 운영의 모든 것IaC는 효율적인 데브옵스와 클라우드 자동화 구축을 위해 꼭 필요한 기술로 각광받고 있다. 그중에서도 테라폼
www.yes24.com
아래의 내용은 6주차 - 테라폼으로 AWS EKS 배포 내용을 다루고 있습니다.

6주차 - 테라폼으로 AWS EKS 배포
Amazon EKS Blueprints for Terraform*
Amazon EKS Blueprints for Terraform 소개
소개 URL: https://aws-ia.github.io/terraform-aws-eks-blueprints/
Amazon EKS Blueprints for Terraform
Amazon EKS Blueprints for Terraform Welcome to Amazon EKS Blueprints for Terraform! This project contains a collection of Amazon EKS cluster patterns implemented in Terraform that demonstrate how fast and easy it is for customers to adopt Amazon EKS. The p
aws-ia.github.io
FAQ URL: https://aws-ia.github.io/terraform-aws-eks-blueprints/faq/
FAQ - Amazon EKS Blueprints for Terraform
Frequently Asked Questions Timeouts on destroy Customers who are deleting their environments using terraform destroy may see timeout errors when VPCs are being deleted. This is due to a known issue in the vpc-cni Customers may face a situation where ENIs t
aws-ia.github.io
EKS Blueprints for Terraform has been designed to be consumed in the following manners:
- Reference:
- Users can refer to the patterns and snippets provided to help guide them to their desired solution.
- Users will typically view how the pattern or snippet is configured to achieve the desired end result and then replicate that in their environment.
- Copy & Paste:
- Users can copy and paste the patterns and snippets into their own environment, using EKS Blueprints as the starting point for their implementation.
- Users can then adapt the initial pattern to customize it to their specific needs.
- Consideration:
- EKS Blueprints for Terraform are not intended to be consumed as-is directly from this project.
- In "Terraform speak" - the patterns and snippets provided in this repository are not designed to be consumed as a Terraform module.
- Therefore, the patterns provided only contain variables when certain information is required to deploy the pattern (i.e. - a Route53 hosted zone ID, or ACM certificate ARN) and generally use local variables.
- If you wish to deploy the patterns into a different region or with other changes, it is recommended that you make those modifications locally before applying the pattern.
- EKS Blueprints for Terraform will not expose variables and outputs in the same manner that Terraform modules follow in order to avoid confusion around the consumption model.
- However, we do have a number of Terraform modules that were created to support EKS Blueprints in addition to the community hosted modules.
- Please see the respective projects for more details on the modules constructed to support EKS Blueprints for Terraform; those projects are listed below.
- terraform-aws-eks-blueprint-addon
- terraform-aws-eks-blueprint-addons
- terraform-aws-eks-blueprtins-teams
- GitOps
- Data on EKS
- Observability Accelerator
- Karpenter Blueprints
- karpenter-blueprints
고려사항
- EKS Blueprints for Terraform are not intended to be consumed as-is directly from this project.
- 그대로 사용은 의도된 것이 아님
- In "Terraform speak" - the patterns and snippets provided in this repository are not designed to be consumed as a Terraform module.
- 패턴과 스니펫은 Terraform 모듈로 사용하도록 설계되지 않음
- Therefore, the patterns provided only contain variables when certain information is required to deploy the pattern (i.e. - a Route53 hosted zone ID, or ACM certificate ARN) and generally use local variables.
- If you wish to deploy the patterns into a different region or with other changes, it is recommended that you make those modifications locally before applying the pattern.
- 일반적으로 Local 블록을 통해 변경하고, 특정 정보가 필요한 경우(R53 호스트영역 ID 등)만 variables 블록을 사용
- EKS Blueprints for Terraform will not expose variables and outputs in the same manner that Terraform modules follow in order to avoid confusion around the consumption model.
- 복잡성을 줄이기 위해 variables 과 outputs 을 최대한 노출하지 않음
- However, we do have a number of Terraform modules that were created to support EKS Blueprints in addition to the community hosted modules.
- Please see the respective projects for more details on the modules constructed to support EKS Blueprints for Terraform; those projects are listed below.
- EKS Blueprints 지원을 위해 제작한 모듈은 아래와 같음
주의사항 - Terraform Caveats
- EKS Blueprints for Terraform does not intend to teach users the recommended practices for Terraform nor does it offer guidance on how users should structure their Terraform projects.
- 권장 사례나 테라폼 구성 지침을 제공하지 않습니다.
- The patterns provided are intended to show users how they can achieve a defined architecture or configuration in a way that they can quickly and easily get up and running to start interacting with that pattern.
- Therefore, there are a few caveats users should be aware of when using EKS Blueprints for Terraform.
- 최대한 빠르고 쉽게 목표 패턴 실행에 목적
- We recognize that most users will already have an existing VPC in a separate Terraform workspace.
- However, the patterns provided come complete with a VPC to ensure a stable, deployable example that has been tested and validated.
- 사용자가 기존 VPC가 있지만, 제공되는 패턴에서 안정적인 배포 보장을 위해 신규 VPC를 배포
- Hashicorp does not recommend providing computed values in provider blocks , which means that the cluster configuration should be defined in a workspace separate from the resources deployed onto the cluster (i.e. - addons).
- 분리 권고
- However, to simplify the pattern experience, we have defined everything in one workspace and provided instructions to provision the patterns using a targeted apply approach.
- Users are encouraged to investigate a Terraform project structure that suites their needs.
- EKS Blueprints for Terraform does not have an opinion in this matter and will defer to Hashicorp's guidance.
- 단순화 하여 모든 것을 하나의 작업 공간에서 정의하고 배포함.
- Patterns are not intended to be consumed in-place in the same manner that one would consume a module.
- Therefore, we do not provide variables and outputs to expose various levels of configuration for the examples.
- Users can modify the pattern locally after cloning to suite their requirements.
- Local 블록 수정
- Please see the FAQ section on authenticating Kubernetes based providers (kubernetes, helm, kubectl) to Amazon EKS clusters regarding the use of static tokens versus dynamic tokens using the awscli
terraform-aws-eks-blueprint-addon
https://github.com/aws-ia/terraform-aws-eks-blueprints-addon
GitHub - aws-ia/terraform-aws-eks-blueprints-addon: Terraform AWS module which creates an EKS addon (helm release + IRSA)
Terraform AWS module which creates an EKS addon (helm release + IRSA) - aws-ia/terraform-aws-eks-blueprints-addon
github.com
- Terraform module which can provision an addon using the Terraform helm_release resource in addition to an IAM role for service account (IRSA).
- 서비스 계정(IRSA)에 대한 IAM 역할 외에도 Terraform 리소스를 사용하여 애드온을 프로비저닝할 수 있는 Terraform 모듈
terraform-aws-eks-blueprint-addons
https://github.com/aws-ia/terraform-aws-eks-blueprints-addons
GitHub - aws-ia/terraform-aws-eks-blueprints-addons: Terraform module which provisions addons on Amazon EKS clusters
Terraform module which provisions addons on Amazon EKS clusters - aws-ia/terraform-aws-eks-blueprints-addons
github.com
- Terraform module which can provision multiple addons; both EKS addons using the aws_eks_addon resource as well as Helm chart based addons using the terraform-aws-eks-blueprint-addon module.
- 여러 애드온을 프로비저닝할 수 있는 Terraform 모듈입니다 - ‘aws_eks_addon 기반 애드온’ + ‘terraform-aws-eks-blueprint-addon 모듈 사용 헬름 차트 기반 애드온’
terraform-aws-eks-blueprints-teams
https://github.com/aws-ia/terraform-aws-eks-blueprints-teams
GitHub - aws-ia/terraform-aws-eks-blueprints-teams: Configure and deploy Team based multi-tenant EKS clusters.
Configure and deploy Team based multi-tenant EKS clusters. - aws-ia/terraform-aws-eks-blueprints-teams
github.com
- Terraform module that creates Kubernetes multi-tenancy resources and configurations, allowing both administrators and application developers to access only the resources which they are responsible for.
- 관리자와 애플리케이션 개발자 모두 자신이 담당하는 리소스에만 액세스할 수 있도록 Kubernetes 멀티테넌시 리소스 및 구성을 생성하는 Terraform 모듈.
[실습] Karpenter on EKS Fargate
This pattern demonstrates how to provision Karpenter on a serverless cluster(serverless data plane) using Fargate Profiles.
Guid URL: https://aws-ia.github.io/terraform-aws-eks-blueprints/patterns/karpenter/
Karpenter on EKS Fargate - Amazon EKS Blueprints for Terraform
Karpenter on EKS Fargate This pattern demonstrates how to provision Karpenter on a serverless cluster (serverless data plane) using Fargate Profiles. Deploy See here for the prerequisites and steps to deploy this pattern. Validate Test by listing the nodes
aws-ia.github.io
사전 준비
Guide URL: https://aws-ia.github.io/terraform-aws-eks-blueprints/getting-started/
Getting Started - Amazon EKS Blueprints for Terraform
Getting Started This getting started guide will help you deploy your first pattern using EKS Blueprints. Prerequisites Ensure that you have installed the following tools locally: Deploy For consuming EKS Blueprints, please see the Consumption section. For
aws-ia.github.io
- awscli(IAM 자격증명)
- terraform
- kubectl
- helm
aws --version
terraform --version
kubectl version --client=true
helm version

코드 준비
git clone https://github.com/aws-ia/terraform-aws-eks-blueprints
cd terraform-aws-eks-blueprints/patterns/karpenter
tree
# version.tf
terraform {
  required_version = ">= 1.3"

  required_providers {
    aws = {
      source  = "hashicorp/aws"
      version = ">= 5.34"
    }
    helm = {
      source  = "hashicorp/helm"
      version = ">= 2.9"
    }
    kubernetes = {
      source  = "hashicorp/kubernetes"
      version = ">= 2.20"
    }
  }

  # ##  Used for end-to-end testing on project; update to suit your needs
  # backend "s3" {
  #   bucket = "terraform-ssp-github-actions-state"
  #   region = "us-west-2"
  #   key    = "e2e/karpenter/terraform.tfstate"
  # }
}
# main.tf
provider "aws" {
  region = local.region
}

# Required for public ECR where Karpenter artifacts are hosted
provider "aws" {
  region = "us-east-1"
  alias  = "virginia"
}

provider "kubernetes" {
  host                   = module.eks.cluster_endpoint
  cluster_ca_certificate = base64decode(module.eks.cluster_certificate_authority_data)

  exec {
    api_version = "client.authentication.k8s.io/v1beta1"
    command     = "aws"
    # This requires the awscli to be installed locally where Terraform is executed
    args = ["eks", "get-token", "--cluster-name", module.eks.cluster_name]
  }
}

provider "helm" {
  kubernetes {
    host                   = module.eks.cluster_endpoint
    cluster_ca_certificate = base64decode(module.eks.cluster_certificate_authority_data)

    exec {
      api_version = "client.authentication.k8s.io/v1beta1"
      command     = "aws"
      # This requires the awscli to be installed locally where Terraform is executed
      args = ["eks", "get-token", "--cluster-name", module.eks.cluster_name]
    }
  }
}

data "aws_ecrpublic_authorization_token" "token" {
  provider = aws.virginia
}

data "aws_availability_zones" "available" {}

locals {
  name   = "t101-${basename(path.cwd)}"
  region = "ap-northeast-2"

  vpc_cidr = "10.10.0.0/16"
  azs      = slice(data.aws_availability_zones.available.names, 0, 3)

  tags = {
    Blueprint  = local.name
    GithubRepo = "github.com/aws-ia/terraform-aws-eks-blueprints"
  }
}

################################################################################
# Cluster
################################################################################

module "eks" {
  source  = "terraform-aws-modules/eks/aws"
  version = "~> 20.11"

  cluster_name                   = local.name
  cluster_version                = "1.30"
  cluster_endpoint_public_access = true

  vpc_id     = module.vpc.vpc_id
  subnet_ids = module.vpc.private_subnets

  # Fargate profiles use the cluster primary security group so these are not utilized
  create_cluster_security_group = false
  create_node_security_group    = false

  enable_cluster_creator_admin_permissions = true

  fargate_profiles = {
    karpenter = {
      selectors = [
        { namespace = "karpenter" }
      ]
    }
    kube_system = {
      name = "kube-system"
      selectors = [
        { namespace = "kube-system" }
      ]
    }
  }

  tags = merge(local.tags, {
    # NOTE - if creating multiple security groups with this module, only tag the
    # security group that Karpenter should utilize with the following tag
    # (i.e. - at most, only one security group should have this tag in your account)
    "karpenter.sh/discovery" = local.name
  })
}

################################################################################
# EKS Blueprints Addons
################################################################################

module "eks_blueprints_addons" {
  source  = "aws-ia/eks-blueprints-addons/aws"
  version = "~> 1.16"

  cluster_name      = module.eks.cluster_name
  cluster_endpoint  = module.eks.cluster_endpoint
  cluster_version   = module.eks.cluster_version
  oidc_provider_arn = module.eks.oidc_provider_arn

  # We want to wait for the Fargate profiles to be deployed first
  create_delay_dependencies = [for prof in module.eks.fargate_profiles : prof.fargate_profile_arn]

  eks_addons = {
    coredns = {
      configuration_values = jsonencode({
        computeType = "Fargate"
        # Ensure that the we fully utilize the minimum amount of resources that are supplied by
        # Fargate https://docs.aws.amazon.com/eks/latest/userguide/fargate-pod-configuration.html
        # Fargate adds 256 MB to each pod's memory reservation for the required Kubernetes
        # components (kubelet, kube-proxy, and containerd). Fargate rounds up to the following
        # compute configuration that most closely matches the sum of vCPU and memory requests in
        # order to ensure pods always have the resources that they need to run.
        resources = {
          limits = {
            cpu = "0.25"
            # We are targeting the smallest Task size of 512Mb, so we subtract 256Mb from the
            # request/limit to ensure we can fit within that task
            memory = "256M"
          }
          requests = {
            cpu = "0.25"
            # We are targeting the smallest Task size of 512Mb, so we subtract 256Mb from the
            # request/limit to ensure we can fit within that task
            memory = "256M"
          }
        }
      })
    }
    vpc-cni    = {}
    kube-proxy = {}
  }

  enable_karpenter = true

  karpenter = {
    repository_username = data.aws_ecrpublic_authorization_token.token.user_name
    repository_password = data.aws_ecrpublic_authorization_token.token.password
  }

  karpenter_node = {
    # Use static name so that it matches what is defined in `karpenter.yaml` example manifest
    iam_role_use_name_prefix = false
  }

  tags = local.tags
}

resource "aws_eks_access_entry" "karpenter_node_access_entry" {
  cluster_name      = module.eks.cluster_name
  principal_arn     = module.eks_blueprints_addons.karpenter.node_iam_role_arn
  kubernetes_groups = []
  type              = "EC2_LINUX"
}

################################################################################
# Supporting Resources
################################################################################

module "vpc" {
  source  = "terraform-aws-modules/vpc/aws"
  version = "~> 5.0"

  name = local.name
  cidr = local.vpc_cidr

  azs             = local.azs
  private_subnets = [for k, v in local.azs : cidrsubnet(local.vpc_cidr, 4, k)]
  public_subnets  = [for k, v in local.azs : cidrsubnet(local.vpc_cidr, 8, k + 48)]

  enable_nat_gateway = true
  single_nat_gateway = true

  public_subnet_tags = {
    "kubernetes.io/role/elb" = 1
  }

  private_subnet_tags = {
    "kubernetes.io/role/internal-elb" = 1
    # Tags subnets for Karpenter auto-discovery
    "karpenter.sh/discovery" = local.name
  }

  tags = local.tags
}
# outputs.tf
output "configure_kubectl" {
  description = "Configure kubectl: make sure you're logged in with the correct AWS profile and run the following command to update your kubeconfig"
  value       = "aws eks --region ${local.region} update-kubeconfig --name ${module.eks.cluster_name}"
}
(참고) Slide Fuction
https://developer.hashicorp.com/terraform/language/functions/slice
slice - Functions - Configuration Language | Terraform | HashiCorp Developer
The slice function extracts some consecutive elements from within a list.
developer.hashicorp.com
# slice extracts some consecutive elements from within a list.
# startindex is inclusive, while endindex is exclusive.
# This function returns an error if either index is outside the bounds of valid indices for the given list.
slice(list, startindex, endindex)

# Examples
> slice(["a", "b", "c", "d"], 1, 3)
[
  "b",
  "c",
]
Init process
# tf init
terraform init
tree .terraform
cat .terraform/modules/modules.json | jq
tree .terraform/providers/registry.terraform.io/hashicorp -L 2
VPC 배포
# VPC 정보 확인
aws ec2 describe-vpcs --filter 'Name=isDefault,Values=false' --output yaml

# vpc 배포 : 3분 소요
terraform apply -target="module.vpc" -auto-approve

# 배포 확인
terraform state list
data.aws_availability_zones.available
module.vpc.aws_default_network_acl.this[0]
module.vpc.aws_default_route_table.default[0]
module.vpc.aws_default_security_group.this[0]
module.vpc.aws_eip.nat[0]
module.vpc.aws_internet_gateway.this[0]
module.vpc.aws_nat_gateway.this[0]
module.vpc.aws_route.private_nat_gateway[0]
module.vpc.aws_route.public_internet_gateway[0]
module.vpc.aws_route_table.private[0]
module.vpc.aws_route_table.public[0]
module.vpc.aws_route_table_association.private[0]
module.vpc.aws_route_table_association.private[1]
module.vpc.aws_route_table_association.private[2]
module.vpc.aws_route_table_association.public[0]
module.vpc.aws_route_table_association.public[1]
module.vpc.aws_route_table_association.public[2]
module.vpc.aws_subnet.private[0]
module.vpc.aws_subnet.private[1]
module.vpc.aws_subnet.private[2]
module.vpc.aws_subnet.public[0]
module.vpc.aws_subnet.public[1]
module.vpc.aws_subnet.public[2]
module.vpc.aws_vpc.this[0]

terraform show
...

# VPC 정보 확인
aws ec2 describe-vpcs --filter 'Name=isDefault,Values=false' --output yaml

# 상세 정보 확인
echo "data.aws_availability_zones.available" | terraform console
{
  "all_availability_zones" = tobool(null)
  "exclude_names" = toset(null) /* of string */
  "exclude_zone_ids" = toset(null) /* of string */
  "filter" = toset(null) /* of object */
  "group_names" = toset([
    "ap-northeast-2",
  ])
  "id" = "ap-northeast-2"
  "names" = tolist([
    "ap-northeast-2a",
    "ap-northeast-2b",
    "ap-northeast-2c",
    "ap-northeast-2d",
  ])
  "state" = tostring(null)
  "timeouts" = null /* object */
  "zone_ids" = tolist([
    "apne2-az1",
    "apne2-az2",
    "apne2-az3",
    "apne2-az4",
  ])
}

terraform state show 'module.vpc.aws_vpc.this[0]'
VPCID=<각자 자신의 VPC ID>
aws ec2 describe-subnets --filters "Name=vpc-id,Values=$VPCID" | jq
aws ec2 describe-subnets --filters "Name=vpc-id,Values=$VPCID" --output text

# public 서브넷과 private 서브넷 CIDR 확인
## private_subnets = [for k, v in local.azs : cidrsubnet(local.vpc_cidr, 4, k)]
## public_subnets  = [for k, v in local.azs : cidrsubnet(local.vpc_cidr, 8, k + 48)]
terraform state show 'module.vpc.aws_subnet.public[0]'
terraform state show 'module.vpc.aws_subnet.private[0]'


EKS 배포
# EKS 배포 : 13분 소요
terraform apply -target="module.eks" -auto-approve

# 배포 확인
terraform state list
module.eks.data.aws_caller_identity.current
module.eks.data.aws_iam_policy_document.assume_role_policy[0]
module.eks.data.aws_iam_session_context.current
module.eks.data.aws_partition.current
module.eks.data.tls_certificate.this[0]
module.eks.aws_cloudwatch_log_group.this[0]
module.eks.aws_ec2_tag.cluster_primary_security_group["Blueprint"]
module.eks.aws_ec2_tag.cluster_primary_security_group["GithubRepo"]
module.eks.aws_ec2_tag.cluster_primary_security_group["karpenter.sh/discovery"]
module.eks.aws_eks_access_entry.this["cluster_creator"]
module.eks.aws_eks_access_policy_association.this["cluster_creator_admin"]
module.eks.aws_eks_cluster.this[0]
module.eks.aws_iam_openid_connect_provider.oidc_provider[0]
module.eks.aws_iam_policy.cluster_encryption[0]
module.eks.aws_iam_role.this[0]
module.eks.aws_iam_role_policy_attachment.cluster_encryption[0]
module.eks.aws_iam_role_policy_attachment.this["AmazonEKSClusterPolicy"]
module.eks.aws_iam_role_policy_attachment.this["AmazonEKSVPCResourceController"]
module.eks.time_sleep.this[0]
module.eks.module.fargate_profile["karpenter"].data.aws_caller_identity.current
module.eks.module.fargate_profile["karpenter"].data.aws_iam_policy_document.assume_role_policy[0]
module.eks.module.fargate_profile["karpenter"].data.aws_partition.current
module.eks.module.fargate_profile["karpenter"].data.aws_region.current
module.eks.module.fargate_profile["karpenter"].aws_eks_fargate_profile.this[0]
module.eks.module.fargate_profile["karpenter"].aws_iam_role.this[0]
module.eks.module.fargate_profile["karpenter"].aws_iam_role_policy_attachment.this["AmazonEKSFargatePodExecutionRolePolicy"]
module.eks.module.fargate_profile["karpenter"].aws_iam_role_policy_attachment.this["AmazonEKS_CNI_Policy"]
module.eks.module.fargate_profile["kube_system"].data.aws_caller_identity.current
module.eks.module.fargate_profile["kube_system"].data.aws_iam_policy_document.assume_role_policy[0]
module.eks.module.fargate_profile["kube_system"].data.aws_partition.current
module.eks.module.fargate_profile["kube_system"].data.aws_region.current
module.eks.module.fargate_profile["kube_system"].aws_eks_fargate_profile.this[0]
module.eks.module.fargate_profile["kube_system"].aws_iam_role.this[0]
module.eks.module.fargate_profile["kube_system"].aws_iam_role_policy_attachment.this["AmazonEKSFargatePodExecutionRolePolicy"]
module.eks.module.fargate_profile["kube_system"].aws_iam_role_policy_attachment.this["AmazonEKS_CNI_Policy"]
module.eks.module.kms.data.aws_caller_identity.current[0]
module.eks.module.kms.data.aws_iam_policy_document.this[0]
module.eks.module.kms.data.aws_partition.current[0]
module.eks.module.kms.aws_kms_alias.this["cluster"]
module.eks.module.kms.aws_kms_key.this[0]

terraform output
configure_kubectl = "aws eks --region ap-northeast-2 update-kubeconfig --name t101-karpenter"

# EKS 자격증명
## aws eks --region <REGION> update-kubeconfig --name <CLUSTER_NAME> --alias <CLUSTER_NAME>
aws eks --region ap-northeast-2 update-kubeconfig --name t101-karpenter
cat ~/.kube/config

# (참고) context name 변경
kubectl config rename-context "arn:aws:eks:ap-northeast-2:$(aws sts get-caller-identity --query 'Account' --output text):cluster/t101-karpenter" "T101-Lab"

# k8s 노드, 파드 정보 확인
kubectl cluster-info
kubectl get node
kubectl get pod -A

# 상세 정보 확인
terraform show
...
terraform state list
terraform state show 'module.eks.data.aws_caller_identity.current'
terraform state show 'module.eks.data.aws_iam_session_context.current'

terraform state show 'module.eks.aws_eks_cluster.this[0]'
terraform state show 'module.eks.data.tls_certificate.this[0]'
terraform state show 'module.eks.aws_cloudwatch_log_group.this[0]'
terraform state show 'module.eks.aws_eks_access_entry.this["cluster_creator"]'
terraform state show 'module.eks.aws_iam_openid_connect_provider.oidc_provider[0]'
terraform state show 'module.eks.data.aws_partition.current'
terraform state show 'module.eks.aws_iam_policy.cluster_encryption[0]'
terraform state show 'module.eks.aws_iam_role.this[0]'

terraform state show 'module.eks.time_sleep.this[0]'
terraform state show 'module.eks.module.kms.aws_kms_key.this[0]'
terraform state show 'module.eks.module.fargate_profile["kube_system"].aws_eks_fargate_profile.this[0]'
terraform state show 'module.eks.module.fargate_profile["karpenter"].aws_eks_fargate_profile.this[0]'


Fargate 소개
EKS(컨트롤 플레인) + Fargate(데이터 플레인)의 완전한 서버리스화(=AWS 관리형)
참고 URL: https://www.eksworkshop.com/docs/fundamentals/fargate/
Fargate | EKS Workshop
Leverage AWS Fargate, the serverless compute engine for containers, with Amazon Elastic Kubernetes Service.
www.eksworkshop.com


- Cluster Autoscaler 불필요, VM 수준의 격리 가능(VM isolation at Pod Level)
- 파게이트 프로파일(파드가 사용할 서브넷, 네임스페이스, 레이블 조건)을 생성하여 지정한 파드가 파게이트에서 동작하게 함
- EKS 는 스케줄러가 특정 조건을 기준으로 어느 노드에 파드를 동작시킬지 결정, 혹은 특정 설정으로 특정 노드에 파드가 동작하게 가능함

addon 배포 & karpenter helm 배포
# 배포 : 2분 소요
terraform apply -auto-approve

# 확인
terraform state list
data.aws_ecrpublic_authorization_token.token
aws_eks_access_entry.karpenter_node_access_entry
module.eks_blueprints_addons.data.aws_caller_identity.current
module.eks_blueprints_addons.data.aws_eks_addon_version.this["coredns"]
module.eks_blueprints_addons.data.aws_eks_addon_version.this["kube-proxy"]
module.eks_blueprints_addons.data.aws_eks_addon_version.this["vpc-cni"]
module.eks_blueprints_addons.data.aws_iam_policy_document.karpenter[0]
module.eks_blueprints_addons.data.aws_iam_policy_document.karpenter_assume_role[0]
module.eks_blueprints_addons.data.aws_partition.current
module.eks_blueprints_addons.data.aws_region.current
module.eks_blueprints_addons.aws_cloudwatch_event_rule.karpenter["health_event"]
module.eks_blueprints_addons.aws_cloudwatch_event_rule.karpenter["instance_rebalance"]
module.eks_blueprints_addons.aws_cloudwatch_event_rule.karpenter["instance_state_change"]
module.eks_blueprints_addons.aws_cloudwatch_event_rule.karpenter["spot_interupt"]
module.eks_blueprints_addons.aws_cloudwatch_event_target.karpenter["health_event"]
module.eks_blueprints_addons.aws_cloudwatch_event_target.karpenter["instance_rebalance"]
module.eks_blueprints_addons.aws_cloudwatch_event_target.karpenter["instance_state_change"]
module.eks_blueprints_addons.aws_cloudwatch_event_target.karpenter["spot_interupt"]
module.eks_blueprints_addons.aws_eks_addon.this["coredns"]
module.eks_blueprints_addons.aws_eks_addon.this["kube-proxy"]
module.eks_blueprints_addons.aws_eks_addon.this["vpc-cni"]
module.eks_blueprints_addons.aws_iam_instance_profile.karpenter[0]
module.eks_blueprints_addons.aws_iam_role.karpenter[0]
module.eks_blueprints_addons.aws_iam_role_policy_attachment.karpenter["AmazonEC2ContainerRegistryReadOnly"]
module.eks_blueprints_addons.aws_iam_role_policy_attachment.karpenter["AmazonEKSWorkerNodePolicy"]
module.eks_blueprints_addons.aws_iam_role_policy_attachment.karpenter["AmazonEKS_CNI_Policy"]
module.eks_blueprints_addons.time_sleep.this
module.eks_blueprints_addons.module.karpenter.data.aws_caller_identity.current[0]
module.eks_blueprints_addons.module.karpenter.data.aws_iam_policy_document.assume[0]
module.eks_blueprints_addons.module.karpenter.data.aws_iam_policy_document.this[0]
module.eks_blueprints_addons.module.karpenter.data.aws_partition.current[0]
module.eks_blueprints_addons.module.karpenter.aws_iam_policy.this[0]
module.eks_blueprints_addons.module.karpenter.aws_iam_role.this[0]
module.eks_blueprints_addons.module.karpenter.aws_iam_role_policy_attachment.this[0]
module.eks_blueprints_addons.module.karpenter.helm_release.this[0]
module.eks_blueprints_addons.module.karpenter_sqs.data.aws_iam_policy_document.this[0]
module.eks_blueprints_addons.module.karpenter_sqs.aws_sqs_queue.this[0]
module.eks_blueprints_addons.module.karpenter_sqs.aws_sqs_queue_policy.this[0]

terraform show
...

# k8s 클러스터, 노드, 파드 정보 확인
kubectl cluster-info
kubectl get nodes -L node.kubernetes.io/instance-type -L topology.kubernetes.io/zone
kubectl get node -owide
NAME                                                      STATUS   ROLES    AGE   VERSION               INTERNAL-IP    EXTERNAL-IP   OS-IMAGE         KERNEL-VERSION                  CONTAINER-RUNTIME
fargate-ip-10-10-36-94.ap-northeast-2.compute.internal    Ready    <none>   10m   v1.30.0-eks-404b9c6   10.10.36.94    <none>        Amazon Linux 2   5.10.219-208.866.amzn2.x86_64   containerd://1.7.11
fargate-ip-10-10-4-201.ap-northeast-2.compute.internal    Ready    <none>   10m   v1.30.0-eks-404b9c6   10.10.4.201    <none>        Amazon Linux 2   5.10.219-208.866.amzn2.x86_64   containerd://1.7.11
fargate-ip-10-10-43-93.ap-northeast-2.compute.internal    Ready    <none>   10m   v1.30.0-eks-404b9c6   10.10.43.93    <none>        Amazon Linux 2   5.10.219-208.866.amzn2.x86_64   containerd://1.7.11
fargate-ip-10-10-46-178.ap-northeast-2.compute.internal   Ready    <none>   10m   v1.30.0-eks-404b9c6   10.10.46.178   <none>        Amazon Linux 2   5.10.219-208.866.amzn2.x86_64   containerd://1.7.11

kubectl get pod -A
NAMESPACE     NAME                         READY   STATUS    RESTARTS   AGE   IP             NODE                                                      NOMINATED NODE   READINESS GATES
karpenter     karpenter-6b8687f5db-r9b7q   1/1     Running   0          12m   10.10.36.94    fargate-ip-10-10-36-94.ap-northeast-2.compute.internal    <none>           <none>
karpenter     karpenter-6b8687f5db-v8zwb   1/1     Running   0          12m   10.10.46.178   fargate-ip-10-10-46-178.ap-northeast-2.compute.internal   <none>           <none>
kube-system   coredns-86dcddd859-x9zp8     1/1     Running   0          12m   10.10.4.201    fargate-ip-10-10-4-201.ap-northeast-2.compute.internal    <none>           <none>
kube-system   coredns-86dcddd859-xxk97     1/1     Running   0          12m   10.10.43.93    fargate-ip-10-10-43-93.ap-northeast-2.compute.internal    <none>           <none>

# helm chart 확인
helm list -n karpenter
NAME            NAMESPACE       REVISION        UPDATED                                 STATUS          CHART           APP VERSION
karpenter       karpenter       1               2024-07-20 23:34:26.74931 +0900 KST     deployed        karpenter-0.35.00.35.0

# SQS queue and EventBridge event rules for Karpenter to utilize for spot termination handling, capacity re-balancing, etc.
## https://jerryljh.tistory.com/132 , https://aws.github.io/aws-eks-best-practices/karpenter/
helm get values -n karpenter karpenter
USER-SUPPLIED VALUES:
serviceAccount:
  annotations:
    eks.amazonaws.com/role-arn: arn:aws:iam::911283464785:role/karpenter-2024072203075821610000000c
  name: karpenter
settings:
  aws:
    clusterEndpoint: https://163CC620EAB64480AA969E78489258AD.yl4.ap-northeast-2.eks.amazonaws.com
    clusterName: t101-karpenter
    interruptionQueueName: karpenter-t101-karpenter
  clusterEndpoint: https://163CC620EAB64480AA969E78489258AD.yl4.ap-northeast-2.eks.amazonaws.com
  clusterName: t101-karpenter
  interruptionQueue: karpenter-t101-karpenter

# 시크릿 확인 : kms로 암호 처리됨 - Encrypt Kubernetes secrets with AWS KMS on existing clusters
## Symmetric, Can encrypt and decrypt data , Created in the same AWS Region as the cluster
## Warning - 활성화 이후 비활성화 불가 You can't disable secrets encryption after enabling it. This action is irreversible.
kubectl get secret -n karpenter
kubectl get secret -n karpenter sh.helm.release.v1.karpenter.v1 -o json | jq

# 상세 정보 확인
terraform state list
terraform state show 'data.aws_ecrpublic_authorization_token.token'
terraform state show 'aws_eks_access_entry.karpenter_node_access_entry'
terraform state show 'module.eks_blueprints_addons.data.aws_caller_identity.current'
terraform state show 'module.eks_blueprints_addons.data.aws_eks_addon_version.this["coredns"]'
terraform state show 'module.eks_blueprints_addons.aws_cloudwatch_event_rule.karpenter["health_event"]'
terraform state show 'module.eks_blueprints_addons.aws_cloudwatch_event_target.karpenter["health_event"]'
terraform state show 'module.eks_blueprints_addons.aws_eks_addon.this["coredns"]'
terraform state show 'module.eks_blueprints_addons.aws_iam_role.karpenter[0]'
terraform state show 'module.eks_blueprints_addons.aws_iam_instance_profile.karpenter[0]'
terraform state show 'module.eks_blueprints_addons.module.karpenter.data.aws_iam_policy_document.this[0]'
terraform state show 'module.eks_blueprints_addons.module.karpenter.data.aws_iam_policy_document.assume[0]'
terraform state show 'module.eks_blueprints_addons.module.karpenter.aws_iam_policy.this[0]'
terraform state show 'module.eks_blueprints_addons.module.karpenter.helm_release.this[0]'
terraform state show 'module.eks_blueprints_addons.module.karpenter_sqs.aws_sqs_queue.this[0]'
terraform state show 'module.eks_blueprints_addons.module.karpenter_sqs.aws_sqs_queue_policy.this[0]'


eks-node-viewer 설치
노드 할당 가능 용량과 요청 request 리소스 표시, 실제 파드 리소스 사용량 X
URL: https://github.com/awslabs/eks-node-viewer
GitHub - awslabs/eks-node-viewer: EKS Node Viewer
EKS Node Viewer. Contribute to awslabs/eks-node-viewer development by creating an account on GitHub.
github.com
- It displays the scheduled pod resource requests vs the allocatable capacity on the node. It does not look at the actual pod resource usage.
- Node마다 할당 가능한 용량과 스케줄링된 POD(컨테이너)의 Resource 중 request 값을 표시한다. 실제 POD(컨테이너) 리소스 사용량은 아니다. /pkg/model/pod.go 파일을 보면 컨테이너의 request 합을 반환하며, init containers는 미포함 - Code
# Install

# macOS
brew tap aws/tap
brew install eks-node-viewer

# Windows/Linux Manual
## go 설치
go version
## EKS Node Viewer 설치 : 약 2분 이상 소요
go install github.com/awslabs/eks-node-viewer/cmd/eks-node-viewer@latest
# [신규 터미널] Display both CPU and Memory Usage*
eks-node-viewer --resources cpu,memory

# Standard usage
eks-node-viewer

# Karpenter nodes only
eks-node-viewer --node-selector karpenter.sh/nodepool

# Display extra labels, i.e. AZ
eks-node-viewer --extra-labels topology.kubernetes.io/zone

# Sort by CPU usage in descending order
eks-node-viewer --node-sort=eks-node-viewer/node-cpu-usage=dsc

# Specify a particular AWS profile and region
AWS_PROFILE=myprofile AWS_REGION=us-west-2

kube-ops-view 설치
노드의 파드 상태 정보를 웹 페이지에서 실시간으로 출력
URL: https://artifacthub.io/packages/helm/geek-cookbook/kube-ops-view
kube-ops-view 1.2.2 · funkypenguin/geek-cookbook
A read-only system dashboard for multiple K8s clusters
artifacthub.io
# helm 배포
helm repo add geek-cookbook https://geek-cookbook.github.io/charts/
helm install kube-ops-view geek-cookbook/kube-ops-view --version 1.2.2 --set env.TZ="Asia/Seoul" --namespace kube-system

# 포트 포워딩
kubectl port-forward deployment/kube-ops-view -n kube-system 8080:8080 &

# 접속 주소 확인 : 각각 1배, 1.5배, 3배 크기
echo -e "KUBE-OPS-VIEW URL = http://localhost:8080"
echo -e "KUBE-OPS-VIEW URL = http://localhost:8080/#scale=1.5"
echo -e "KUBE-OPS-VIEW URL = http://localhost:8080/#scale=3"
Karpenter 소개
노드 수명 주기 관리 솔루션, 몇 초 만에 컴퓨팅 리소스 제공
URL: https://catalog.us-east-1.prod.workshops.aws/workshops/f6b4587e-b8a5-4a43-be87-26bd85a70aba/en-US
Running efficient Kubernetes Clusters on Amazon EC2 with Karpenter
In this workshop, you will learn how to provision, manage, and maintain your Kubernetes clusters with Amazon EKS at any scale using Karpenter. Karpenter is a node lifecycle management solution used to scale your Kubernetes Cluster. It observes incoming pod
catalog.us-east-1.prod.workshops.aws


- Watching for pods that the Kubernetes scheduler has marked as unschedulable
- Evaluating scheduling constraints (resource requests, nodeselectors, affinities, tolerations, and topology spread constraints) requested by the pods
- Provisioning nodes that meet the requirements of the pods
- Scheduling the pods to run on the new nodes
- Removing the nodes when the nodes are no longer needed
Disruption
Expiration , Drift , Consolidation
URL: https://www.eksworkshop.com/docs/autoscaling/compute/karpenter/consolidation
Disruption (Consolidation) | EKS Workshop
Karpenter automatically discovers nodes that are eligible for disruption and spins up replacements when needed. This can happen for three different reasons:
www.eksworkshop.com

Applying Spot-to-Spot consolidation best practices with Karpenter | Amazon Web Services
This post is written by Robert Northard – AWS Container Specialist Solutions Architect, and Carlos Manzanedo Rueda – AWS WW SA Leader for Efficient Compute Karpenter is an open source node lifecycle management project built for Kubernetes. In this post
aws.amazon.com
- Expiration 만료 : 기본 720시간(30일) 후 인스턴스를 자동으로 만료하여 강제로 노드를 최신 상태로 유지
- Drift 드리프트 : 구성 변경 사항(NodePool, EC2NodeClass)를 감지하여 필요한 변경 사항을 적용
- Consolidation 통합 : 비용 효율적인 컴퓨팅 최적화
- 스팟 인스턴스 시작 시 Karpenter는 AWS EC2 Fleet Instance API를 호출하여 NodePool 구성 기반으로 선택한 인스턴스 유형을 전달.
- AWS EC2 Fleet Instance API는 시작된 인스턴스 목록과 시작할 수 없는 인스턴스 목록을 즉시 반환하는 API로, 시작할 수 없을 경우 Karpenter는 대체 용량을 요청하거나 워크로드에 대한 soft 일정 제약 조건을 제거할 수 있음

- Spot-to-Spot Consolidation 에는 주문형 통합과 다른 접근 방식이 필요했습니다. 온디맨드 통합의 경우 규모 조정 및 최저 가격이 주요 지표로 사용됩니다.
- 스팟 간 통합이 이루어지려면 Karpenter에는 최소 15개의 인스턴스 유형이 포함된 다양한 인스턴스 구성(연습에 정의된 NodePool 예제 참조)이 필요합니다. 이러한 제약 조건이 없으면 Karpenter가 가용성이 낮고 중단 빈도가 높은 인스턴스를 선택할 위험이 있습니다.
Karpenter 실습
# karpenter.yaml
---
apiVersion: karpenter.k8s.aws/v1beta1
kind: EC2NodeClass
metadata:
  name: default
spec:
  amiFamily: AL2
  role: karpenter-t101-karpenter
  subnetSelectorTerms:
    - tags:
        karpenter.sh/discovery: t101-karpenter
  securityGroupSelectorTerms:
    - tags:
        karpenter.sh/discovery: t101-karpenter
  tags:
    karpenter.sh/discovery: t101-karpenter
---
apiVersion: karpenter.sh/v1beta1
kind: NodePool
metadata:
  name: default
spec:
  template:
    spec:
      nodeClassRef:
        name: default
      requirements:
        - key: "karpenter.k8s.aws/instance-category"
          operator: In
          values: ["c", "m", "r"]
        - key: "karpenter.k8s.aws/instance-cpu"
          operator: In
          values: ["4", "8", "16", "32"]
        - key: "karpenter.k8s.aws/instance-hypervisor"
          operator: In
          values: ["nitro"]
        - key: "karpenter.k8s.aws/instance-generation"
          operator: Gt
          values: ["2"]
  limits:
    cpu: 1000
  disruption:
    consolidationPolicy: WhenEmpty
    consolidateAfter: 30s
# example.yaml
piVersion: apps/v1
kind: Deployment
metadata:
  name: inflate
spec:
  replicas: 0
  selector:
    matchLabels:
      app: inflate
  template:
    metadata:
      labels:
        app: inflate
    spec:
      terminationGracePeriodSeconds: 0
      containers:
        - name: inflate
          image: public.ecr.aws/eks-distro/kubernetes/pause:3.7
          resources:
            requests:
              cpu: 1
# karpenter 배포

# Provision the Karpenter EC2NodeClass and NodePool resources which provide Karpenter the necessary configurations to provision EC2 resources:
kubectl apply -f karpenter.yaml

# 확인
kubectl get ec2nodeclass,nodepool
NAME                                     AGE
ec2nodeclass.karpenter.k8s.aws/default   31s

NAME                            NODECLASS
nodepool.karpenter.sh/default   default

# Once the Karpenter resources are in place, Karpenter will provision the necessary EC2 resources to satisfy any pending pods in the scheduler's queue. You can demonstrate this with the example deployment provided.
# First deploy the example deployment which has the initial number replicas set to 0:
kubectl apply -f example.yaml

kubectl get deploy
NAME      READY   UP-TO-DATE   AVAILABLE   AGE
inflate   0/0     0            0           42s

# (옵션) 신규 터미널 : karpenter 컨트롤러 로그 확인
kubectl logs -f -n karpenter -l app.kubernetes.io/name=karpenter -c controller

# When you scale the example deployment, you should see Karpenter respond by quickly provisioning EC2 resources to satisfy those pending pod requests:
kubectl scale deployment inflate --replicas=3 && kubectl get pod -w

#
kubectl get nodes -L karpenter.sh/nodepool -L node.kubernetes.io/instance-type -L topology.kubernetes.io/zone -L karpenter.sh/capacity-type
NAME                                                      STATUS   ROLES    AGE     VERSION               NODEPOOL   INSTANCE-TYPE   ZONE              CAPACITY-TYPE
fargate-ip-10-10-11-164.ap-northeast-2.compute.internal   Ready    <none>   6m37s   v1.30.0-eks-404b9c6                              ap-northeast-2a
fargate-ip-10-10-36-94.ap-northeast-2.compute.internal    Ready    <none>   105m    v1.30.0-eks-404b9c6                              ap-northeast-2c
fargate-ip-10-10-4-201.ap-northeast-2.compute.internal    Ready    <none>   105m    v1.30.0-eks-404b9c6                              ap-northeast-2a
fargate-ip-10-10-43-93.ap-northeast-2.compute.internal    Ready    <none>   105m    v1.30.0-eks-404b9c6                              ap-northeast-2c
fargate-ip-10-10-46-178.ap-northeast-2.compute.internal   Ready    <none>   105m    v1.30.0-eks-404b9c6                              ap-northeast-2c
ip-10-10-26-220.ap-northeast-2.compute.internal           Ready    <none>   2m4s    v1.30.0-eks-036c24b   default    c6gn.xlarge     ap-northeast-2b   spot

#
kubectl get nodeclaims
kubectl get nodeclaims -o yaml | kubectl neat

# deploy 삭제 >> 노드 변화 확인 해보기!
kubectl delete -f example.yaml

# karpenter 정책 삭제
kubectl apply -f karpenter.yaml
삭제
# kube-ops-view 삭제
helm uninstall kube-ops-view -n kube-system

# addon & karpenter helm 삭제 : 1분 소요
terraform destroy -target="module.eks_blueprints_addons" -auto-approve

# EKS 삭제 : 8분 소요
terraform destroy -target="module.eks" -auto-approve

# VPC 삭제 : vpc 삭제가 잘 안될 경우 aws 콘솔에서 vpc 수동 삭제 -> vnic 등 남아 있을 경우 해당 vnic 강제 삭제
terraform destroy -auto-approve

# VPC 삭제 확인
aws ec2 describe-vpcs --filter 'Name=isDefault,Values=false' --output yaml

# kubeconfig 삭제
rm -rf ~/.kube/config
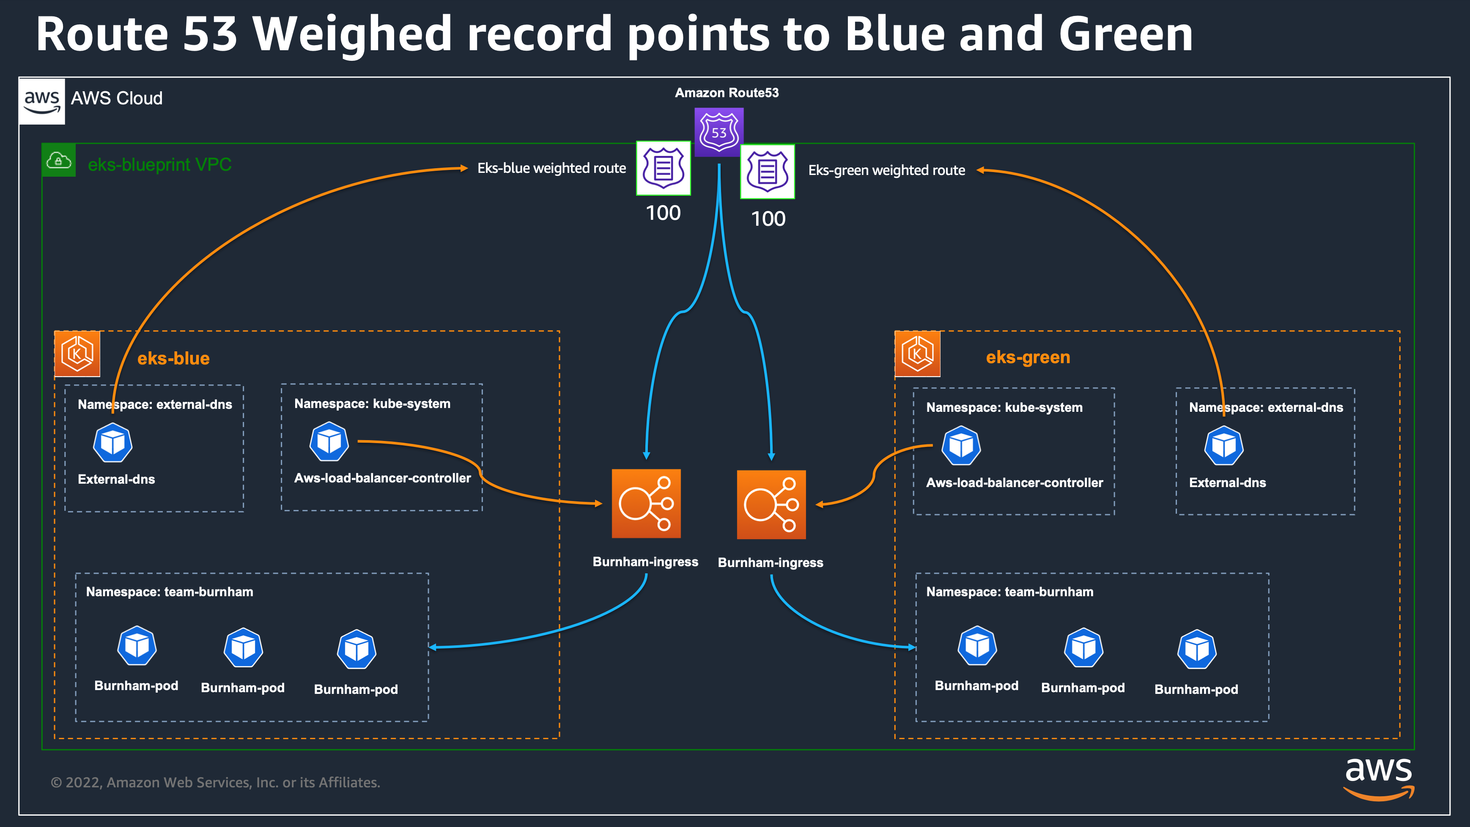
Blue/Green Migration
Guide URL: https://aws-ia.github.io/terraform-aws-eks-blueprints/patterns/blue-green-upgrade/
Blue/Green Upgrade - Amazon EKS Blueprints for Terraform
Blue/Green Migration This directory provides a solution based on EKS Blueprint for Terraform that shows how to leverage blue/green or canary application workload migration between EKS clusters, using Amazon Route 53 weighted routing feature. The workloads
aws-ia.github.io
ArgoCD on Amazon EKS
Guide URL: https://aws-ia.github.io/terraform-aws-eks-blueprints/patterns/gitops-getting-started-argocd/
GitOps Getting Started (ArgoCD) - Amazon EKS Blueprints for Terraform
ArgoCD on Amazon EKS This tutorial guides you through deploying an Amazon EKS cluster with addons configured via ArgoCD, employing the GitOps Bridge Pattern. The GitOps Bridge Pattern enables Kubernetes administrators to utilize Infrastructure as Code (IaC
aws-ia.github.io

Multi-Cluster centralized hub-spoke topology
GitOps Multi-Cluster Hub-Spoke Topology (ArgoCD) - Amazon EKS Blueprints for Terraform
Multi-Cluster centralized hub-spoke topology This tutorial guides you through deploying an Amazon EKS cluster with addons configured via ArgoCD in a Multi-Cluster Hub-Spoke topology, employing the GitOps Bridge Pattern. This example deploys ArgoCD on the H
aws-ia.github.io

EKS Workshop
EKS Workshop 소개
다양한 주제 기술의 실습 랩 가이드 제공
URL: https://eksworkshop.com/docs/introduction/
Introduction | EKS Workshop
Welcome to the AWS Elastic Kubernetes Service (EKS) workshop!
www.eksworkshop.com
Github URL: https://github.com/aws-samples/eks-workshop-v2
GitHub - aws-samples/eks-workshop-v2: Hands-on labs for Amazon EKS
Hands-on labs for Amazon EKS. Contribute to aws-samples/eks-workshop-v2 development by creating an account on GitHub.
github.com
Youtube URL: https://www.youtube.com/watch?v=E956xeOt050
EKS 배포 툴
Using eksctl | EKS Workshop
This section outlines how to build a cluster for the lab exercises using the eksctl tool. This is the easiest way to get started, and is recommended for most learners.
www.eksworkshop.com
Using Terraform | EKS Workshop
Creating the workshop cluster with Terraform is currently in preview. Please raise any issues encountered in the GitHub repository.
www.eksworkshop.com
[실습] EKS 배포
실습 사전 준비
URL: https://aws-ia.github.io/terraform-aws-eks-blueprints/getting-started/
Getting Started - Amazon EKS Blueprints for Terraform
Getting Started This getting started guide will help you deploy your first pattern using EKS Blueprints. Prerequisites Ensure that you have installed the following tools locally: Deploy For consuming EKS Blueprints, please see the Consumption section. For
aws-ia.github.io
- awscli (IAM 자격증명)
- terraform
- kubectl
코드 준비
Github URL: https://github.com/aws-samples/eks-workshop-v2
GitHub - aws-samples/eks-workshop-v2: Hands-on labs for Amazon EKS
Hands-on labs for Amazon EKS. Contribute to aws-samples/eks-workshop-v2 development by creating an account on GitHub.
github.com
#
git clone https://github.com/aws-samples/eks-workshop-v2
cd eks-workshop-v2/cluster/terraform
# providers.tf
provider "aws" {
  default_tags {
    tags = local.tags
  }
}

terraform {
  required_providers {
    aws = {
      source  = "hashicorp/aws"
      version = ">= 4.67.0"
    }
  }

  required_version = ">= 1.4.2"
}
# variables.tf
variable "cluster_name" {
  description = "Name of the EKS cluster"
  type        = string
  default     = "eks-workshop"
}

variable "cluster_version" {
  description = "EKS cluster version."
  type        = string
  default     = "1.30"
}

variable "ami_release_version" {
  description = "Default EKS AMI release version for node groups"
  type        = string
  default     = "1.30.0-20240625"
}

variable "vpc_cidr" {
  description = "Defines the CIDR block used on Amazon VPC created for Amazon EKS."
  type        = string
  default     = "10.42.0.0/16"
}
# vpc.tf
locals {
  private_subnets = [for k, v in local.azs : cidrsubnet(var.vpc_cidr, 3, k + 3)]
  public_subnets  = [for k, v in local.azs : cidrsubnet(var.vpc_cidr, 3, k)]
  azs             = slice(data.aws_availability_zones.available.names, 0, 3)
}

data "aws_availability_zones" "available" {
  state = "available"
}

module "vpc" {
  source  = "terraform-aws-modules/vpc/aws"
  version = "~> 5.1"

  name = var.cluster_name
  cidr = var.vpc_cidr

  azs                   = local.azs
  public_subnets        = local.public_subnets
  private_subnets       = local.private_subnets
  public_subnet_suffix  = "SubnetPublic"
  private_subnet_suffix = "SubnetPrivate"

  enable_nat_gateway   = true
  create_igw           = true
  enable_dns_hostnames = true
  single_nat_gateway   = true

  # Manage so we can name
  manage_default_network_acl    = true
  default_network_acl_tags      = { Name = "${var.cluster_name}-default" }
  manage_default_route_table    = true
  default_route_table_tags      = { Name = "${var.cluster_name}-default" }
  manage_default_security_group = true
  default_security_group_tags   = { Name = "${var.cluster_name}-default" }

  public_subnet_tags = merge(local.tags, {
    "kubernetes.io/role/elb" = "1"
  })
  private_subnet_tags = merge(local.tags, {
    "karpenter.sh/discovery" = var.cluster_name
  })

  tags = local.tags
}
# main.tf
locals {
  tags = {
    created-by = "eks-workshop-v2"
    study      = "t101"
    env        = var.cluster_name
  }
}
# eks.tf
module "eks" {
  source  = "terraform-aws-modules/eks/aws"
  version = "~> 20.0"

  cluster_name                   = var.cluster_name
  cluster_version                = var.cluster_version
  cluster_endpoint_public_access = true

  cluster_addons = {
    vpc-cni = {
      before_compute = true
      most_recent    = true
      configuration_values = jsonencode({
        env = {
          ENABLE_POD_ENI                    = "true"
          ENABLE_PREFIX_DELEGATION          = "true"
          POD_SECURITY_GROUP_ENFORCING_MODE = "standard"
        }
        nodeAgent = {
          enablePolicyEventLogs = "true"
        }
        enableNetworkPolicy = "true"
      })
    }
  }

  vpc_id     = module.vpc.vpc_id
  subnet_ids = module.vpc.private_subnets

  create_cluster_security_group = false
  create_node_security_group    = false

  eks_managed_node_groups = {
    default = {
      instance_types       = ["m5.large"]
      force_update_version = true
      release_version      = var.ami_release_version

      min_size     = 3
      max_size     = 6
      desired_size = 3

      update_config = {
        max_unavailable_percentage = 50
      }

      labels = {
        workshop-default = "yes"
      }
    }
  }

  tags = merge(local.tags, {
    "karpenter.sh/discovery" = var.cluster_name
  })
}
Init process
terraform init
tree .terraform
cat .terraform/modules/modules.json | jq
tree .terraform/providers/registry.terraform.io/hashicorp -L 2
VPC 배포
# VPC 정보 확인
aws ec2 describe-vpcs --filter 'Name=isDefault,Values=false' --output yaml

# vpc 배포 : 3분 소요
terraform apply -target="module.vpc" -auto-approve

# 배포 확인
terraform state list
terraform show
...

# VPC 정보 확인
aws ec2 describe-vpcs --filter 'Name=isDefault,Values=false' --output yaml

# 상세 정보 확인 : VPC/Subnet tag 정보 확인
echo "data.aws_availability_zones.available" | terraform console
terraform state show 'module.vpc.aws_vpc.this[0]'
VPCID=<각자 자신의 VPC ID>
aws ec2 describe-subnets --filters "Name=vpc-id,Values=$VPCID" | jq
aws ec2 describe-subnets --filters "Name=vpc-id,Values=$VPCID" --output text

# public 서브넷과 private 서브넷 CIDR 확인
## private_subnets = [for k, v in local.azs : cidrsubnet(var.vpc_cidr, 3, k + 3)]
## public_subnets  = [for k, v in local.azs : cidrsubnet(var.vpc_cidr, 3, k)]
## private_subnets = [for k, v in local.azs : cidrsubnet(local.vpc_cidr, 4, k)]
## public_subnets  = [for k, v in local.azs : cidrsubnet(local.vpc_cidr, 8, k + 48)]
terraform state show 'module.vpc.aws_subnet.public[0]'
terraform state show 'module.vpc.aws_subnet.private[0]'
EKS 배포
# EKS 배포 : 11분 소요
terraform apply -auto-approve

# 배포 확인
terraform state list
module.eks.data.aws_caller_identity.current
module.eks.data.aws_eks_addon_version.this["vpc-cni"]
module.eks.data.aws_iam_policy_document.assume_role_policy[0]
module.eks.data.aws_iam_session_context.current
module.eks.data.aws_partition.current
module.eks.data.tls_certificate.this[0]
module.eks.aws_cloudwatch_log_group.this[0]
module.eks.aws_ec2_tag.cluster_primary_security_group["created-by"]
module.eks.aws_ec2_tag.cluster_primary_security_group["env"]
module.eks.aws_ec2_tag.cluster_primary_security_group["karpenter.sh/discovery"]
module.eks.aws_ec2_tag.cluster_primary_security_group["study"]
module.eks.aws_eks_addon.before_compute["vpc-cni"]
module.eks.aws_eks_cluster.this[0]
module.eks.aws_iam_openid_connect_provider.oidc_provider[0]
module.eks.aws_iam_policy.cluster_encryption[0]
module.eks.aws_iam_role.this[0]
module.eks.aws_iam_role_policy_attachment.cluster_encryption[0]
module.eks.aws_iam_role_policy_attachment.this["AmazonEKSClusterPolicy"]
module.eks.aws_iam_role_policy_attachment.this["AmazonEKSVPCResourceController"]
module.eks.time_sleep.this[0]
module.eks.module.eks_managed_node_group["default"].data.aws_caller_identity.current
module.eks.module.eks_managed_node_group["default"].data.aws_iam_policy_document.assume_role_policy[0]
module.eks.module.eks_managed_node_group["default"].data.aws_partition.current
module.eks.module.eks_managed_node_group["default"].aws_eks_node_group.this[0]
module.eks.module.eks_managed_node_group["default"].aws_iam_role.this[0]
module.eks.module.eks_managed_node_group["default"].aws_iam_role_policy_attachment.this["AmazonEC2ContainerRegistryReadOnly"]
module.eks.module.eks_managed_node_group["default"].aws_iam_role_policy_attachment.this["AmazonEKSWorkerNodePolicy"]
module.eks.module.eks_managed_node_group["default"].aws_iam_role_policy_attachment.this["AmazonEKS_CNI_Policy"]
module.eks.module.eks_managed_node_group["default"].aws_launch_template.this[0]
module.eks.module.kms.data.aws_caller_identity.current[0]
module.eks.module.kms.data.aws_iam_policy_document.this[0]
module.eks.module.kms.data.aws_partition.current[0]
module.eks.module.kms.aws_kms_alias.this["cluster"]
module.eks.module.kms.aws_kms_key.this[0]
module.eks.module.eks_managed_node_group["default"].module.user_data.null_resource.validate_cluster_service_cidr
...

# EKS 자격증명
## aws eks --region <REGION> update-kubeconfig --name <CLUSTER_NAME> --alias <CLUSTER_NAME>
aws eks --region ap-northeast-2 update-kubeconfig --name eks-workshop
cat ~/.kube/config

# k8s 클러스터 정보 확인
kubectl cluster-info

# 각자 자신의 IAM User 의 access entry 생성
ACCOUNT_ID=$(aws sts get-caller-identity --query 'Account' --output text)
MYIAMUSER=<각자 자신의 IAM User>
MYIAMUSER=admin

echo $ACCOUNT_ID $MYIAMUSER
aws eks create-access-entry --cluster-name eks-workshop --principal-arn arn:aws:iam::${ACCOUNT_ID}:user/${MYIAMUSER}
aws eks list-access-entries --cluster-name eks-workshop

# 각자 자신의 IAM User에 AmazonEKSClusterAdminPolicy 연동
aws eks associate-access-policy --cluster-name eks-workshop --principal-arn arn:aws:iam::${ACCOUNT_ID}:user/${MYIAMUSER} \
  --policy-arn arn:aws:eks::aws:cluster-access-policy/AmazonEKSClusterAdminPolicy --access-scope type=cluster

aws eks list-associated-access-policies --cluster-name eks-workshop --principal-arn arn:aws:iam::${ACCOUNT_ID}:user/${MYIAMUSER} | jq
aws eks describe-access-entry --cluster-name eks-workshop --principal-arn arn:aws:iam::${ACCOUNT_ID}:user/${MYIAMUSER} | jq

# (참고) context name 변경
kubectl config rename-context "arn:aws:eks:ap-northeast-2:$(aws sts get-caller-identity --query 'Account' --output text):cluster/eks-workshop" "T101-Lab"


# k8s 클러스터, 노드, 파드 정보 확인
kubectl cluster-info
kubectl get node
kubectl get nodes -L node.kubernetes.io/instance-type -L topology.kubernetes.io/zone
NAME                                               STATUS   ROLES    AGE   VERSION               INSTANCE-TYPE   ZONE
ip-10-42-124-1.ap-northeast-2.compute.internal     Ready    <none>   22m   v1.30.0-eks-036c24b   m5.large        ap-northeast-2a
ip-10-42-134-162.ap-northeast-2.compute.internal   Ready    <none>   22m   v1.30.0-eks-036c24b   m5.large        ap-northeast-2b
ip-10-42-167-206.ap-northeast-2.compute.internal   Ready    <none>   22m   v1.30.0-eks-036c24b   m5.large        ap-northeast-2c

kubectl get pod -A
NAMESPACE     NAME                      READY   STATUS    RESTARTS   AGE
kube-system   aws-node-f5vrd            2/2     Running   0          22m
kube-system   aws-node-m945d            2/2     Running   0          22m
kube-system   aws-node-vbwc4            2/2     Running   0          22m
kube-system   coredns-5b9dfbf96-5bdgg   1/1     Running   0          25m
kube-system   coredns-5b9dfbf96-vvb4r   1/1     Running   0          25m
kube-system   kube-proxy-84rlt          1/1     Running   0          22m
kube-system   kube-proxy-cbtql          1/1     Running   0          22m
kube-system   kube-proxy-q8xbn          1/1     Running   0          22m

# 상세 정보 확인
terraform show
terraform state list
terraform state show 'module.eks.aws_ec2_tag.cluster_primary_security_group["study"]'
terraform state show 'module.eks.aws_eks_addon.before_compute["vpc-cni"]'
terraform state show 'module.eks.aws_eks_cluster.this[0]'
terraform state show 'module.eks.aws_iam_openid_connect_provider.oidc_provider[0]'
terraform state show 'module.eks.aws_iam_policy.cluster_encryption[0]'
terraform state show 'module.eks.time_sleep.this[0]'
terraform state show 'module.eks.module.eks_managed_node_group["default"].aws_eks_node_group.this[0]'
terraform state show 'module.eks.module.eks_managed_node_group["default"].aws_iam_role.this[0]'
terraform state show 'module.eks.module.eks_managed_node_group["default"].aws_launch_template.this[0]'
terraform state show 'module.eks.module.eks_managed_node_group["default"].module.user_data.null_resource.validate_cluster_service_cidr'
terraform state show 'module.eks.module.kms.aws_kms_key.this[0]'
terraform state show 'module.eks.module.kms.aws_kms_alias.this["cluster"]'
kube-ops-view 설치
노드의 파드 상태 정보를 웹 페이지에서 실시간으로 출력
# helm 배포
helm repo add geek-cookbook https://geek-cookbook.github.io/charts/
helm install kube-ops-view geek-cookbook/kube-ops-view --version 1.2.2 --set env.TZ="Asia/Seoul" --namespace kube-system

# 포트 포워딩
kubectl port-forward deployment/kube-ops-view -n kube-system 8080:8080

# 접속 주소 확인 : 각각 1배, 1.5배, 3배 크기
echo -e "KUBE-OPS-VIEW URL = http://localhost:8080"
echo -e "KUBE-OPS-VIEW URL = http://localhost:8080/#scale=1.5"
echo -e "KUBE-OPS-VIEW URL = http://localhost:8080/#scale=3"
리소스 삭제
# kube-ops-view 삭제
helm uninstall kube-ops-view -n kube-system

# 삭제 : vpc 삭제가 잘 안될 경우 aws 콘솔에서 vpc 수동 삭제 -> vnic 등 남아 있을 경우 해당 vnic 강제 삭제 : 9분 소요
terraform destroy -auto-approve

# VPC 삭제 확인
aws ec2 describe-vpcs --filter 'Name=isDefault,Values=false' --output yaml

# kubeconfig 삭제
rm -rf ~/.kube/config
EKS Terraform Workshop
[eu-west-1 아일랜드 리전 필수 사용] Cloud9 IDE 에서 아래 실습 진행 할 것!
소개
Guide URL: https://catalog.us-east-1.prod.workshops.aws/workshops/afee4679-89af-408b-8108-44f5b1065cc7/en-US
Terraform EKS Workshop
NOTE - To complete the Keycloak/Grafana login section you will need a public facing AWS domain:
catalog.us-east-1.prod.workshops.aws
Github URL:
https://github.com/aws-samples/terraform-eks-code/tree/module
GitHub - aws-samples/terraform-eks-code
Contribute to aws-samples/terraform-eks-code development by creating an account on GitHub.
github.com
https://github.com/aws-samples/aws2tf/tree/master
GitHub - aws-samples/aws2tf: aws2tf - automates the importing of existing AWS resources into Terraform and outputs the Terraform
aws2tf - automates the importing of existing AWS resources into Terraform and outputs the Terraform HCL code. - aws-samples/aws2tf
github.com
사전 준비
# 코드 준비
git clone -b module https://github.com/aws-samples/terraform-eks-code.git tfekscode
cd tfekscode

# TF_VAR_awsalias
export TF_VAR_awsalias=<your AWS hosts alias>
echo "export TF_VAR_awsalias=${TF_VAR_awsalias}" | tee -a ~/.bashrc
실습 순서 소개 EKS multi-part Build with Terraform
Terraform EKS Workshop
NOTE - To complete the Keycloak/Grafana login section you will need a public facing AWS domain:
catalog.us-east-1.prod.workshops.aws
Initial Setup for Terraform state
Terraform EKS Workshop
NOTE - To complete the Keycloak/Grafana login section you will need a public facing AWS domain:
catalog.us-east-1.prod.workshops.aws
Setting up the Network
Terraform EKS Workshop
NOTE - To complete the Keycloak/Grafana login section you will need a public facing AWS domain:
catalog.us-east-1.prod.workshops.aws
EKS Cluster Creation
Terraform EKS Workshop
NOTE - To complete the Keycloak/Grafana login section you will need a public facing AWS domain:
catalog.us-east-1.prod.workshops.aws
Attach addons to cluster with EKS Blueprints module
Terraform EKS Workshop
NOTE - To complete the Keycloak/Grafana login section you will need a public facing AWS domain:
catalog.us-east-1.prod.workshops.aws
Enable the Observability Accelerator
Terraform EKS Workshop
NOTE - To complete the Keycloak/Grafana login section you will need a public facing AWS domain:
catalog.us-east-1.prod.workshops.aws
Install/Configure Keycloak
Terraform EKS Workshop
NOTE - To complete the Keycloak/Grafana login section you will need a public facing AWS domain:
catalog.us-east-1.prod.workshops.aws
Prepare the cluster for eksworkshop
Terraform EKS Workshop
NOTE - To complete the Keycloak/Grafana login section you will need a public facing AWS domain:
catalog.us-east-1.prod.workshops.aws
EKS Blueprints for Terraform and Argo CD*
Guide URL: https://catalog.us-east-1.prod.workshops.aws/workshops/d2b662ae-e9d7-4b31-b68b-64ade19d5dcc/en-US
EKS Blueprints for Terraform - Workshop
This workshop helps you build a shared platform (Kubernetes multi-tenant) where multiple developer groups at an organization can consume and deploy workloads freely without the platform team being the bottleneck. We walk through the baseline setup of an EK
catalog.us-east-1.prod.workshops.aws
실습 1: Module Standalone GitOps cluster
EKS Blueprints for Terraform - Workshop
This workshop helps you build a shared platform (Kubernetes multi-tenant) where multiple developer groups at an organization can consume and deploy workloads freely without the platform team being the bottleneck. We walk through the baseline setup of an EK
catalog.us-east-1.prod.workshops.aws

- In this module, we are going to create a single EKS cluster using Terraform, and configure with Argo CD for addons and workloads.
실습 2: Advanced - Argo CD Hub-Spoke deployment
EKS Blueprints for Terraform - Workshop
This workshop helps you build a shared platform (Kubernetes multi-tenant) where multiple developer groups at an organization can consume and deploy workloads freely without the platform team being the bottleneck. We walk through the baseline setup of an EK
catalog.us-east-1.prod.workshops.aws

- There are many Argo CD deployment architectures. In this workshop you will deploy hub-spoke architecture.
- In a hub-spoke architecture, the central Argo CD server is responsible for managing the deployment of applications to multiple Kubernetes clusters.
지금까지 Terraform 101 Study 6주차 내용이었습니다.
테라폼을 학습하시는 분들에게 도움이 되었으면 좋을 것 같습니다 🤗
항상 긴 글 읽어주셔서 감사드립니다
요즘엔 비가 간헐적으로 쏟아지는 묘한 날씨네요
항상 건강 챙기시고 좋은 주말 보내세요!
감사합니다 😍
'Terraform' 카테고리의 다른 글
| Terraform 101 Study - 7주차 (0) | 2024.07.30 |
|---|---|
| Terraform 101 Study - 5주차 (0) | 2024.07.12 |
| Terraform 101 Study - 4주차 (0) | 2024.07.07 |
| Terraform 101 Study - 3주차 (0) | 2024.06.30 |
| Terraform 101 Study - 2주차 (0) | 2024.06.23 |