
안녕하세요 늑대양 입니다
이번에 CloudNet@ 에서 진행하는 CI/CD Study 에 참여하게 되어 관련 내용을 정리하여 게시합니다.
CloudNet@ URL: https://gasidaseo.notion.site/CloudNet-Blog-c9dfa44a27ff431dafdd2edacc8a1863
CloudNet@ Blog | Notion
CloudNet@ 팀에서 Cloud Infra & Network 기술에 대한 정보를 공유하는 블로그 입니다.
gasidaseo.notion.site
스터디는 3주간 진행되며, 3주차 주제는 Jenkins CI / ArgoCD + k8s 입니다.


아래의 실습은 macOS 환경을 기준으로 작성되었습니다
0. 실습 환경 구성
Jenkins, gogs 컨테이너
호스트 OS 포트 노출로 접속 및 사용
# 작업 디렉토리 생성 후 이동
mkdir cicd-labs
cd cicd-labs

#
cat <<EOT > docker-compose.yaml
services:

  jenkins:
    container_name: jenkins
    image: jenkins/jenkins
    restart: unless-stopped
    networks:
      - cicd-network
    ports:
      - "8080:8080"
      - "50000:50000"
    volumes:
      - /var/run/docker.sock:/var/run/docker.sock
      - jenkins_home:/var/jenkins_home

  gogs:
    container_name: gogs
    image: gogs/gogs
    restart: unless-stopped
    networks:
      - cicd-network
    ports:
      - "10022:22"
      - "3000:3000"
    volumes:
      - gogs-data:/data

volumes:
  jenkins_home:
  gogs-data:

networks:
  cicd-network:
    driver: bridge
EOT


# 배포
docker compose up -d
docker compose ps

# 기본 정보 확인
for i in gogs jenkins ; do echo ">> container : $i <<"; docker compose exec $i sh -c "whoami && pwd"; echo; done

# 도커를 이용하여 각 컨테이너로 접속
docker compose exec jenkins bash
exit

docker compose exec gogs bash
exit
Jenkins 컨테이너 설정
# Jenkins 초기 암호 확인
docker compose exec jenkins cat /var/jenkins_home/secrets/initialAdminPassword
09a21116f3ce4f27a0ede79372febfb1

# Jenkins 웹 접속 주소 확인 : 계정 / 암호 입력 >> admin / qwe123
open "http://127.0.0.1:8080" # macOS
웹 브라우저에서 http://127.0.0.1:8080 접속 # Windows

# (참고) 로그 확인 : 플러그인 설치 과정 확인
docker compose logs jenkins -f

Jenkins 컨테이너에서 호스트에 도커 데몬 사용 설정 (Docker-out-of-Docker)
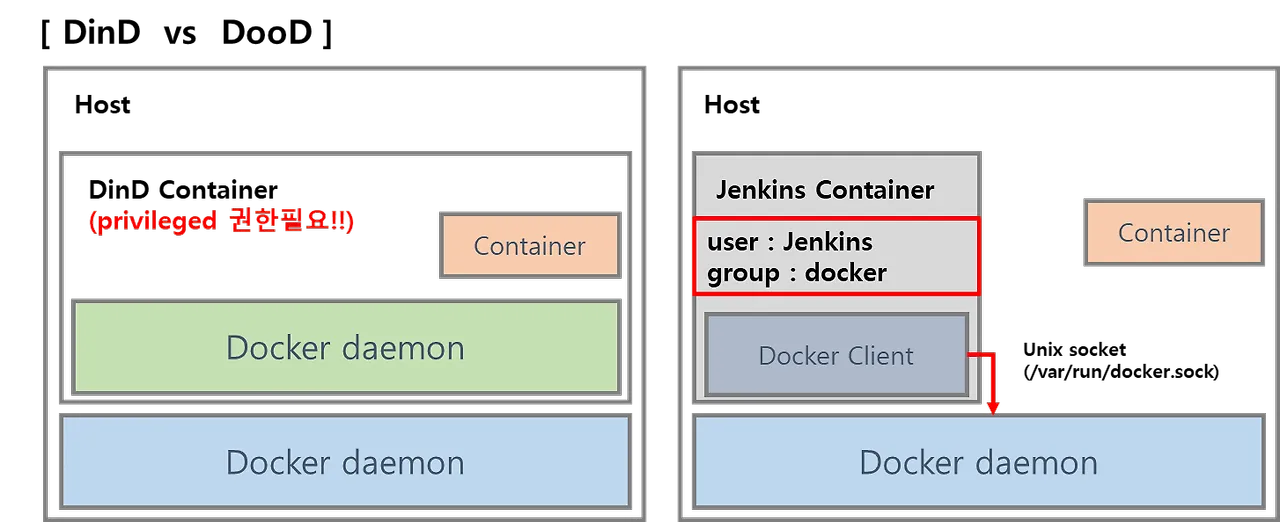
# Jenkins 컨테이너 내부에 도커 실행 파일 설치
docker compose exec --privileged -u root jenkins bash
-----------------------------------------------------
id

curl -fsSL https://download.docker.com/linux/debian/gpg -o /etc/apt/keyrings/docker.asc
chmod a+r /etc/apt/keyrings/docker.asc
echo \
  "deb [arch=$(dpkg --print-architecture) signed-by=/etc/apt/keyrings/docker.asc] https://download.docker.com/linux/debian \
  $(. /etc/os-release && echo "$VERSION_CODENAME") stable" | \
  tee /etc/apt/sources.list.d/docker.list > /dev/null
apt-get update && apt install docker-ce-cli curl tree jq yq -y

docker info
docker ps
which docker

# Jenkins 컨테이너 내부에서 root가 아닌 jenkins 유저도 docker를 실행할 수 있도록 권한을 부여
groupadd -g 2000 -f docker  # macOS(Container)
groupadd -g 1001 -f docker  # Windows WSL2(Container) >> cat /etc/group 에서 docker 그룹ID를 지정

chgrp docker /var/run/docker.sock
ls -l /var/run/docker.sock
usermod -aG docker jenkins
cat /etc/group | grep docker

exit
--------------------------------------------

# jenkins item 실행 시 docker 명령 실행 권한 에러 발생 : Jenkins 컨테이너 재기동으로 위 설정 내용을 Jenkins app 에도 적용 필요
docker compose restart jenkins
sudo docker compose restart jenkins  # Windows 경우 이후부터 sudo 붙여서 실행하자

# jenkins user로 docker 명령 실행 확인
docker compose exec jenkins id
docker compose exec jenkins docker info
docker compose exec jenkins docker ps

# mac 재부팅 시에 jenkins 컨테이너에서 docker 실행 실패 시
# 소켓 파일에 docker 그룹을 다시 지정

# 소켓 파일에 그룹이 다시 원상태로 복귀...
docker compose exec --privileged -u root jenkins ls -l /var/run/docker.sock

# 소켓 파일에 docker 그룹을 다시 지정
docker compose exec --privileged -u root jenkins chgrp docker /var/run/docker.sock

# 확인
docker compose exec jenkins docker info
Gogs 컨테이너 초기 설정
# 초기 설정 웹 접속
open "http://127.0.0.1:3000/install" # macOS
웹 브라우저에서 http://127.0.0.1:3000/install 접속 # Windows

# 초기 설정
# - 데이터베이스 유형 : SQLite3
# 애플리케이션 URL :  http://<각자 자신의 PC IP>:3000/
# 기본 브랜치 : main
# 관리자 계정 설정 클릭 : 이름(계정명 - *닉네임 사용 devops), 비밀번호(계정암호 qwe123), 이메일 입력

Gogs 실습을 위한 저장소 설정
# Host 에서 직접 git 작업

# (옵션) GIT 인증 정보 초기화
git credential-cache exit

#
git clone <각자 Gogs dev-app repo 주소>
git clone http://192.168.254.124:3000/devops/dev-app.git
Cloning into 'dev-app'...
Username for 'http://192.168.254.124:3000': devops  # Gogs 계정명
Password for 'http://devops@192.168.254.124:3000': <토큰> # 혹은 계정암호
...

#
cd dev-app

#
git config user.name "devops"
git config user.email "a@a.com"
git config init.defaultBranch main
git config credential.helper store

#
git branch
git remote -v

# server.py 파일 작성
cat > server.py <<EOF
from http.server import ThreadingHTTPServer, BaseHTTPRequestHandler
from datetime import datetime
import socket

class RequestHandler(BaseHTTPRequestHandler):
    def do_GET(self):
        self.send_response(200)
        self.send_header('Content-type', 'text/plain')
        self.end_headers()

        now = datetime.now()
        hostname = socket.gethostname()
        response_string = now.strftime("The time is %-I:%M:%S %p, VERSION 0.0.1\n")
        response_string += f"Server hostname: {hostname}\n"
        self.wfile.write(bytes(response_string, "utf-8"))

def startServer():
    try:
        server = ThreadingHTTPServer(('', 80), RequestHandler)
        print("Listening on " + ":".join(map(str, server.server_address)))
        server.serve_forever()
    except KeyboardInterrupt:
        server.shutdown()

if __name__ == "__main__":
    startServer()
EOF


# Dockerfile 생성
cat > Dockerfile <<EOF
FROM python:3.12
ENV PYTHONUNBUFFERED 1
COPY . /app
WORKDIR /app
CMD python3 server.py
EOF


# VERSION 파일 생성
echo "0.0.1" > VERSION

#
git status
git add .
git commit -m "Add dev-app"
git push -u origin main
...

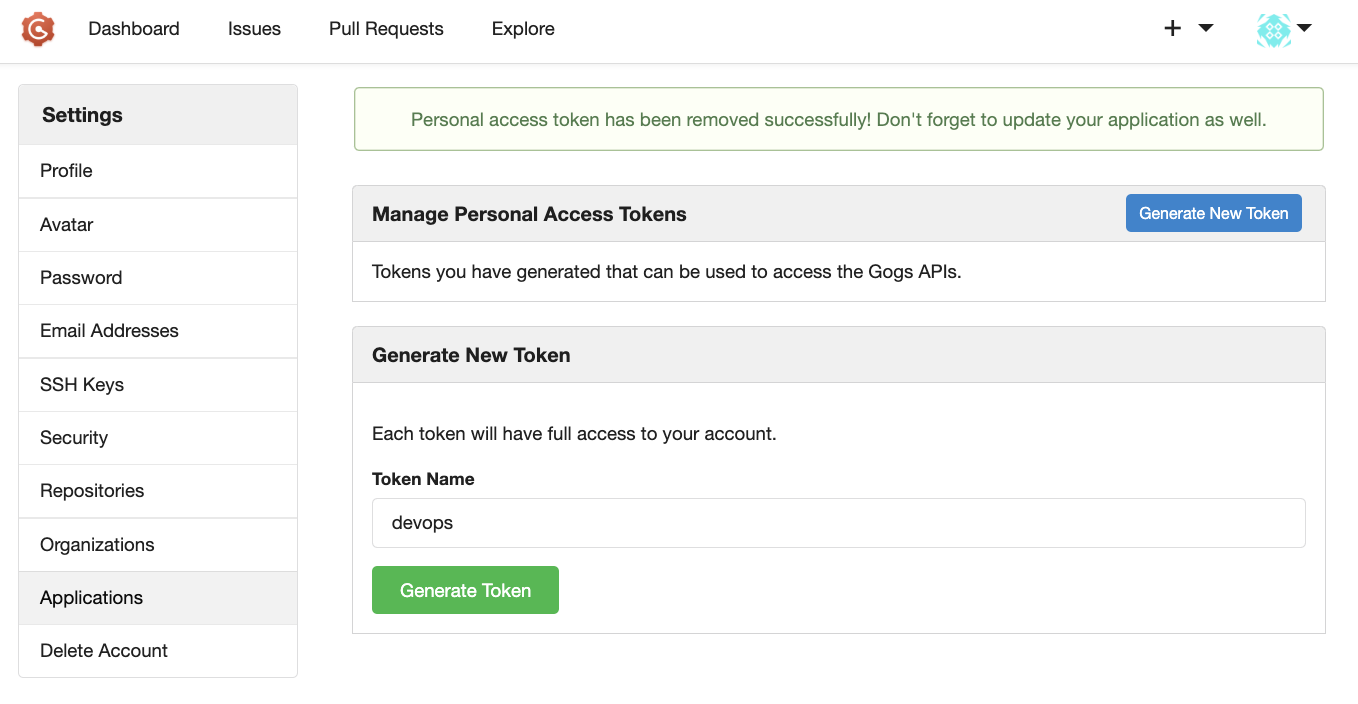
도커 허브 토큰 발급


1. Jenkins CI + k8s(kind)
kind 소개
Docker in Docker 형태로 쿠버네티스 클러스 환경 구성
kind URL: https://kind.sigs.k8s.io/
kind
kind is a tool for running local Kubernetes clusters using Docker container “nodes”. kind was primarily designed for testing Kubernetes itself, but may be used for local development or CI. If you have go 1.16+ and docker, podman or nerdctl installed go
kind.sigs.k8s.io

- kind is a tool for running local Kubernetes clusters using Docker container “nodes”.
- kind was primarily designed for testing Kubernetes itself, but may be used for local development or CI.
- kind is targeted at testing Kubernetes , kind supports multi-node (including HA) clusters
- kind uses kubeadm to configure cluster nodes.
kind 설치
1. Docker Desktop 설치
Installation Docs URL: https://docs.docker.com/desktop/setup/install/mac-install/
Mac
Install Docker for Mac to get started. This guide covers system requirements, where to download, and instructions on how to install and update.
docs.docker.com

2. kind 및 툴 설치
# 필수 툴 설치

# Install Kind
brew install kind
kind --version

# Install kubectl
brew install kubernetes-cli
kubectl version --client=true

## kubectl -> k 단축키 설정
echo "alias kubectl=kubecolor" >> ~/.zshrc

# Install Helm
brew install helm
helm version

# 권장사항:
# 유용한 툴 설치
# 툴 설치
brew install krew
brew install kube-ps1
brew install kubectx

# kubectl 출력 시 하이라이트 처리
brew install kubecolor
echo "alias kubectl=kubecolor" >> ~/.zshrc
echo "compdef kubecolor=kubectl" >> ~/.zshrc

# krew 플러그인 설치
kubectl krew install neat stren
3. kind 기본 사용
# 별도 kubeconfig 지정 후 사용

# 방안1 : 환경변수 지정
export KUBECONFIG=/Users/<Username>/Downloads/kind/config

# 방안2 : 혹은 --kubeconfig ./config 지정 가능

# 클러스터 생성
kind create cluster

# kubeconfig 파일 확인
ls -l /Users/<Username>/Downloads/kind/config
-rw-------  1 <Username>  staff  5608  4 24 09:05 /Users/<Username>/Downloads/kind/config

# 파드 정보 확인
kubectl get pod -A

# 클러스터 삭제
kind delete cluster
unset KUBECONFIG
# 클러스터 배포 전 확인
docker ps

# Create a cluster with kind
kind create cluster

# 클러스터 배포 확인
kind get clusters
kind get nodes
kubectl cluster-info

# 노드 정보 확인
kubectl get node -o wide

# 파드 정보 확인
kubectl get pod -A
kubectl get componentstatuses

# 컨트롤플레인 (컨테이너) 노드 1대가 실행
docker ps
docker images

# kube config 파일 확인
cat ~/.kube/config
혹은
cat $KUBECONFIG # KUBECONFIG 변수 지정 사용 시

# nginx 파드 배포 및 확인 : 컨트롤플레인 노드인데 파드가 배포 될까요?
kubectl run nginx --image=nginx:alpine
kubectl get pod -owide

# 노드에 Taints 정보 확인
kubectl describe node | grep Taints
Taints:             <none>

# 클러스터 삭제
kind delete cluster

# kube config 삭제 확인
cat ~/.kube/config
혹은
cat $KUBECONFIG # KUBECONFIG 변수 지정 사용 시
kind 로 k8s 배포
# 클러스터 배포 전 확인
docker ps

# 도커 로그인 진행
docker login -u <사용자 ID>


# 방안1 : 환경변수 지정
export KUBECONFIG=$PWD/kubeconfig

# Create a cluster with kind
MyIP=<각자 자신의 PC IP>

cd ..
cat > kind-3node.yaml <<EOF
kind: Cluster
apiVersion: kind.x-k8s.io/v1alpha4
networking:
  apiServerAddress: "$MyIP"
nodes:
- role: control-plane
  extraPortMappings:
  - containerPort: 30000
    hostPort: 30000
  - containerPort: 30001
    hostPort: 30001
  - containerPort: 30002
    hostPort: 30002
  - containerPort: 30003
    hostPort: 30003
- role: worker
- role: worker
EOF
kind create cluster --config kind-3node.yaml --name myk8s --image kindest/node:v1.30.6

# 확인
kind get nodes --name myk8s
kubens default

# kind 는 별도 도커 네트워크 생성 후 사용 : 기본값 172.18.0.0/16
docker network ls
docker inspect kind | jq

# k8s api 주소 확인 : 어떻게 로컬에서 접속이 되는 걸까?
kubectl cluster-info

# 노드 정보 확인 : CRI 는 containerd 사용
kubectl get node -o wide

# 파드 정보 확인 : CNI 는 kindnet 사용
kubectl get pod -A -o wide

# 네임스페이스 확인 >> 도커 컨테이너에서 배운 네임스페이스와 다릅니다!
kubectl get namespaces

# 컨트롤플레인/워커 노드(컨테이너) 확인 : 도커 컨테이너 이름은 myk8s-control-plane , myk8s-worker/worker-2 임을 확인
docker ps
docker images

# 디버그용 내용 출력에 ~/.kube/config 권한 인증 로드
kubectl get pod -v6

# kube config 파일 확인
cat $KUBECONFIG
ls -l $KUBECONFIG

# 참고 - 클러스터 삭제

# 클러스터 삭제
kind delete cluster --name myk8s
docker ps
cat $KUBECONFIG
unset KUBECONFIG
# kube-ops-view

# helm show values geek-cookbook/kube-ops-view
helm repo add geek-cookbook https://geek-cookbook.github.io/charts/
helm install kube-ops-view geek-cookbook/kube-ops-view --version 1.2.2 --set service.main.type=NodePort,service.main.ports.http.nodePort=30001 --set env.TZ="Asia/Seoul" --namespace kube-system

# 설치 확인
kubectl get deploy,pod,svc,ep -n kube-system -l app.kubernetes.io/instance=kube-ops-view

# kube-ops-view 접속 URL 확인 (1.5 , 2 배율)
open "http://127.0.0.1:30001/#scale=1.5"
open "http://127.0.0.1:30001/#scale=2"

Jenkins 설정
Jenkins Plugin 설치

- Pipeline Stage View
- Docker Pipeline
- Gogs
Jenkins 자격증명 설정
- Jenkins 관리 → Credentials → Globals → Add Credentials

- gogs-crd
- Kind : Username with password
- Username : devops
- Password : <Gogs 토큰>
- ID : gogs-crd
- 도커 허브 자격증명 설정 : dockerhub-crd
- Kind : Username with password
- Username : <도커 계정명>
- Password : <도커 계정 암호 혹은 토큰>
- ID : dockerhub-crd
- k8s(kind) 자격증명 설정 : k8s-crd
- Kind : Secret file
- File : <kubeconfig 파일 업로드>
- ID : k8s-crd
Jenkins Item 생성(Pipeline)
# Item name: pipeline-ci

# Pipeline Script
pipeline {
    agent any
    environment {
        DOCKER_IMAGE = '<자신의 도커 허브 계정>/dev-app' // Docker 이미지 이름
    }
    stages {
        stage('Checkout') {
            steps {
                 git branch: 'main',
                 url: 'http://192.168.254.124:3000/devops/dev-app.git',  // Git에서 코드 체크아웃
                 credentialsId: 'gogs-crd'  // Credentials ID
            }
        }
        stage('Read VERSION') {
            steps {
                script {
                    // VERSION 파일 읽기
                    def version = readFile('VERSION').trim()
                    echo "Version found: ${version}"
                    // 환경 변수 설정
                    env.DOCKER_TAG = version
                }
            }
        }
        stage('Docker Build and Push') {
            steps {
                script {
                    docker.withRegistry('https://index.docker.io/v1/', 'dockerhub-crd') {
                        // DOCKER_TAG 사용
                        def appImage = docker.build("${DOCKER_IMAGE}:${DOCKER_TAG}")
                        appImage.push()
                        appImage.push("latest")
                    }
                }
            }
        }
    }
    post {
        success {
            echo "Docker image ${DOCKER_IMAGE}:${DOCKER_TAG} has been built and pushed successfully!"
        }
        failure {
            echo "Pipeline failed. Please check the logs."
        }
    }
}
k8s Deploying an application

- Kubernetes uses declarative configuration, where you declare the state you want (like “I want 3 copies of my container running in the cluster”) in a configuration file.
- Then, submit that config to the cluster, and Kubernetes will strive to meet the requirements you specified.

# 디플로이먼트 오브젝트 배포 : 리플리카(파드 2개), 컨테이너 이미지 >> 아래 도커 계정 부분만 변경하여 배포 테스트
DHUSER=<도커 허브 계정명>

cat <<EOF | kubectl apply -f -
apiVersion: apps/v1
kind: Deployment
metadata:
  name: timeserver
spec:
  replicas: 2
  selector:
    matchLabels:
      pod: timeserver-pod
  template:
    metadata:
      labels:
        pod: timeserver-pod
    spec:
      containers:
      - name: timeserver-container
        image: docker.io/$DHUSER/dev-app:0.0.1
EOF
watch -d kubectl get deploy,pod -o wide

# 배포 상태 확인 : kube-ops-view 웹 확인
kubectl get deploy,pod -o wide
kubectl describe pod
...
Events:
  Type     Reason     Age                From               Message
  ----     ------     ----               ----               -------
  Normal   Scheduled  53s                default-scheduler  Successfully assigned default/timeserver-7cf7db8f6c-mtvn7 to myk8s-worker
  Normal   BackOff    19s (x2 over 50s)  kubelet            Back-off pulling image "docker.io/gasida/dev-app:latest"
  Warning  Failed     19s (x2 over 50s)  kubelet            Error: ImagePullBackOff
  Normal   Pulling    4s (x3 over 53s)   kubelet            Pulling image "docker.io/gasida/dev-app:latest"
  Warning  Failed     3s (x3 over 51s)   kubelet            Failed to pull image "docker.io/gasida/dev-app:latest": failed to pull and unpack image "docker.io/gasida/dev-app:latest": failed to resolve reference "docker.io/gasida/dev-app:latest": pull access denied, repository does not exist or may require authorization: server message: insufficient_scope: authorization failed
  Warning  Failed     3s (x3 over 51s)   kubelet            Error: ErrImagePull
Troubleshooting: image pull error
- (ErrImagePull / ErrImagePullBackOff)
- 보통 컨테이너 이미지 정보를 잘못 기입하는 경우에 발생
- This error indicates that Kubernetes was unable to download the container image.
- 혹은 이미지 저장소에 이미지가 없거나, 이미지 가져오는 자격 증명이 없는 경우에 발생
- This typically means that the image name was misspelled in your configuration, the image doesn’t exist in the image repository, or your cluster doesn’t have the required credentials to access the repository.
- Check the spelling of your image and verify that the image is in your repository.
# k8s secret : 도커 자격증명 설정
kubectl get secret -A  # 생성 시 타입 지정

DHUSER=<도커 허브 계정>
DHPASS=<도커 허브 암호 혹은 토큰>
echo $DHUSER $DHPASS

DHUSER=gasida
DHPASS=dckr_pat_KWx-0N27iEd1lk8aNvRz8pDrQlI
echo $DHUSER $DHPASS

kubectl create secret docker-registry dockerhub-secret \
  --docker-server=https://index.docker.io/v1/ \
  --docker-username=$DHUSER \
  --docker-password=$DHPASS

# 확인
kubectl get secret
kubectl describe secret
kubectl get secrets -o yaml | kubectl neat  # base64 인코딩 확인

SECRET=eyJhdXRocyI6eyJodHRwczovL2luZGV4LmRvY2tlci5pby92MS8iOnsidXNlcm5hbWUiOiJnYXNpZGEiLCJwYXNzd29yZCI6ImRja3JfcGF0X0tXeC0wTjI3aUVkMWxrOGFOdlJ6OHBEclFsSSIsImF1dGgiOiJaMkZ6YVdSaE9tUmphM0pmY0dGMFgwdFhlQzB3VGpJM2FVVmtNV3hyT0dGT2RsSjZPSEJFY2xGc1NRPT0ifX19
echo "$SECRET" | base64 -d ; echo


# 디플로이먼트 오브젝트 업데이트 : 시크릿 적용 >> 아래 도커 계정 부분만 변경해서 배포해보자
cat <<EOF | kubectl apply -f -
apiVersion: apps/v1
kind: Deployment
metadata:
  name: timeserver
spec:
  replicas: 2
  selector:
    matchLabels:
      pod: timeserver-pod
  template:
    metadata:
      labels:
        pod: timeserver-pod
    spec:
      containers:
      - name: timeserver-container
        image: docker.io/$DHUSER/dev-app:0.0.1
      imagePullSecrets:
      - name: dockerhub-secret
EOF
watch -d kubectl get deploy,pod -o wide

# 확인
kubectl get deploy,pod

# 접속을 위한 curl 파드 생성
kubectl run curl-pod --image=curlimages/curl:latest --command -- sh -c "while true; do sleep 3600; done"
kubectl get pod -owide

# timeserver 파드 IP 1개 확인 후 접속 확인
PODIP1=<timeserver-Y 파드 IP>
PODIP1=10.244.1.3

kubectl exec -it curl-pod -- curl $PODIP1
kubectl exec -it curl-pod -- curl $PODIP1

# 로그 확인
kubectl logs deploy/timeserver
kubectl logs deploy/timeserver -f
kubectl stern deploy/timeserver
kubectl stern -l pod=timeserver-pod

# 파드 1개 삭제 후 동작 확인 → 접속 확인

#
POD1NAME=<파드 1개 이름>
POD1NAME=timeserver-7954b8f6df-l25wx

kubectl get pod -owide
kubectl delete pod $POD1NAME && kubectl get pod -w

# 셀프 힐링 , 파드 IP 변경 -> 고정 진입점(고정 IP/도메인네임) 필요 => Service
kubectl get deploy,rs,pod -owide


Publishing your Service
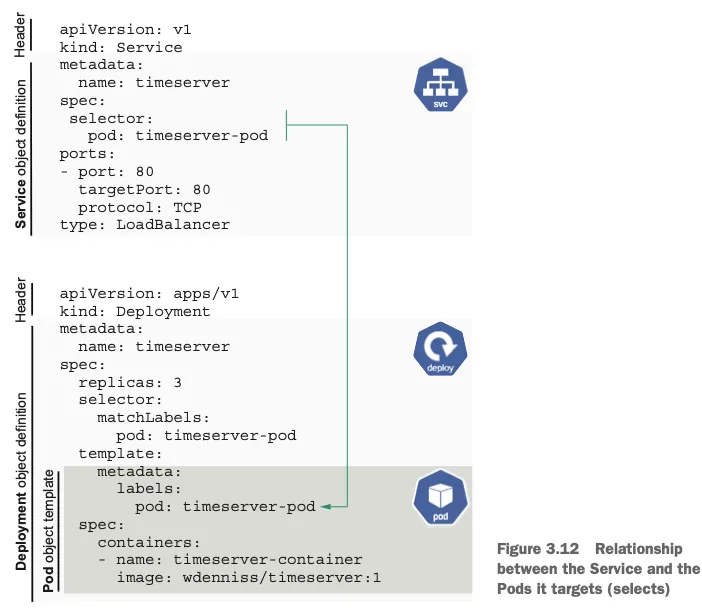
# 서비스 생성
cat <<EOF | kubectl apply -f -
apiVersion: v1
kind: Service
metadata:
  name: timeserver
spec:
  selector:
    pod: timeserver-pod
  ports:
  - port: 80
    targetPort: 80
    protocol: TCP
    nodePort: 30000
  type: NodePort
EOF

#
kubectl get service,ep timeserver -owide
NAME                 TYPE       CLUSTER-IP     EXTERNAL-IP   PORT(S)        AGE   SELECTOR
service/timeserver   NodePort   10.96.236.37   <none>        80:30000/TCP   25s   pod=timeserver-pod

NAME                   ENDPOINTS                                   AGE
endpoints/timeserver   10.244.1.2:80,10.244.2.2:80,10.244.3.2:80   25s

# Service(ClusterIP)로 접속 확인 : 도메인네임, ClusterIP
kubectl exec -it curl-pod -- curl timeserver
kubectl exec -it curl-pod -- curl $(kubectl get svc timeserver -o jsonpath={.spec.clusterIP})

# Service(NodePort)로 접속 확인 "노드IP:NodePort"
curl http://127.0.0.1:30000
curl http://127.0.0.1:30000

# 반복 접속 해두기 : 부하분산 확인
while true; do curl -s --connect-timeout 1 http://127.0.0.1:30000 | grep name ; sleep 1 ; done
for i in {1..100};  do curl -s http://127.0.0.1:30000 | grep name; done | sort | uniq -c | sort -nr

# 파드 복제복 증가 : service endpoint 대상에 자동 추가
kubectl scale deployment timeserver --replicas 4
kubectl get service,ep timeserver -owide

# 반복 접속 해두기 : 부하분산 확인
while true; do curl -s --connect-timeout 1 http://127.0.0.1:30000 | grep name ; sleep 1 ; done
for i in {1..100};  do curl -s http://127.0.0.1:30000 | grep name; done | sort | uniq -c | sort -nr
Updating your application
# 샘플 server.py 코드 변경
# 새 0.0.2 버전 태그로 컨테이너 이미지 빌드 → 컨테이너 저장소 Push ⇒ k8s deployment 업데이트 배포

# VERSION 변경 : 0.0.2
# server.py 변경 : 0.0.2
git add . && git commit -m "VERSION $(cat VERSION) Changed" && git push -u origin main
# 파드 복제복 증가
kubectl scale deployment timeserver --replicas 4
kubectl get service,ep timeserver -owide

# 반복 접속 해두기 : 부하분산 확인
while true; do curl -s --connect-timeout 1 http://127.0.0.1:30000 | grep name ; sleep 1 ; done
for i in {1..100};  do curl -s http://127.0.0.1:30000 | grep name; done | sort | uniq -c | sort -nr

#
kubectl set image deployment timeserver timeserver-container=$DHUSER/dev-app:0.0.Y && watch -d "kubectl get deploy,ep timeserver; echo; kubectl get rs,pod"
kubectl set image deployment timeserver timeserver-container=$DHUSER/dev-app:0.0.2 && watch -d "kubectl get deploy,ep timeserver; echo; kubectl get rs,pod"

# 롤링 업데이트 확인
kubectl get deploy,rs,pod,svc,ep -owide

# kubectl get deploy $DEPLOYMENT_NAME
kubectl get deploy timeserver
kubectl get pods -l pod=timeserver-pod

#
curl http://127.0.0.1:30000
Gogs Webhooks 설정
# gogs 컨테이너의 app.init 파일 수정 후 컨테이너 재기동

[security]
INSTALL_LOCK = true
SECRET_KEY   = j2xaUPQcbAEwpIu
LOCAL_NETWORK_ALLOWLIST = 192.168.254.124 # 각자 자신의 PC IP

# 업데이트 후 컨테이너 재기동
dockerc compose restart gogs

2. Jenkins CI/CD + k8s(kind)
Jenkins 컨테이너 내부에 툴 설치
# kubectl, helm

# Install kubectl, helm
docker compose exec --privileged -u root jenkins bash
--------------------------------------------
#curl -LO "https://dl.k8s.io/release/v1.31.0/bin/linux/amd64/kubectl"
curl -LO "https://dl.k8s.io/release/$(curl -L -s https://dl.k8s.io/release/stable.txt)/bin/linux/arm64/kubectl"  # macOS
curl -LO "https://dl.k8s.io/release/$(curl -L -s https://dl.k8s.io/release/stable.txt)/bin/linux/amd64/kubectl"  # WindowOS

install -o root -g root -m 0755 kubectl /usr/local/bin/kubectl
kubectl version --client=true

#
curl https://raw.githubusercontent.com/helm/helm/main/scripts/get-helm-3 | bash
helm version

exit
--------------------------------------------
docker compose exec jenkins kubectl version --client=true
docker compose exec jenkins helm version

Jenkins Item 생성 - k8s-cmd
# Pipeline
# Item name: k8s-cmd

pipeline {
    agent any
    environment {
        KUBECONFIG = credentials('k8s-crd')
    }
    stages {
        stage('List Pods') {
            steps {
                sh '''
                # Fetch and display Pods
                kubectl get pods -A --kubeconfig "$KUBECONFIG"
                '''
            }
        }
    }
}

Jenkins를 이용한 blue-green 배포 준비
# 디플로이먼트 / 서비스 yaml 파일 작성

#
cd dev-app

#
mkdir deploy

#
cat > deploy/echo-server-blue.yaml <<EOF
apiVersion: apps/v1
kind: Deployment
metadata:
  name: echo-server-blue
spec:
  replicas: 2
  selector:
    matchLabels:
      app: echo-server
      version: blue
  template:
    metadata:
      labels:
        app: echo-server
        version: blue
    spec:
      containers:
      - name: echo-server
        image: hashicorp/http-echo
        args:
        - "-text=Hello from Blue"
        ports:
        - containerPort: 5678
EOF

cat > deploy/echo-server-service.yaml <<EOF
apiVersion: v1
kind: Service
metadata:
  name: echo-server-service
spec:
  selector:
    app: echo-server
    version: blue
  ports:
  - protocol: TCP
    port: 80
    targetPort: 5678
    nodePort: 30000
  type: NodePort
EOF

cat > deploy/echo-server-green.yaml <<EOF
apiVersion: apps/v1
kind: Deployment
metadata:
  name: echo-server-green
spec:
  replicas: 2
  selector:
    matchLabels:
      app: echo-server
      version: green
  template:
    metadata:
      labels:
        app: echo-server
        version: green
    spec:
      containers:
      - name: echo-server
        image: hashicorp/http-echo
        args:
        - "-text=Hello from Green"
        ports:
        - containerPort: 5678
EOF

#
git add . && git commit -m "Add echo server yaml" && git push -u origin main
참고사항) 직접 blue-green 업데이트 실행
#
cd deploy
kubectl delete deploy,svc --all
kubectl apply -f .

#
kubectl get deploy,svc,ep -owide
curl -s http://127.0.0.1:30000

#
kubectl patch svc echo-server-service -p '{"spec": {"selector": {"version": "green"}}}'
kubectl get deploy,svc,ep -owide
curl -s http://127.0.0.1:30000

#
kubectl patch svc echo-server-service -p '{"spec": {"selector": {"version": "blue"}}}'
kubectl get deploy,svc,ep -owide
curl -s http://127.0.0.1:30000

# 삭제
kubectl delete -f .
cd ..
Jenkins Item 생성 - k8s-bluegreen
# 이전 실습의 디플로이먼트, 서비스 삭제
kubectl delete deploy,svc timeserver

# 반복 접속 미리 실행
while true; do curl -s --connect-timeout 1 http://127.0.0.1:30000 ; date ; echo "------------" ; sleep 1 ; done

# Pipeline script
pipeline {
    agent any

    environment {
        KUBECONFIG = credentials('k8s-crd')
    }

    stages {
        stage('Checkout') {
            steps {
                 git branch: 'main',
                 url: 'http://192.168.254.124:3000/devops/dev-app.git',  // Git에서 코드 체크아웃
                 credentialsId: 'gogs-crd'  // Credentials ID
            }
        }

        stage('container image build') {
            steps {
                echo "container image build"
            }
        }

        stage('container image upload') {
            steps {
                echo "container image upload"
            }
        }

        stage('k8s deployment blue version') {
            steps {
                sh "kubectl apply -f ./deploy/echo-server-blue.yaml --kubeconfig $KUBECONFIG"
                sh "kubectl apply -f ./deploy/echo-server-service.yaml --kubeconfig $KUBECONFIG"
            }
        }

        stage('approve green version') {
            steps {
                input message: 'approve green version', ok: "Yes"
            }
        }

        stage('k8s deployment green version') {
            steps {
	        	sh "kubectl apply -f ./deploy/echo-server-green.yaml --kubeconfig $KUBECONFIG"
            }
        }

        stage('approve version switching') {
            steps {
                script {
                    returnValue = input message: 'Green switching?', ok: "Yes", parameters: [booleanParam(defaultValue: true, name: 'IS_SWITCHED')]
                    if (returnValue) {
                        sh "kubectl patch svc echo-server-service -p '{\"spec\": {\"selector\": {\"version\": \"green\"}}}' --kubeconfig $KUBECONFIG"
                    }
                }
            }
        }

        stage('Blue Rollback') {
            steps {
                script {
                    returnValue = input message: 'Blue Rollback?', parameters: [choice(choices: ['done', 'rollback'], name: 'IS_ROLLBACk')]
                    if (returnValue == "done") {
                        sh "kubectl delete -f ./deploy/echo-server-blue.yaml --kubeconfig $KUBECONFIG"
                    }
                    if (returnValue == "rollback") {
                        sh "kubectl patch svc echo-server-service -p '{\"spec\": {\"selector\": {\"version\": \"blue\"}}}' --kubeconfig $KUBECONFIG"
                    }
                }
            }
        }
    }
}
# 지금 배포 후 동작 확인

# 실습 완료 후 삭제
kubectl delete deploy echo-server-blue echo-server-green
kubectl delete svc echo-server-service
3. Jenkins CI + ArgoCD + k8s(kind)
Argo Main URL: https://argoproj.github.io/
Home
Open source Kubernetes native workflows, events, CI and CD
argoproj.github.io
ArgoCD Main URL: https://argoproj.github.io/cd/
Argo CD
Declarative continuous delivery with a fully-loaded UI.
argoproj.github.io
Argo CD 소개
Argo CD is a declarative, GitOps continuous delivery tool for Kubernetes
- Application definitions, configurations, and environments should be declarative and version controlled.
- Application deployment and lifecycle management should be automated, auditable, and easy to understand.
- How it works : Argo CD follows the GitOps pattern of using Git repositories as the source of truth for defining the desired application state. Kubernetes manifests can be specified in several ways:

Argo CD Architecture URL: https://argo-cd.readthedocs.io/en/stable/operator-manual/architecture/
Argo CD 설치 및 기본 설정
Argo CD 설치
# 네임스페이스 생성 및 파라미터 파일 작성
kubectl create ns argocd
cat <<EOF > argocd-values.yaml
dex:
  enabled: false

server:
  service:
    type: NodePort
    nodePortHttps: 30002
EOF

# 설치
helm repo add argo https://argoproj.github.io/argo-helm
helm install argocd argo/argo-cd --version 7.7.10 -f argocd-values.yaml --namespace argocd

# 확인
kubectl get pod,svc,ep -n argocd
kubectl get crd | grep argo
applications.argoproj.io                     2024-04-14T08:12:16Z
applicationsets.argoproj.io                  2024-04-14T08:12:17Z
appprojects.argoproj.io                      2024-04-14T08:12:16Z

# 최초 접속 암호 확인
kubectl -n argocd get secret argocd-initial-admin-secret -o jsonpath="{.data.password}" | base64 -d ;echo
PCdOlwZT8c4naBWK

# Argo CD 웹 접속 주소 확인 : 초기 암호 입력 (admin 계정)
open "https://127.0.0.1:30002" # macOS
## Windows OS경우 직접 웹 브라우저에서 https://127.0.0.1:30002 접속


- Argo CD 웹 접속 확인
- User info → UPDATE PASSWORD 로 admin 계정 암호 변경 (qwe12345)
- 기본 정보 확인 (Settings) : Clusters, Projects, Accounts
- ops-deploy Repo 등록 : Settings → Repositories → CONNECT REPO 클릭
- connection method : VIA HTTPS
- Type : git
- Project : default
- Repo URL : http://<Private IP>:3000/devops/ops-deploy
- Username : devops
- Password : <Gogs 토큰>


(기초) helm chart를 통한 배포 실습
#
mkdir nginx-chart
cd nginx-chart

mkdir templates

cat > templates/configmap.yaml <<EOF
apiVersion: v1
kind: ConfigMap
metadata:
  name: {{ .Release.Name }}
data:
  index.html: |
{{ .Values.indexHtml | indent 4 }}
EOF

cat > templates/deployment.yaml <<EOF
apiVersion: apps/v1
kind: Deployment
metadata:
  name: {{ .Release.Name }}
spec:
  replicas: {{ .Values.replicaCount }}
  selector:
    matchLabels:
      app: {{ .Release.Name }}
  template:
    metadata:
      labels:
        app: {{ .Release.Name }}
    spec:
      containers:
      - name: nginx
        image: {{ .Values.image.repository }}:{{ .Values.image.tag }}
        ports:
        - containerPort: 80
        volumeMounts:
        - name: index-html
          mountPath: /usr/share/nginx/html/index.html
          subPath: index.html
      volumes:
      - name: index-html
        configMap:
          name: {{ .Release.Name }}
EOF

cat > templates/service.yaml <<EOF
apiVersion: v1
kind: Service
metadata:
  name: {{ .Release.Name }}
spec:
  selector:
    app: {{ .Release.Name }}
  ports:
  - protocol: TCP
    port: 80
    targetPort: 80
    nodePort: 30000
  type: NodePort
EOF

cat > values.yaml <<EOF
indexHtml: |
  <!DOCTYPE html>
  <html>
  <head>
    <title>Welcome to Nginx!</title>
  </head>
  <body>
    <h1>Hello, Kubernetes!</h1>
    <p>Nginx version 1.26.1</p>
  </body>
  </html>

image:
  repository: nginx
  tag: 1.26.1

replicaCount: 1
EOF

cat > Chart.yaml <<EOF
apiVersion: v2
name: nginx-chart
description: A Helm chart for deploying Nginx with custom index.html
type: application
version: 1.0.0
appVersion: "1.26.1"
EOF

# 이전 timeserver/service(nodeport) 삭제
kubectl delete deploy,svc --all

# 직접 배포 해보기
helm install dev-nginx . -f values.yaml
helm list
kubectl get deploy,svc,ep,cm dev-nginx -owide

#
curl http://127.0.0.1:30000
curl -s http://127.0.0.1:30000 | grep version
open http://127.0.0.1:30000


# value 값 변경 후 적용 해보기 : version/tag, replicaCount
cat > values.yaml <<EOF
indexHtml: |
  <!DOCTYPE html>
  <html>
  <head>
    <title>Welcome to Nginx!</title>
  </head>
  <body>
    <h1>Hello, Kubernetes!</h1>
    <p>Nginx version 1.26.2</p>
  </body>
  </html>

image:
  repository: nginx
  tag: 1.26.2

replicaCount: 2
EOF

# helm chart 업그레이드 적용
helm upgrade dev-nginx . -f values.yaml

# 확인
helm list
kubectl get deploy,svc,ep,cm dev-nginx -owide
curl http://127.0.0.1:30000
curl -s http://127.0.0.1:30000 | grep version
open http://127.0.0.1:30000

# 확인 후 삭제
helm uninstall dev-nginx
Repo(ops-deploy) 에 nginx helm chart 를 Argo CD를 통한 배포 1
git 작업
#
cd ~/cicd-labs
git clone http://192.168.254.124:3000/devops/ops-deploy.git
cd ops-deploy

#
git config user.name "devops"
git config user.email "a@a.com"
git config init.defaultBranch main
git config credential.helper store

#
VERSION=1.26.1
mkdir nginx-chart
mkdir nginx-chart/templates

cat > nginx-chart/VERSION <<EOF
$VERSION
EOF

cat > nginx-chart/templates/configmap.yaml <<EOF
apiVersion: v1
kind: ConfigMap
metadata:
  name: {{ .Release.Name }}
data:
  index.html: |
{{ .Values.indexHtml | indent 4 }}
EOF

cat > nginx-chart/templates/deployment.yaml <<EOF
apiVersion: apps/v1
kind: Deployment
metadata:
  name: {{ .Release.Name }}
spec:
  replicas: {{ .Values.replicaCount }}
  selector:
    matchLabels:
      app: {{ .Release.Name }}
  template:
    metadata:
      labels:
        app: {{ .Release.Name }}
    spec:
      containers:
      - name: nginx
        image: {{ .Values.image.repository }}:{{ .Values.image.tag }}
        ports:
        - containerPort: 80
        volumeMounts:
        - name: index-html
          mountPath: /usr/share/nginx/html/index.html
          subPath: index.html
      volumes:
      - name: index-html
        configMap:
          name: {{ .Release.Name }}
EOF

cat > nginx-chart/templates/service.yaml <<EOF
apiVersion: v1
kind: Service
metadata:
  name: {{ .Release.Name }}
spec:
  selector:
    app: {{ .Release.Name }}
  ports:
  - protocol: TCP
    port: 80
    targetPort: 80
    nodePort: 30000
  type: NodePort
EOF

cat > nginx-chart/values-dev.yaml <<EOF
indexHtml: |
  <!DOCTYPE html>
  <html>
  <head>
    <title>Welcome to Nginx!</title>
  </head>
  <body>
    <h1>Hello, Kubernetes!</h1>
    <p>DEV : Nginx version $VERSION</p>
  </body>
  </html>

image:
  repository: nginx
  tag: $VERSION

replicaCount: 1
EOF

cat > nginx-chart/values-prd.yaml <<EOF
indexHtml: |
  <!DOCTYPE html>
  <html>
  <head>
    <title>Welcome to Nginx!</title>
  </head>
  <body>
    <h1>Hello, Kubernetes!</h1>
    <p>PRD : Nginx version $VERSION</p>
  </body>
  </html>

image:
  repository: nginx
  tag: $VERSION

replicaCount: 2
EOF

cat > nginx-chart/Chart.yaml <<EOF
apiVersion: v2
name: nginx-chart
description: A Helm chart for deploying Nginx with custom index.html
type: application
version: 1.0.0
appVersion: "$VERSION"
EOF

tree nginx-chart
nginx-chart
├── Chart.yaml
├── VERSION
├── templates
│   ├── configmap.yaml
│   ├── deployment.yaml
│   └── service.yaml
├── values-dev.yaml
└── values-prd.yaml

#
git status && git add . && git commit -m "Add nginx helm chart" && git push -u origin main

Argo CD 에 App 등록
- Application → NEW APP 통해 생성 진행
- GENERAL
- App Name : dev-nginx
- Project Name : default
- SYNC POLICY : Manual
- SYNC OPTIONS : AUTO-CREATE NAMESPACE(Check)
- Source
- Repo URL : 설정되어 있는 것 선택
- Revision : HEAD
- PATH : nginx-chart
- DESTINATION
- Cluster URL : <기본값>
- NAMESPACE : dev-nginx
- HELM
- Values files : values-dev.yaml


#
kubectl get applications -n argocd
NAME        SYNC STATUS   HEALTH STATUS
dev-nginx   OutOfSync     Missing

kubectl describe applications -n argocd dev-nginx

# 반복 접속 시도
while true; do curl -s --connect-timeout 1 http://127.0.0.1:30000 ; date ; echo "------------" ; sleep 1 ; done


# SYNC 반영 확인

# 아래 처럼 yaml 로 APP 생성 가능
kubectl get applications -n argocd

# 배포 확인
kubectl get all -n dev-nginx -o wide

# 코드 수정 후 반영 확인

#
VERSION=1.26.2

cat > nginx-chart/VERSION <<EOF
$VERSION
EOF

cat > nginx-chart/values-dev.yaml <<EOF
indexHtml: |
  <!DOCTYPE html>
  <html>
  <head>
    <title>Welcome to Nginx!</title>
  </head>
  <body>
    <h1>Hello, Kubernetes!</h1>
    <p>DEV : Nginx version $VERSION</p>
  </body>
  </html>

image:
  repository: nginx
  tag: $VERSION

replicaCount: 2
EOF

cat > nginx-chart/values-prd.yaml <<EOF
indexHtml: |
  <!DOCTYPE html>
  <html>
  <head>
    <title>Welcome to Nginx!</title>
  </head>
  <body>
    <h1>Hello, Kubernetes!</h1>
    <p>PRD : Nginx version $VERSION</p>
  </body>
  </html>

image:
  repository: nginx
  tag: $VERSION

replicaCount: 2
EOF

#
git status && git add . && git commit -m "Update nginx version $(cat nginx-chart/VERSION)" && git push -u origin main


# 배포 확인
kubectl get all -n dev-nginx -o wide

# Argo CD 웹에서 App 삭제
watch -d kubectl get all -n dev-nginx -o wide
Repo(ops-deploy) 에 nginx helm chart 를 Argo CD를 통한 배포 2
Argo CD Declarative Setup - Argo CD 애플리케이션 자체를 yaml 로 생성
Docs URL: https://argo-cd.readthedocs.io/en/stable/operator-manual/declarative-setup/
dev-nginx app 생성 및 Auto SYNC
#
# repoURL 변경 필요
cat <<EOF | kubectl apply -f -
apiVersion: argoproj.io/v1alpha1
kind: Application
metadata:
  name: dev-nginx
  namespace: argocd
  finalizers:
  - resources-finalizer.argocd.argoproj.io
spec:
  project: default
  source:
    helm:
      valueFiles:
      - values-dev.yaml
    path: nginx-chart
    repoURL: http://172.30.1.28:3000/devops/ops-deploy
    targetRevision: HEAD
  syncPolicy:
    automated:
      prune: true
    syncOptions:
    - CreateNamespace=true
  destination:
    namespace: dev-nginx
    server: https://kubernetes.default.svc
EOF

#
kubectl get applications -n argocd dev-nginx
kubectl get applications -n argocd dev-nginx -o yaml | kubectl neat
kubectl describe applications -n argocd dev-nginx
kubectl get pod,svc,ep,cm -n dev-nginx

#
curl http://127.0.0.1:30000
open http://127.0.0.1:30000

# Argo CD App 삭제
kubectl delete applications -n argocd dev-nginx
prd-nginx app 생성 및 Auto SYNC
#
# repoURL 변경 필요
cat <<EOF | kubectl apply -f -
apiVersion: argoproj.io/v1alpha1
kind: Application
metadata:
  name: prd-nginx
  namespace: argocd
  finalizers:
  - resources-finalizer.argocd.argoproj.io
spec:
  destination:
    namespace: prd-nginx
    server: https://kubernetes.default.svc
  project: default
  source:
    helm:
      valueFiles:
      - values-prd.yaml
    path: nginx-chart
    repoURL: http://172.30.1.28:3000/devops/ops-deploy
    targetRevision: HEAD
  syncPolicy:
    automated:
      prune: true
    syncOptions:
    - CreateNamespace=true
EOF

#
kubectl get applications -n argocd prd-nginx
kubectl describe applications -n argocd prd-nginx
kubectl get pod,svc,ep,cm -n prd-nginx

#
curl http://127.0.0.1:30000
open http://127.0.0.1:30000

# Argo CD App 삭제
kubectl delete applications -n argocd prd-nginx

Full CI/CD 구성

ops-deploy repo 코드 작업
#
cd ops-deploy
mkdir dev-app

# 도커 계정 정보
DHUSER=<도커 허브 계정>
DHUSER=gasida

# 버전 정보
VERSION=0.0.1

#
cat > dev-app/VERSION <<EOF
$VERSION
EOF

cat > dev-app/timeserver.yaml <<EOF
apiVersion: apps/v1
kind: Deployment
metadata:
  name: timeserver
spec:
  replicas: 2
  selector:
    matchLabels:
      pod: timeserver-pod
  template:
    metadata:
      labels:
        pod: timeserver-pod
    spec:
      containers:
      - name: timeserver-container
        image: docker.io/$DHUSER/dev-app:$VERSION
      imagePullSecrets:
      - name: dockerhub-secret
EOF

cat > dev-app/service.yaml <<EOF
apiVersion: v1
kind: Service
metadata:
  name: timeserver
spec:
  selector:
    pod: timeserver-pod
  ports:
  - port: 80
    targetPort: 80
    protocol: TCP
    nodePort: 30000
  type: NodePort
EOF

#
git status && git add . && git commit -m "Add dev-app deployment yaml" && git push -u origin main
Argo CD app 생성
#
# repoURL IP 변경 필요
cat <<EOF | kubectl apply -f -
apiVersion: argoproj.io/v1alpha1
kind: Application
metadata:
  name: timeserver
  namespace: argocd
  finalizers:
  - resources-finalizer.argocd.argoproj.io
spec:
  project: default
  source:
    path: dev-app
    repoURL: http://172.30.1.28:3000/devops/ops-deploy
    targetRevision: HEAD
  syncPolicy:
    automated:
      prune: true
    syncOptions:
    - CreateNamespace=true
  destination:
    namespace: default
    server: https://kubernetes.default.svc
EOF

#
kubectl get applications -n argocd timeserver
kubectl get applications -n argocd timeserver -o yaml | kubectl neat
kubectl describe applications -n argocd timeserver
kubectl get deploy,rs,pod
kubectl get svc,ep timeserver

#
curl http://127.0.0.1:30000
open http://127.0.0.1:30000
dev-app repo 코드 작업
- dev-app Repo에 VERSION 업데이트 시 → ops-deploy Repo 에 dev-app 에 파일에 버전 정보 업데이트 작업 추가
- 기존 버전 정보는 VERSION 파일 내에 정보를 가져와서 변수 지정 : OLDVER=$(cat dev-app/VERSION)
- 신규 버전 정보는 environment 도커 태그 정보를 가져와서 변수 지정 : NEWVER=$(echo ${DOCKER_TAG})
- 이후 sed 로 ops-deploy Repo 에 dev-app/VERSION, timeserver.yaml 2개 파일에 ‘기존 버전’ → ‘신규 버전’으로 값 변경
- 이후 ops-deploy Repo 에 git push ⇒ Argo CD app 가 최대 3분 사이에 변경 확인 후 AutoSync 로 신규 버전 업데이트 진행
# 젠킨스에 SCM-Pipeline(SCM:git) 으로 사용되고 있는 파일을 수정해서 실습에 사용

# docker ID 변경 필요
# url IP 변경 필요

pipeline {
    agent any
    environment {
        DOCKER_IMAGE = 'sainthm/dev-app' // Docker 이미지 이름
        GOGSCRD = credentials('gogs-crd')
    }
    stages {
        stage('dev-app Checkout') {
            steps {
                 git branch: 'main',
                 url: 'http://172.30.1.28:3000/devops/dev-app.git',  // Git에서 코드 체크아웃
                 credentialsId: 'gogs-crd'  // Credentials ID
            }
        }
        stage('Read VERSION') {
            steps {
                script {
                    // VERSION 파일 읽기
                    def version = readFile('VERSION').trim()
                    echo "Version found: ${version}"
                    // 환경 변수 설정
                    env.DOCKER_TAG = version
                }
            }
        }
        stage('Docker Build and Push') {
            steps {
                script {
                    docker.withRegistry('https://index.docker.io/v1/', 'dockerhub-crd') {
                        // DOCKER_TAG 사용
                        def appImage = docker.build("${DOCKER_IMAGE}:${DOCKER_TAG}")
                        appImage.push()
                        appImage.push("latest")
                    }
                }
            }
        }
        stage('ops-deploy Checkout') {
            steps {
                 git branch: 'main',
                 url: 'http://192.168.254.124:3000/devops/ops-deploy.git',  // Git에서 코드 체크아웃
                 credentialsId: 'gogs-crd'  // Credentials ID
            }
        }
        stage('ops-deploy version update push') {
            steps {
                sh '''
                OLDVER=$(cat dev-app/VERSION)
                NEWVER=$(echo ${DOCKER_TAG})
                sed -i -e "s/$OLDVER/$NEWVER/" dev-app/timeserver.yaml
                sed -i -e "s/$OLDVER/$NEWVER/" dev-app/VERSION
                git add ./dev-app
                git config user.name "devops"
                git config user.email "a@a.com"
                git commit -m "version update ${DOCKER_TAG}"
                git push http://${GOGSCRD_USR}:${GOGSCRD_PSW}@192.168.254.124:3000/devops/ops-deploy.git
                '''
            }
        }
    }
    post {
        success {
            echo "Docker image ${DOCKER_IMAGE}:${DOCKER_TAG} has been built and pushed successfully!"
        }
        failure {
            echo "Pipeline failed. Please check the logs."
        }
    }
}
# dev-app 리포지토리에서 git push 수행

# VERSION 파일 수정 : 0.0.3
# server.py 파일 수정 : 0.0.3

# git push : VERSION, server.py, Jenkinsfile
git add . && git commit -m "VERSION $(cat VERSION) Changed" && git push -u origin main
동작 확인

- Argo CD app 가 최대 3분 사이에 변경 확인 후 AutoSync 로 신규 버전 업데이트 진행
- Argo CD WebHook 설정 시 즉시 반영 가능
dev-app 리포에서 업데이트 수행

# VERSION 파일 수정 : 0.0.4
# server.py 파일 수정 : 0.0.4

# git push : VERSION, server.py, Jenkinsfile
git add . && git commit -m "VERSION $(cat VERSION) Changed" && git push -u origin main


# VERSION 파일 수정 : 0.0.5
# server.py 파일 수정 : 0.0.5

# git push : VERSION, server.py, Jenkinsfile
git add . && git commit -m "VERSION $(cat VERSION) Changed" && git push -u origin main
4. Argo Rollout + k8s(kind)
Argo Rollout 소개
Kubernetes Progressive Delivery Controller
Argo Rollouts URL: https://argoproj.github.io/argo-rollouts/
Argo Rollouts - Kubernetes Progressive Delivery Controller
Argo Rollouts - Kubernetes Progressive Delivery Controller What is Argo Rollouts? Argo Rollouts is a Kubernetes controller and set of CRDs which provide advanced deployment capabilities such as blue-green, canary, canary analysis, experimentation, and prog
argoproj.github.io
- Argo Rollouts는 Kubernetes 환경에서 고급 배포 전략을 제공하는 오픈소스 컨트롤러입니다.
- 이를 통해 애플리케이션을 더욱 안정적이고 유연하게 업데이트할 수 있으며, 배포 과정에서 발생할 수 있는 위험을 최소화할 수 있습니다.
주요 기능
- 고급 배포 전략 지원:
- Canary 배포: 새로운 버전을 단계적으로 배포하여 트래픽을 점진적으로 이동.
- Blue/Green 배포: 기존 버전과 새로운 버전을 병렬로 운영한 뒤, 새로운 버전으로 트래픽 전환.
- Progressive Delivery: 배포 단계를 자동화하고 모니터링 도구와 통합하여 문제를 빠르게 탐지.
- 풍부한 통합:
- Argo Rollouts는 Prometheus, Datadog, Grafana와 같은 모니터링 도구와 연동하여 배포 상태를 실시간으로 확인하고, 이상 상황에 대한 롤백을 자동으로 처리할 수 있습니다.
- Argo CD와의 시너지:
- Argo CD와 함께 사용하면 GitOps 방식을 통해 배포를 완벽히 자동화할 수 있습니다.
- 코드 변경이 Git에 커밋되면 자동으로 Rollout이 시작되며, 이를 통해 개발 속도를 높이고 신뢰성을 확보할 수 있습니다.
사용 사례
- 배포 안정성 확보: 빠른 문제 감지 및 롤백 기능으로 서비스 중단을 최소화
- DevOps 가속화: CI/CD 파이프라인과 통합하여 배포 프로세스를 자동화
- 대규모 애플리케이션 관리: 다양한 배포 전략을 유연하게 적용하여 복잡한 환경에서도 효율적인 운영
Argo Rollouts 설치 및 Sample 테스트
Getting Started Docs URL: https://argoproj.github.io/argo-rollouts/getting-started/
Basic Usage - Argo Rollouts - Kubernetes Progressive Delivery Controller
Getting Started This guide will demonstrate various concepts and features of Argo Rollouts by going through deployment, upgrade, promotion, and abortion of a Rollout. Requirements Kubernetes cluster with argo-rollouts controller installed (see install guid
argoproj.github.io
Argo Rollouts 설치
# 네임스페이스 생성 및 파라미터 파일 작성
cd $PWD

kubectl create ns argo-rollouts
cat <<EOT > argorollouts-values.yaml
dashboard:
  enabled: true
  service:
    type: NodePort
    nodePort: 30003
EOT

# 설치
helm install argo-rollouts argo/argo-rollouts --version 2.35.1 -f argorollouts-values.yaml --namespace argo-rollouts

# 확인
kubectl get all -n argo-rollouts
kubectl get crds

# Argo rollouts 대시보드 접속 주소 확인
echo "http://127.0.0.1:30003"
open "http://127.0.0.1:30003"
Deploying a Rollout


#
spec:
  replicas: 5
  strategy:
    canary:
      steps:
      - setWeight: 20
      - pause: {}
      - setWeight: 40
      - pause: {duration: 10}
      - setWeight: 60
      - pause: {duration: 10}
      - setWeight: 80
      - pause: {duration: 10}


# Run the following command to deploy the initial Rollout and Service:
kubectl apply -f https://raw.githubusercontent.com/argoproj/argo-rollouts/master/docs/getting-started/basic/rollout.yaml
kubectl apply -f https://raw.githubusercontent.com/argoproj/argo-rollouts/master/docs/getting-started/basic/service.yaml

# 확인
kubectl get rollout
kubectl describe rollout

kubectl get pod -l app=rollouts-demo
kubectl get svc,ep rollouts-demo
kubectl get rollouts rollouts-demo -o json | grep rollouts-demo
...
   "image": "argoproj/rollouts-demo:blue"
...
Updating a Rollout
# Run the following command to update the rollouts-demo Rollout with the "yellow" version of the container:
kubectl edit rollouts rollouts-demo
..
     - image: argoproj/rollouts-demo:yellow
...

# 파드 label 정보 확인
watch -d kubectl get pod -l app=rollouts-demo -owide --show-labels


이것으로 CloudNet@ CI/CD Study - 3주차 - GitHub Actions CI/CD 내용을 마무리 합니다.
긴 글 읽어주셔서 감사합니다
'k8s > CloudNet@' 카테고리의 다른 글
| CI/CD Study - 2주차 - GitHub Actions CI/CD (0) | 2024.12.15 |
|---|---|
| CI/CD Study - 1주차 - Jenkins CI/CD + Docker (0) | 2024.12.07 |
| [CloudNet@] AWS EKS Workshop Study - 5주차. (0) | 2023.05.28 |
| [CloudNet@] AWS EKS Workshop Study - 4주차. (0) | 2023.05.21 |
| [CloudNet@] AWS EKS Workshop Study - 3주차. (0) | 2023.05.14 |