
안녕하세요 늑대양입니다 😍

이번에 CloudNet@에서 진행하는 AWS EKS Workshop Study(AEWS)에 참여하여 관련 내용을 공유드리고자 합니다.

오늘은 AEWS 스터디 5주차 학습 내용을 안내해드리록하겠습니다.

CloudNet@ 팀 블로그 Main URL:
https://www.notion.so/gasidaseo/CloudNet-Blog-c9dfa44a27ff431dafdd2edacc8a1863
CloudNet@ Blog
CloudNet@ 팀에서 Cloud Infra & Network 기술에 대한 정보를 공유하는 블로그 입니다.
www.notion.so
AWS EKS Workshop Study - 5주차
5주차 학습 주제: EKS Autoscaling
Index.
- 실습 환경 배포 & 소개
- HPA - Horizontal Pod Autoscaler
- KEDA - Kubernetes based Event Driven Autoscaler
- VPCA - Vertical Pod Autoscaler
- CA - Cluster Auto Scaler
- CPA - Cluster Proportional Autoscaler
- Karpenter
- (Optional) Amazon EKS with AWS Batch
- (실습 완료 후) 자원 삭제
실습 환경 배포 & 소개
- CloudFormation 배포는 4주차 게시글을 참고해주세요
- 업데이트 된 사항:
- 그라파나 대시보드 추가 (15757 17900 15172) + helm repo 관련
- EKS Node Viewer 설치
프로메테우스 & 그라파나 설치
# 프로메테우스 & 그라파나(admin / prom-operator) 설치

# 사용 리전의 인증서 ARN 확인
CERT_ARN=`aws acm list-certificates --query 'CertificateSummaryList[].CertificateArn[]' --output text`
echo $CERT_ARN

# repo 추가
helm repo add prometheus-community https://prometheus-community.github.io/helm-charts

# 파라미터 파일 생성
cat <<EOT > monitor-values.yaml
prometheus:
  prometheusSpec:
    podMonitorSelectorNilUsesHelmValues: false
    serviceMonitorSelectorNilUsesHelmValues: false
    retention: 5d
    retentionSize: "10GiB"

  verticalPodAutoscaler:
    enabled: true

  ingress:
    enabled: true
    ingressClassName: alb
    hosts:
      - prometheus.$MyDomain
    paths:
      - /*
    annotations:
      alb.ingress.kubernetes.io/scheme: internet-facing
      alb.ingress.kubernetes.io/target-type: ip
      alb.ingress.kubernetes.io/listen-ports: '[{"HTTPS":443}, {"HTTP":80}]'
      alb.ingress.kubernetes.io/certificate-arn: $CERT_ARN
      alb.ingress.kubernetes.io/success-codes: 200-399
      alb.ingress.kubernetes.io/load-balancer-name: myeks-ingress-alb
      alb.ingress.kubernetes.io/group.name: study
      alb.ingress.kubernetes.io/ssl-redirect: '443'

grafana:
  defaultDashboardsTimezone: Asia/Seoul
  adminPassword: prom-operator

  ingress:
    enabled: true
    ingressClassName: alb
    hosts:
      - grafana.$MyDomain
    paths:
      - /*
    annotations:
      alb.ingress.kubernetes.io/scheme: internet-facing
      alb.ingress.kubernetes.io/target-type: ip
      alb.ingress.kubernetes.io/listen-ports: '[{"HTTPS":443}, {"HTTP":80}]'
      alb.ingress.kubernetes.io/certificate-arn: $CERT_ARN
      alb.ingress.kubernetes.io/success-codes: 200-399
      alb.ingress.kubernetes.io/load-balancer-name: myeks-ingress-alb
      alb.ingress.kubernetes.io/group.name: study
      alb.ingress.kubernetes.io/ssl-redirect: '443'

defaultRules:
  create: false
kubeControllerManager:
  enabled: false
kubeEtcd:
  enabled: false
kubeScheduler:
  enabled: false
alertmanager:
  enabled: false
EOT

# 배포
kubectl create ns monitoring
helm install kube-prometheus-stack prometheus-community/kube-prometheus-stack --version 45.27.2 \
--set prometheus.prometheusSpec.scrapeInterval='15s' --set prometheus.prometheusSpec.evaluationInterval='15s' \
-f monitor-values.yaml --namespace monitoring

# Metrics-server 배포
kubectl apply -f https://github.com/kubernetes-sigs/metrics-server/releases/latest/download/components.yaml


EKS Node Viewer 설치
노드 할당 가능 용량과 요청 request 리소스 표시, 실제 파드 리소스 사용량 X
Main github URL: https://github.com/awslabs/eks-node-viewer
GitHub - awslabs/eks-node-viewer: EKS Node Viewer
EKS Node Viewer. Contribute to awslabs/eks-node-viewer development by creating an account on GitHub.
github.com
- eks-node-viewer는 클러스터 내에서, 노드에 대한 사용량을 동적으로 확인할 수 있는 툴
- 초기에는 AWS에서 consolidation 과 karpenter 시연을 위해, 내부 개발 툴로 진행
# go 설치
yum install -y go

# EKS Node Viewer 설치 : 현재 ec2 spec에서는 설치에 다소 시간이 소요됨 = 2분 이상
go install github.com/awslabs/eks-node-viewer/cmd/eks-node-viewer@latest

# bin 확인 및 사용
tree ~/go/bin
cd ~/go/bin
./eks-node-viewer


명령 샘플
# Standard usage
./eks-node-viewer

# Display both CPU and Memory Usage
./eks-node-viewer --resources cpu,memory

# Karenter nodes only
./eks-node-viewer --node-selector "karpenter.sh/provisioner-name"

# Display extra labels, i.e. AZ
./eks-node-viewer --extra-labels topology.kubernetes.io/zone

# Specify a particular AWS profile and region
AWS_PROFILE=myprofile AWS_REGION=us-west-2

기본 옵션
# select only Karpenter managed nodes
node-selector=karpenter.sh/provisioner-name

# display both CPU and memory
resources=cpu,memory

Kubernetes autoscaling overview
관련 영상: https://www.youtube.com/watch?v=5B4-s_ivn1o


HPA - Horizontal Pod Autoscaler

- HPA(Horizontal Pod Autoscaler) 컨트롤러는 메트릭 값에 값에 따라 파드의 개수를 할당
- 파드 스케일링을 적용하기 위해 컨테이너에 필요한 리소스 양을 명시하고, HPA를 통해 스케일할 조건을 작성해야 함!
# 실습에 사용할, php-apache.yaml 명세
apiVersion: apps/v1
kind: Deployment
metadata:
  name: php-apache
spec:
  selector:
    matchLabels:
      run: php-apache
  template:
    metadata:
      labels:
        run: php-apache
    spec:
      containers:
      - name: php-apache
        image: registry.k8s.io/hpa-example
        ports:
        - containerPort: 80
        resources:
          limits:
            cpu: 500m
          requests:
            cpu: 200m
---
apiVersion: v1
kind: Service
metadata:
  name: php-apache
  labels:
    run: php-apache
spec:
  ports:
  - port: 80
  selector:
    run: php-apache
# Run and expose php-apache server
curl -s -O https://raw.githubusercontent.com/kubernetes/website/main/content/en/examples/application/php-apache.yaml
cat php-apache.yaml | yh
kubectl apply -f php-apache.yaml

# 확인
kubectl exec -it deploy/php-apache -- cat /var/www/html/index.php
...

# 모니터링 : 터미널2개 사용
watch -d 'kubectl get hpa,pod;echo;kubectl top pod;echo;kubectl top node'
kubectl exec -it deploy/php-apache -- top

# 접속
PODIP=$(kubectl get pod -l run=php-apache -o jsonpath={.items[0].status.podIP})
curl -s $PODIP; echo


도전과제 - HPA : Autoscaling on multiple metrics and custom metrics
HorizontalPodAutoscaler Walkthrough
A HorizontalPodAutoscaler (HPA for short) automatically updates a workload resource (such as a Deployment or StatefulSet), with the aim of automatically scaling the workload to match demand. Horizontal scaling means that the response to increased load is t
kubernetes.io
#
cat<< EOT > hpa-v2.yaml
apiVersion: autoscaling/v2
kind: HorizontalPodAutoscaler
apiVersion: autoscaling/v2
kind: HorizontalPodAutoscaler
metadata:
  name: php-apache
spec:
  minReplicas: 1
  maxReplicas: 10
  scaleTargetRef:
    apiVersion: apps/v1
    kind: Deployment
    name: php-apache
  metrics:
  - type: Resource
    resource:
      name: cpu
      target:
        type: Utilization
        averageUtilization: 50
  - type: Pods
    pods:
      metric:
        name: packets-per-second
      target:
        type: AverageValue
        averageValue: 1k
  - type: Object
    object:
      metric:
        name: requests-per-second
      describedObject:
        apiVersion: networking.k8s.io/v1
        kind: Ingress
        name: main-route
      target:
        type: Value
        value: 10k
EOT

#
kubectl apply -f hpa-v2.yaml
KEDA - Kubernetes based Event Driven Autoscaler

- 기존의 HPA(Horizontal Pod Autoscaler)는 리소스(CPU, Memory) 메트릭을 기반으로 스케일 여부를 결정
- 반면에 KEDA는 특정 이벤트를 기반으로 스케일 여부를 결정 가능
- 예를 들어 airflow는 metadb를 통해 현재 실행 중이거나 대기 중인 task가 얼마나 존재하는지 알 수 있으며, 이러한 이벤트를 활용하여 worker의 scale을 결정한다면 queue에 task가 많이 추가되는 시점에 더 빠르게 확장 가능
KEDA 설치:
# KEDA 설치
cat <<EOT > keda-values.yaml
metricsServer:
  useHostNetwork: true

prometheus:
  metricServer:
    enabled: true
    port: 9022
    portName: metrics
    path: /metrics
    serviceMonitor:
      # Enables ServiceMonitor creation for the Prometheus Operator
      enabled: true
    podMonitor:
      # Enables PodMonitor creation for the Prometheus Operator
      enabled: true
  operator:
    enabled: true
    port: 8080
    serviceMonitor:
      # Enables ServiceMonitor creation for the Prometheus Operator
      enabled: true
    podMonitor:
      # Enables PodMonitor creation for the Prometheus Operator
      enabled: true

  webhooks:
    enabled: true
    port: 8080
    serviceMonitor:
      # Enables ServiceMonitor creation for the Prometheus webhooks
      enabled: true
EOT

kubectl create namespace keda
helm repo add kedacore https://kedacore.github.io/charts
helm install keda kedacore/keda --version 2.10.2 --namespace keda -f keda-values.yaml

# KEDA 설치 확인
kubectl get-all -n keda
kubectl get all -n keda
kubectl get crd | grep keda

# keda 네임스페이스에 디플로이먼트 생성
kubectl apply -f php-apache.yaml -n keda
kubectl get pod -n keda

# ScaledObject 정책 생성 : cron
cat <<EOT > keda-cron.yaml
apiVersion: keda.sh/v1alpha1
kind: ScaledObject
metadata:
  name: php-apache-cron-scaled
spec:
  minReplicaCount: 0
  maxReplicaCount: 2
  pollingInterval: 30
  cooldownPeriod: 300
  scaleTargetRef:
    apiVersion: apps/v1
    kind: Deployment
    name: php-apache
  triggers:
  - type: cron
    metadata:
      timezone: Asia/Seoul
      start: 00,15,30,45 * * * *
      end: 05,20,35,50 * * * *
      desiredReplicas: "1"
EOT
kubectl apply -f keda-cron.yaml -n keda

# 그라파나 대시보드 추가
# 모니터링
watch -d 'kubectl get ScaledObject,hpa,pod -n keda'
kubectl get ScaledObject -w

# 확인
kubectl get ScaledObject,hpa,pod -n keda
kubectl get hpa -o jsonpath={.items[0].spec} -n keda | jq
...
"metrics": [
    {
      "external": {
        "metric": {
          "name": "s0-cron-Asia-Seoul-00,15,30,45xxxx-05,20,35,50xxxx",
          "selector": {
            "matchLabels": {
              "scaledobject.keda.sh/name": "php-apache-cron-scaled"
            }
          }
        },
        "target": {
          "averageValue": "1",
          "type": "AverageValue"
        }
      },
      "type": "External"
    }

# KEDA 및 deployment 등 삭제
kubectl delete -f keda-cron.yaml -n keda && kubectl delete deploy php-apache -n keda && helm uninstall keda -n keda
kubectl delete namespace keda
도전과제 - KEDA 활용: Karpenter + KEDA로 특정 시간에 AutoScaling
관련 URL:
https://jenakim47.tistory.com/90
[EKS] Karpenter + KEDA를 사용해서 특정 시간에 Auto Scaling 하는 방법
개요 Karpenter + KEDA를 사용해서 이벤트 시간 전에 Node Scale Out 하고 일정 시간 지난 후 Scale In 되도록 테스트를 해보겠습니다. Karpenter가 Node를 프로비저닝 할 때 1~2분 정도 시간이 걸립니다. 이벤트
jenakim47.tistory.com
https://swalloow.github.io/airflow-worker-keda-autoscaler/
Airflow worker에 KEDA AutoScaler 적용한 후기
Airflow에서 실행되는 배치 작업들은 특정 시간 또는 야간에 많이 수행되고 이외의 시간은 상대적으로 여유로운 경우가 많습니다. 이러한 상황에서 오토스케일링을 적용한다면 효율적으로 리소
swalloow.github.io
VPA - Vertical Pod Autoscaler
pod resources.request을 최대한 최적값으로 수정, HPA와 같이 사용 불가능, 수정 시 파드 재실행
# 환경 준비
# 코드 다운로드
git clone https://github.com/kubernetes/autoscaler.git
cd ~/autoscaler/vertical-pod-autoscaler/
tree hack


# openssl 버전 확인
openssl version
OpenSSL 1.0.2k-fips  26 Jan 2017

# openssl 1.1.1 이상 버전 확인
yum install openssl11 -y
openssl11 version
OpenSSL 1.1.1g FIPS  21 Apr 2020

# 스크립트파일내에 openssl11 수정
sed -i 's/openssl/openssl11/g' ~/autoscaler/vertical-pod-autoscaler/pkg/admission-controller/gencerts.sh

# Deploy the Vertical Pod Autoscaler to your cluster with the following command.
watch -d kubectl get pod -n kube-system
cat hack/vpa-up.sh
./hack/vpa-up.sh
kubectl get crd | grep autoscaling


공식 예제 실습
#
# 모니터링
watch -d kubectl top pod

# 공식 예제 배포
cd ~/autoscaler/vertical-pod-autoscaler/
cat examples/hamster.yaml | yh
kubectl apply -f examples/hamster.yaml && kubectl get vpa -w

# 파드 리소스 Requestes 확인
kubectl describe pod | grep Requests: -A2
    Requests:
      cpu:        100m
      memory:     50Mi
--
    Requests:
      cpu:        587m
      memory:     262144k
--
    Requests:
      cpu:        587m
      memory:     262144k

# VPA에 의해 기존 파드 삭제되고 신규 파드가 생성됨
kubectl get events --sort-by=".metadata.creationTimestamp" | grep VPA
2m16s       Normal    EvictedByVPA             pod/hamster-5bccbb88c6-s6jkp         Pod was evicted by VPA Updater to apply resource recommendation.
76s         Normal    EvictedByVPA             pod/hamster-5bccbb88c6-jc6gq         Pod was evicted by VPA Updater to apply resource recommendation.

# 실습 완료 후, 리소스 삭제
kubectl delete -f examples/hamster.yaml && cd ~/autoscaler/vertical-pod-autoscaler/ && ./hack/vpa-down.sh

CA - Cluster Auto Scaler

- Cluster Autoscale 동작을 하기 위한 cluster-autoscaler 파드(디플로이먼트)를 배치합니다.
- Cluster Autoscaler(CA)는 pending 상태인 파드가 존재할 경우, 워커 노드를 스케일 아웃합니다.
- 특정 시간을 간격으로 사용률을 확인하여 스케일 인/아웃을 수행합니다. 그리고 AWS에서는 Auto Scaling Group(ASG)을 사용하여 Cluster Autoscaler를 적용합니다.
Cluster Autoscaler 설정
AWS 환경에서는 CA 관련 아래의 네 가지 옵션을 제공
- One Auto Scaling group
- Multiple Auto Scaling groups
- Auto-Discovery : CA 설정과 관련하여 권장하는 옵션
- Control-plane Node setup
# 설정 전 확인 작업
# EKS 노드에 이미 아래 tag가 들어가 있음
# k8s.io/cluster-autoscaler/enabled : true
# k8s.io/cluster-autoscaler/myeks : owned
aws ec2 describe-instances  --filters Name=tag:Name,Values=$CLUSTER_NAME-ng1-Node --query "Reservations[*].Instances[*].Tags[*]" --output yaml | yh
...
- Key: k8s.io/cluster-autoscaler/myeks
      Value: owned
- Key: k8s.io/cluster-autoscaler/enabled
      Value: 'true'
...

# 현재 autoscaling(ASG) 정보 확인
# aws autoscaling describe-auto-scaling-groups --query "AutoScalingGroups[? Tags[? (Key=='eks:cluster-name') && Value=='클러스터이름']].[AutoScalingGroupName, MinSize, MaxSize,DesiredCapacity]" --output table
aws autoscaling describe-auto-scaling-groups \
    --query "AutoScalingGroups[? Tags[? (Key=='eks:cluster-name') && Value=='myeks']].[AutoScalingGroupName, MinSize, MaxSize,DesiredCapacity]" \
    --output table
-----------------------------------------------------------------
|                   DescribeAutoScalingGroups                   |
+------------------------------------------------+----+----+----+
|  eks-ng1-44c41109-daa3-134c-df0e-0f28c823cb47  |  3 |  3 |  3 |
+------------------------------------------------+----+----+----+

# MaxSize 6개로 수정
export ASG_NAME=$(aws autoscaling describe-auto-scaling-groups --query "AutoScalingGroups[? Tags[? (Key=='eks:cluster-name') && Value=='myeks']].AutoScalingGroupName" --output text)
aws autoscaling update-auto-scaling-group --auto-scaling-group-name ${ASG_NAME} --min-size 3 --desired-capacity 3 --max-size 6

# 확인
aws autoscaling describe-auto-scaling-groups --query "AutoScalingGroups[? Tags[? (Key=='eks:cluster-name') && Value=='myeks']].[AutoScalingGroupName, MinSize, MaxSize,DesiredCapacity]" --output table
-----------------------------------------------------------------
|                   DescribeAutoScalingGroups                   |
+------------------------------------------------+----+----+----+
|  eks-ng1-c2c41e26-6213-a429-9a58-02374389d5c3  |  3 |  6 |  3 |
+------------------------------------------------+----+----+----+

# 배포 : Deploy the Cluster Autoscaler (CA)
curl -s -O https://raw.githubusercontent.com/kubernetes/autoscaler/master/cluster-autoscaler/cloudprovider/aws/examples/cluster-autoscaler-autodiscover.yaml
sed -i "s/<YOUR CLUSTER NAME>/$CLUSTER_NAME/g" cluster-autoscaler-autodiscover.yaml
kubectl apply -f cluster-autoscaler-autodiscover.yaml

# 확인
kubectl get pod -n kube-system | grep cluster-autoscaler
kubectl describe deployments.apps -n kube-system cluster-autoscaler

# (옵션) cluster-autoscaler 파드가 동작하는 워커 노드가 퇴출(evict) 되지 않게 설정
kubectl -n kube-system annotate deployment.apps/cluster-autoscaler cluster-autoscaler.kubernetes.io/safe-to-evict="false"
CA 테스트
# 모니터링
kubectl get nodes -w
while true; do kubectl get node; echo "------------------------------" ; date ; sleep 1; done
while true; do aws ec2 describe-instances --query "Reservations[*].Instances[*].{PrivateIPAdd:PrivateIpAddress,InstanceName:Tags[?Key=='Name']|[0].Value,Status:State.Name}" --filters Name=instance-state-name,Values=running --output text ; echo "------------------------------"; date; sleep 1; done

# Deploy a Sample App
# We will deploy an sample nginx application as a ReplicaSet of 1 Pod
cat <<EOF> nginx.yaml
apiVersion: apps/v1
kind: Deployment
metadata:
  name: nginx-to-scaleout
spec:
  replicas: 1
  selector:
    matchLabels:
      app: nginx
  template:
    metadata:
      labels:
        service: nginx
        app: nginx
    spec:
      containers:
      - image: nginx
        name: nginx-to-scaleout
        resources:
          limits:
            cpu: 500m
            memory: 512Mi
          requests:
            cpu: 500m
            memory: 512Mi
EOF

kubectl apply -f nginx.yaml
kubectl get deployment/nginx-to-scaleout

# Scale our ReplicaSet
# Let’s scale out the replicaset to 15
kubectl scale --replicas=15 deployment/nginx-to-scaleout && date

# 확인
kubectl get pods -l app=nginx -o wide --watch
kubectl -n kube-system logs -f deployment/cluster-autoscaler

# 노드 자동 증가 확인
kubectl get nodes
aws autoscaling describe-auto-scaling-groups \
    --query "AutoScalingGroups[? Tags[? (Key=='eks:cluster-name') && Value=='myeks']].[AutoScalingGroupName, MinSize, MaxSize,DesiredCapacity]" \
    --output table

./eks-node-viewer
42 pods (0 pending 42 running 42 bound)
ip-192-168-3-196.ap-northeast-2.compute.internal cpu ███████████████████████████████████ 100% (10 pods) t3.medium/$0.0520 On-Demand
ip-192-168-1-91.ap-northeast-2.compute.internal  cpu ███████████████████████████████░░░░  89% (9 pods)  t3.medium/$0.0520 On-Demand
ip-192-168-2-185.ap-northeast-2.compute.internal cpu █████████████████████████████████░░  95% (11 pods) t3.medium/$0.0520 On-Demand
ip-192-168-2-87.ap-northeast-2.compute.internal  cpu █████████████████████████████░░░░░░  84% (6 pods)  t3.medium/$0.0520 On-Demand
ip-192-168-3-15.ap-northeast-2.compute.internal  cpu █████████████████████████████░░░░░░  84% (6 pods)  t3.medium/$0.0520 On-Demand

# 디플로이먼트 삭제
kubectl delete -f nginx.yaml && date

# 노드 갯수 축소 : 기본은 10분 후 scale down 됨, 물론 아래 flag 로 시간 수정 가능 >> 그러니 디플로이먼트 삭제 후 10분 기다리고 나서 보자!
# By default, cluster autoscaler will wait 10 minutes between scale down operations,
# you can adjust this using the --scale-down-delay-after-add, --scale-down-delay-after-delete,
# and --scale-down-delay-after-failure flag.
# E.g. --scale-down-delay-after-add=5m to decrease the scale down delay to 5 minutes after a node has been added.

# 터미널1
watch -d kubectl get node

리소스 삭제
위 실습 중 디플로이먼트 삭제 후 10분 후 노드 갯수 축소되는 것을 확인 후 아래 삭제를 해보자! >> 만약 바로 아래 CA 삭제 시 워커 노드는 4개 상태가 되어서 수동으로 2대 변경 하자!
kubectl delete -f nginx.yaml

# size 수정
aws autoscaling update-auto-scaling-group --auto-scaling-group-name ${ASG_NAME} --min-size 3 --desired-capacity 3 --max-size 3
aws autoscaling describe-auto-scaling-groups --query "AutoScalingGroups[? Tags[? (Key=='eks:cluster-name') && Value=='myeks']].[AutoScalingGroupName, MinSize, MaxSize,DesiredCapacity]" --output table

# Cluster Autoscaler 삭제
kubectl delete -f cluster-autoscaler-autodiscover.yaml

도전과제 - Cluster Over-Provisioning
Scale out 시간 절약을 위해, 여유 노드를 미리 프로비저닝 하는 방법
관련 링크 URL: https://www.eksworkshop.com/docs/autoscaling/compute/cluster-autoscaler/overprovisioning/
Cluster Over-Provisioning | EKS Workshop
The Kubernetes Cluster Autoscaler (CA) for AWS configures AWS EC2 Auto Scaling group (ASG) of the EKS node group to scale nodes in cluster when there are pods pending to be scheduled.
www.eksworkshop.com
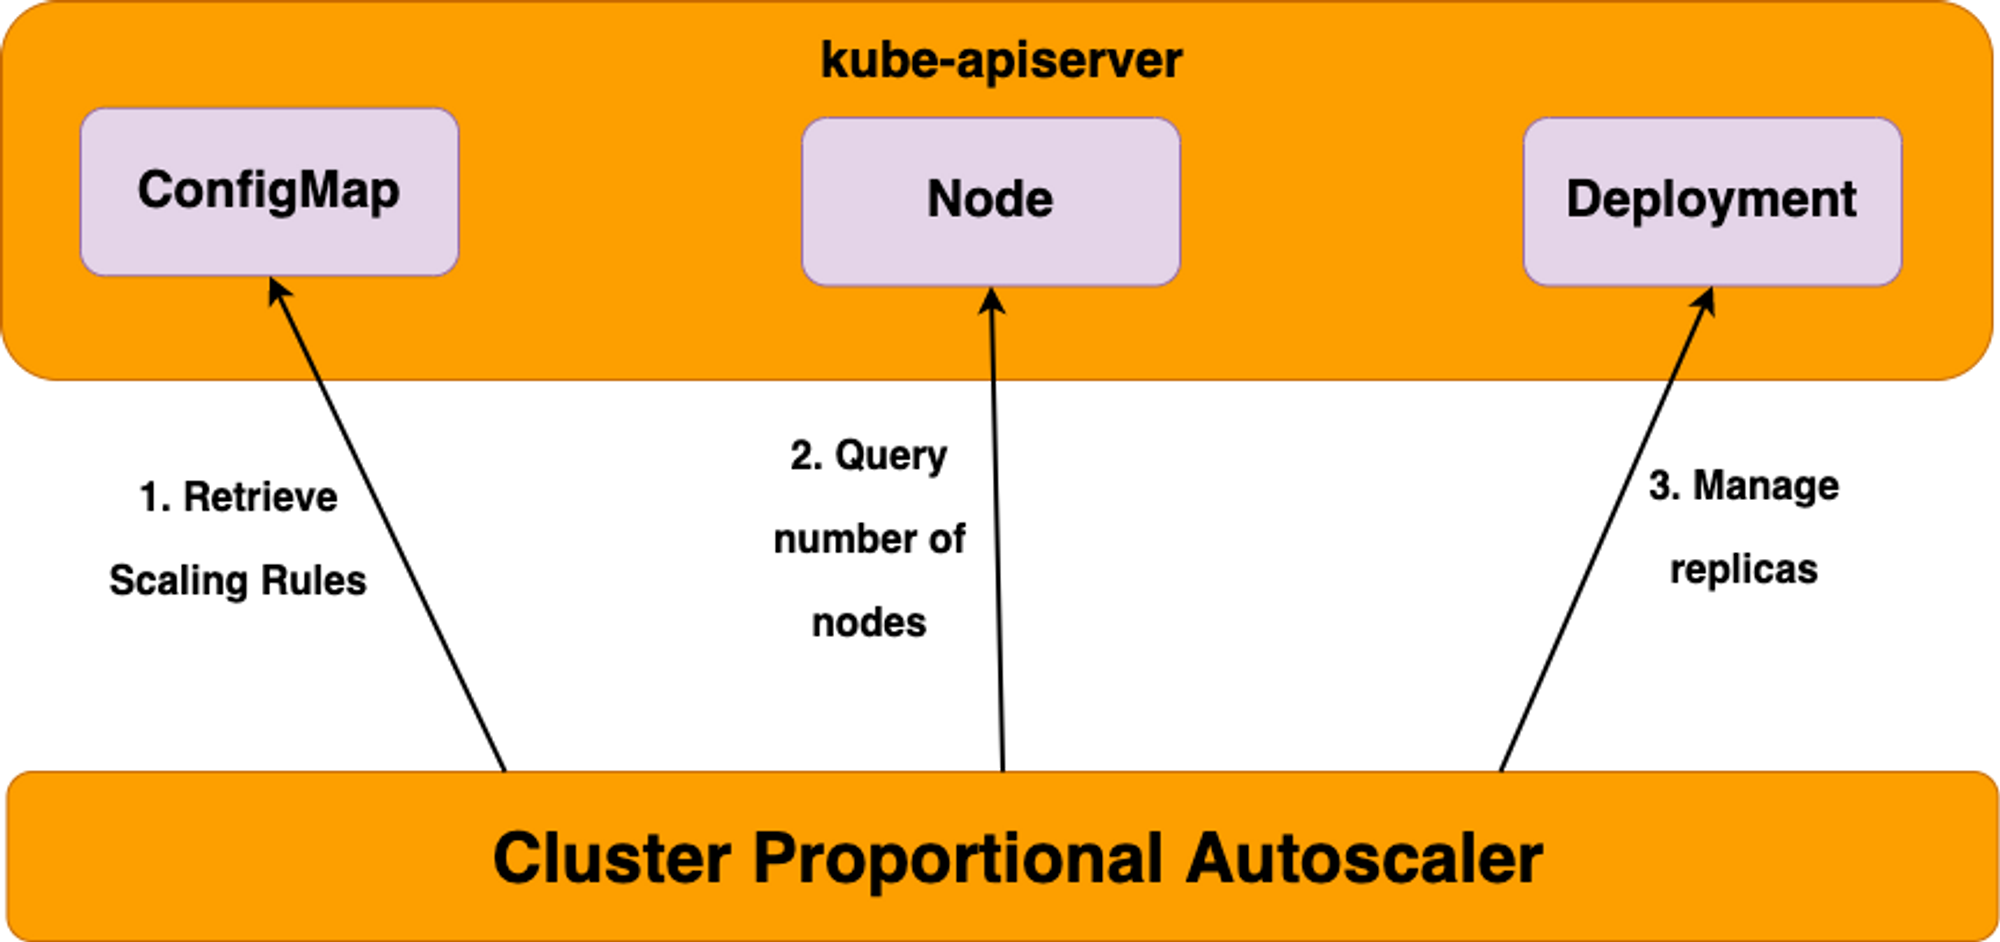
CPA - Cluster Proportional Autoscaler
노드 수 증가에 비례하여 성능 처리가 필요한 애플리케이션(컨테이너/파드)를 수평으로 자동 확장
#
helm repo add cluster-proportional-autoscaler https://kubernetes-sigs.github.io/cluster-proportional-autoscaler

# CPA규칙을 설정하고 helm차트를 릴리즈 필요
helm upgrade --install cluster-proportional-autoscaler cluster-proportional-autoscaler/cluster-proportional-autoscaler

# nginx 디플로이먼트 배포
cat <<EOT > cpa-nginx.yaml
apiVersion: apps/v1
kind: Deployment
metadata:
  name: nginx-deployment
spec:
  replicas: 1
  selector:
    matchLabels:
      app: nginx
  template:
    metadata:
      labels:
        app: nginx
    spec:
      containers:
      - name: nginx
        image: nginx:latest
        resources:
          limits:
            cpu: "100m"
            memory: "64Mi"
          requests:
            cpu: "100m"
            memory: "64Mi"
        ports:
        - containerPort: 80
EOT
kubectl apply -f cpa-nginx.yaml

# CPA 규칙 설정
cat <<EOF > cpa-values.yaml
config:
  ladder:
    nodesToReplicas:
      - [1, 1]
      - [2, 2]
      **- [3, 3]
      - [4, 3]**
      - [5, 5]
options:
  namespace: default
  target: "deployment/nginx-deployment"
EOF

# 모니터링
**watch -d kubectl get pod**

# helm 업그레이드
helm upgrade --install cluster-proportional-autoscaler -f cpa-values.yaml cluster-proportional-autoscaler/cluster-proportional-autoscaler

# 노드 5개로 증가
export ASG_NAME=$(aws autoscaling describe-auto-scaling-groups --query "AutoScalingGroups[? Tags[? (Key=='eks:cluster-name') && Value=='myeks']].AutoScalingGroupName" --output text)
aws autoscaling update-auto-scaling-group --auto-scaling-group-name ${ASG_NAME} --min-size 5 --desired-capacity 5 --max-size 5
aws autoscaling describe-auto-scaling-groups --query "AutoScalingGroups[? Tags[? (Key=='eks:cluster-name') && Value=='myeks']].[AutoScalingGroupName, MinSize, MaxSize,DesiredCapacity]" --output table

# 노드 4개로 축소
aws autoscaling update-auto-scaling-group --auto-scaling-group-name ${ASG_NAME} --min-size 4 --desired-capacity 4 --max-size 4
aws autoscaling describe-auto-scaling-groups --query "AutoScalingGroups[? Tags[? (Key=='eks:cluster-name') && Value=='myeks']].[AutoScalingGroupName, MinSize, MaxSize,DesiredCapacity]" --output table

# 리소스 삭제
helm uninstall cluster-proportional-autoscaler && kubectl delete -f cpa-nginx.yaml

이후의 karpenter 실습을 위한 기존 리소스 삭제 진행
# 헬름 차트 삭제
helm uninstall -n kube-system kube-ops-view
helm uninstall -n monitoring kube-prometheus-stack

# 리소스 삭제
eksctl delete cluster --name $CLUSTER_NAME && aws cloudformation delete-stack --stack-name $CLUSTER_NAME
Karpenter
오픈소스 노드 수명 주기 관리 솔루션, 몇 초 만에 컴퓨팅 리소스 제공

- k8s 스케쥴러에서 unschedulable 로 표시된 파드에 대한 모니터링
- 파드에서 요청한 스케줄링 제약 조건에 대해 평가
- 파드의 요구조건에 맞는 노드를 프로비저닝
- 새로운 노드에서 구동되기 위한 파드를 스케쥴링
- 노드가 더 이상 필요하지 않을 경우, 노드 삭제
Karpenter 실습 환경 배포
# CloudFormation 템플릿 정보
https://s3.ap-northeast-2.amazonaws.com/cloudformation.cloudneta.net/K8S/karpenter-preconfig.yaml

# IP 주소 확인 : 172.30.0.0/16 VPC 대역에서 172.30.1.0/24 대역을 사용 중
ip -br -c addr

# 이후 eks-node-viewer 설치는 동일하게 진행
go install github.com/awslabs/eks-node-viewer/cmd/eks-node-viewer@latest

# [터미널1] bin 확인 및 사용
tree ~/go/bin
cd ~/go/bin
./eks-node-viewer -h- 기존 리소스 스택 삭제 후, myeks2 스택 배포 진행
- Karpenter 배포또한 CloudFormation으로 진행
- CloudFormation 스택을 통해, EKS cluster 셋업
- k8s service account, IAM Role 생성 및 IRSA 연동
- 노드 연결을 위한 aws-auth configmap 추가
- 관련 링크: https://karpenter.sh/v0.27.5/getting-started/getting-started-with-karpenter/
Getting Started with Karpenter
Set up a cluster and add Karpenter
karpenter.sh
Karpenter 실습
# 환경변수 정보 확인
export | egrep 'ACCOUNT|AWS_|CLUSTER' | egrep -v 'SECRET|KEY'

# 환경변수 설정
export KARPENTER_VERSION=v0.27.5
export TEMPOUT=$(mktemp)
echo $KARPENTER_VERSION $CLUSTER_NAME $AWS_DEFAULT_REGION $AWS_ACCOUNT_ID $TEMPOUT

# CloudFormation 스택으로 IAM Policy, Role, EC2 Instance Profile 생성 : 3분 정도 소요
curl -fsSL https://karpenter.sh/"${KARPENTER_VERSION}"/getting-started/getting-started-with-karpenter/cloudformation.yaml  > $TEMPOUT \
&& aws cloudformation deploy \
  --stack-name "Karpenter-${CLUSTER_NAME}" \
  --template-file "${TEMPOUT}" \
  --capabilities CAPABILITY_NAMED_IAM \
  --parameter-overrides "ClusterName=${CLUSTER_NAME}"

# 클러스터 생성 : myeks2 EKS 클러스터 생성 19분 정도 소요
eksctl create cluster -f - <<EOF
---
apiVersion: eksctl.io/v1alpha5
kind: ClusterConfig
metadata:
  name: ${CLUSTER_NAME}
  region: ${AWS_DEFAULT_REGION}
  version: "1.24"
  tags:
    karpenter.sh/discovery: ${CLUSTER_NAME}

iam:
  withOIDC: true
  serviceAccounts:
  - metadata:
      name: karpenter
      namespace: karpenter
    roleName: ${CLUSTER_NAME}-karpenter
    attachPolicyARNs:
    - arn:aws:iam::${AWS_ACCOUNT_ID}:policy/KarpenterControllerPolicy-${CLUSTER_NAME}
    roleOnly: true

iamIdentityMappings:
- arn: "arn:aws:iam::${AWS_ACCOUNT_ID}:role/KarpenterNodeRole-${CLUSTER_NAME}"
  username: system:node:{{EC2PrivateDNSName}}
  groups:
  - system:bootstrappers
  - system:nodes

managedNodeGroups:
- instanceType: m5.large
  amiFamily: AmazonLinux2
  name: ${CLUSTER_NAME}-ng
  desiredCapacity: 2
  minSize: 1
  maxSize: 10
  iam:
    withAddonPolicies:
      externalDNS: true

## Optionally run on fargate
# fargateProfiles:
# - name: karpenter
#  selectors:
#  - namespace: karpenter
EOF

# eks 배포 확인
eksctl get cluster
eksctl get nodegroup --cluster $CLUSTER_NAME
eksctl get iamidentitymapping --cluster $CLUSTER_NAME
eksctl get iamserviceaccount --cluster $CLUSTER_NAME
eksctl get addon --cluster $CLUSTER_NAME

# [터미널1] eks-node-viewer
cd ~/go/bin && ./eks-node-viewer

# k8s 확인
kubectl cluster-info
kubectl get node --label-columns=node.kubernetes.io/instance-type,eks.amazonaws.com/capacityType,topology.kubernetes.io/zone
kubectl get pod -n kube-system -owide
kubectl describe cm -n kube-system aws-auth
...
mapRoles:
----
- groups:
  - system:bootstrappers
  - system:nodes
  rolearn: arn:aws:iam::911283464785:role/KarpenterNodeRole-myeks2
  username: system:node:{{EC2PrivateDNSName}}
- groups:
  - system:bootstrappers
  - system:nodes
  rolearn: arn:aws:iam::911283464785:role/eksctl-myeks2-nodegroup-myeks2-ng-NodeInstanceRole-1KDXF4FLKKX1B
  username: system:node:{{EC2PrivateDNSName}}
...

# 카펜터 설치를 위한 환경 변수 설정 및 확인
export CLUSTER_ENDPOINT="$(aws eks describe-cluster --name ${CLUSTER_NAME} --query "cluster.endpoint" --output text)"
export KARPENTER_IAM_ROLE_ARN="arn:aws:iam::${AWS_ACCOUNT_ID}:role/${CLUSTER_NAME}-karpenter"
echo $CLUSTER_ENDPOINT $KARPENTER_IAM_ROLE_ARN

# EC2 Spot Fleet 사용을 위한 service-linked-role 생성 확인 : 만들어있는것을 확인하는 거라 아래 에러 출력이 정상!
# If the role has already been successfully created, you will see:
# An error occurred (InvalidInput) when calling the CreateServiceLinkedRole operation: Service role name AWSServiceRoleForEC2Spot has been taken in this account, please try a different suffix.
aws iam create-service-linked-role --aws-service-name spot.amazonaws.com || true

# docker logout : Logout of docker to perform an unauthenticated pull against the public ECR
docker logout public.ecr.aws

# karpenter 설치
helm upgrade --install karpenter oci://public.ecr.aws/karpenter/karpenter --version ${KARPENTER_VERSION} --namespace karpenter --create-namespace \
  --set serviceAccount.annotations."eks\.amazonaws\.com/role-arn"=${KARPENTER_IAM_ROLE_ARN} \
  --set settings.aws.clusterName=${CLUSTER_NAME} \
  --set settings.aws.defaultInstanceProfile=KarpenterNodeInstanceProfile-${CLUSTER_NAME} \
  --set settings.aws.interruptionQueueName=${CLUSTER_NAME} \
  --set controller.resources.requests.cpu=1 \
  --set controller.resources.requests.memory=1Gi \
  --set controller.resources.limits.cpu=1 \
  --set controller.resources.limits.memory=1Gi \
  --wait

# 확인
kubectl get-all -n karpenter
kubectl get all -n karpenter
kubectl get cm -n karpenter karpenter-global-settings -o jsonpath={.data} | jq
kubectl get crd | grep karpenter

Provisioner 생성
#
cat <<EOF | kubectl apply -f -
apiVersion: karpenter.sh/v1alpha5
kind: Provisioner
metadata:
  name: default
spec:
  requirements:
    - key: karpenter.sh/capacity-type
      operator: In
      values: ["spot"]
  limits:
    resources:
      cpu: 1000
  providerRef:
    name: default
  ttlSecondsAfterEmpty: 30
---
apiVersion: karpenter.k8s.aws/v1alpha1
kind: AWSNodeTemplate
metadata:
  name: default
spec:
  subnetSelector:
    karpenter.sh/discovery: ${CLUSTER_NAME}
  securityGroupSelector:
    karpenter.sh/discovery: ${CLUSTER_NAME}
EOF

# 확인
kubectl get awsnodetemplates,provisioners
Grafana를 활용한 모니터링
#
helm repo add grafana-charts https://grafana.github.io/helm-charts
helm repo add prometheus-community https://prometheus-community.github.io/helm-charts
helm repo update

kubectl create namespace monitoring

# 프로메테우스 설치
curl -fsSL https://karpenter.sh/"${KARPENTER_VERSION}"/getting-started/getting-started-with-karpenter/prometheus-values.yaml | tee prometheus-values.yaml
helm install --namespace monitoring prometheus prometheus-community/prometheus --values prometheus-values.yaml --set alertmanager.enabled=false

# 그라파나 설치
curl -fsSL https://karpenter.sh/"${KARPENTER_VERSION}"/getting-started/getting-started-with-karpenter/grafana-values.yaml | tee grafana-values.yaml
helm install --namespace monitoring grafana grafana-charts/grafana --values grafana-values.yaml --set service.type=LoadBalancer

# admin 암호
kubectl get secret --namespace monitoring grafana -o jsonpath="{.data.admin-password}" | base64 --decode ; echo

# 그라파나 접속
kubectl annotate service grafana -n monitoring "external-dns.alpha.kubernetes.io/hostname=grafana.$MyDomain"
echo -e "grafana URL = http://grafana.$MyDomain"
# pause 파드 1개에 CPU 1개 최소 보장 할당
cat <<EOF | kubectl apply -f -
apiVersion: apps/v1
kind: Deployment
metadata:
  name: inflate
spec:
  replicas: 0
  selector:
    matchLabels:
      app: inflate
  template:
    metadata:
      labels:
        app: inflate
    spec:
      terminationGracePeriodSeconds: 0
      containers:
        - name: inflate
          image: public.ecr.aws/eks-distro/kubernetes/pause:3.7
          resources:
            requests:
              cpu: 1
EOF
kubectl scale deployment inflate --replicas 5
kubectl logs -f -n karpenter -l app.kubernetes.io/name=karpenter -c controller

# 스팟 인스턴스 확인!
aws ec2 describe-spot-instance-requests --filters "Name=state,Values=active" --output table
kubectl get node -l karpenter.sh/capacity-type=spot -o jsonpath='{.items[0].metadata.labels}' | jq
kubectl get node --label-columns=eks.amazonaws.com/capacityType,karpenter.sh/capacity-type,node.kubernetes.io/instance-type
NAME                                                STATUS   ROLES    AGE     VERSION                CAPACITYTYPE   CAPACITY-TYPE   INSTANCE-TYPE
ip-192-168-2-101.ap-northeast-2.compute.internal    Ready    <none>   17m     v1.24.13-eks-0a21954   ON_DEMAND                      m5.large
ip-192-168-51-200.ap-northeast-2.compute.internal   Ready    <none>   17m     v1.24.13-eks-0a21954   ON_DEMAND                      m5.large
ip-192-168-87-49.ap-northeast-2.compute.internal    Ready    <none>   3m10s   v1.24.13-eks-0a21954                  spot            c5n.2xlarge


Scale down deployment
# Now, delete the deployment. After 30 seconds (ttlSecondsAfterEmpty), Karpenter should terminate the now empty nodes.
kubectl delete deployment inflate
kubectl logs -f -n karpenter -l app.kubernetes.io/name=karpenter -c controller
Consolidation
노드의 리소스 사용량을 확인하고 자동으로 노드 사용량을 최적화시켜 주는 설정
관련 링크 URL: https://www.eksworkshop.com/docs/autoscaling/compute/karpenter/consolidation/
Consolidation | EKS Workshop
Scaling out infrastructure is only one side of the equation for operating compute infrastructure in a cost-effective manner. We also need to be able to optimize on an on-going basis such that, for example, workloads running on under-utilized compute instan
www.eksworkshop.com
#
kubectl delete provisioners default
cat <<EOF | kubectl apply -f -
apiVersion: karpenter.sh/v1alpha5
kind: Provisioner
metadata:
  name: default
spec:
  consolidation:
    enabled: true
  labels:
    type: karpenter
  limits:
    resources:
      cpu: 1000
      memory: 1000Gi
  providerRef:
    name: default
  requirements:
    - key: karpenter.sh/capacity-type
      operator: In
      values:
        - on-demand
    - key: node.kubernetes.io/instance-type
      operator: In
      values:
        - c5.large
        - m5.large
        - m5.xlarge
EOF

#
cat <<EOF | kubectl apply -f -
apiVersion: apps/v1
kind: Deployment
metadata:
  name: inflate
spec:
  replicas: 0
  selector:
    matchLabels:
      app: inflate
  template:
    metadata:
      labels:
        app: inflate
    spec:
      terminationGracePeriodSeconds: 0
      containers:
        - name: inflate
          image: public.ecr.aws/eks-distro/kubernetes/pause:3.7
          resources:
            requests:
              cpu: 1
EOF
kubectl scale deployment inflate --replicas 12
kubectl logs -f -n karpenter -l app.kubernetes.io/name=karpenter -c controller

# 인스턴스 확인
# This changes the total memory request for this deployment to around 12Gi,
# which when adjusted to account for the roughly 600Mi reserved for the kubelet on each node means that this will fit on 2 instances of type m5.large:
kubectl get node -l type=karpenter
kubectl get node --label-columns=eks.amazonaws.com/capacityType,karpenter.sh/capacity-type
kubectl get node --label-columns=node.kubernetes.io/instance-type,topology.kubernetes.io/zone

# Next, scale the number of replicas back down to 5:
kubectl scale deployment inflate --replicas 5

# The output will show Karpenter identifying specific nodes to cordon, drain and then terminate:
kubectl logs -f -n karpenter -l app.kubernetes.io/name=karpenter -c controller
2023-05-17T07:02:00.768Z	INFO	controller.deprovisioning	deprovisioning via consolidation delete, terminating 1 machines ip-192-168-14-81.ap-northeast-2.compute.internal/m5.xlarge/on-demand	{"commit": "d7e22b1-dirty"}
2023-05-17T07:02:00.803Z	INFO	controller.termination	cordoned node	{"commit": "d7e22b1-dirty", "node": "ip-192-168-14-81.ap-northeast-2.compute.internal"}
2023-05-17T07:02:01.320Z	INFO	controller.termination	deleted node	{"commit": "d7e22b1-dirty", "node": "ip-192-168-14-81.ap-northeast-2.compute.internal"}
2023-05-17T07:02:39.283Z	DEBUG	controller	deleted launch template	{"commit": "d7e22b1-dirty", "launch-template": "karpenter.k8s.aws/9547068762493117560"}

# Next, scale the number of replicas back down to 1
kubectl scale deployment inflate --replicas 1
kubectl logs -f -n karpenter -l app.kubernetes.io/name=karpenter -c controller
2023-05-17T07:05:08.877Z	INFO	controller.deprovisioning	deprovisioning via consolidation delete, terminating 1 machines ip-192-168-145-253.ap-northeast-2.compute.internal/m5.xlarge/on-demand	{"commit": "d7e22b1-dirty"}
2023-05-17T07:05:08.914Z	INFO	controller.termination	cordoned node	{"commit": "d7e22b1-dirty", "node": "ip-192-168-145-253.ap-northeast-2.compute.internal"}
2023-05-17T07:05:09.316Z	INFO	controller.termination	deleted node	{"commit": "d7e22b1-dirty", "node": "ip-192-168-145-253.ap-northeast-2.compute.internal"}
2023-05-17T07:05:25.923Z	INFO	controller.deprovisioning	deprovisioning via consolidation replace, terminating 1 machines ip-192-168-48-2.ap-northeast-2.compute.internal/m5.xlarge/on-demand and replacing with on-demand machine from types m5.large, c5.large	{"commit": "d7e22b1-dirty"}
2023-05-17T07:05:25.940Z	INFO	controller.deprovisioning	launching machine with 1 pods requesting {"cpu":"1125m","pods":"4"} from types m5.large, c5.large	{"commit": "d7e22b1-dirty", "provisioner": "default"}
2023-05-17T07:05:26.341Z	DEBUG	controller.deprovisioning.cloudprovider	created launch template	{"commit": "d7e22b1-dirty", "provisioner": "default", "launch-template-name": "karpenter.k8s.aws/9547068762493117560", "launch-template-id": "lt-036151ea9df7d309f"}
2023-05-17T07:05:28.182Z	INFO	controller.deprovisioning.cloudprovider	launched instance	{"commit": "d7e22b1-dirty", "provisioner": "default", "id": "i-0eb3c8ff63724dc95", "hostname": "ip-192-168-144-98.ap-northeast-2.compute.internal", "instance-type": "c5.large", "zone": "ap-northeast-2b", "capacity-type": "on-demand", "capacity": {"cpu":"2","ephemeral-storage":"20Gi","memory":"3788Mi","pods":"29"}}
2023-05-17T07:06:12.307Z	INFO	controller.termination	cordoned node	{"commit": "d7e22b1-dirty", "node": "ip-192-168-48-2.ap-northeast-2.compute.internal"}
2023-05-17T07:06:12.856Z	INFO	controller.termination	deleted node	{"commit": "d7e22b1-dirty", "node": "ip-192-168-48-2.ap-northeast-2.compute.internal"}

# 인스턴스 확인
kubectl get node -l type=karpenter
kubectl get node --label-columns=eks.amazonaws.com/capacityType,karpenter.sh/capacity-type
kubectl get node --label-columns=node.kubernetes.io/instance-type,topology.kubernetes.io/zone

# 삭제
kubectl delete deployment inflate

실습 리소스 삭제
#
kubectl delete svc -n monitoring grafana
helm uninstall -n kube-system kube-ops-view
helm uninstall karpenter --namespace karpenter

# 위 삭제 완료 후 아래 삭제
aws ec2 describe-launch-templates --filters Name=tag:karpenter.k8s.aws/cluster,Values=${CLUSTER_NAME} |
    jq -r ".LaunchTemplates[].LaunchTemplateName" |
    xargs -I{} aws ec2 delete-launch-template --launch-template-name {}

# 클러스터 삭제
eksctl delete cluster --name "${CLUSTER_NAME}"

#
aws cloudformation delete-stack --stack-name "Karpenter-${CLUSTER_NAME}"

# 위 삭제 완료 후 아래 삭제
aws cloudformation delete-stack --stack-name ${CLUSTER_NAME}
(Optional) Amazon EKS with AWS Batch
관련 링크: https://catalog.us-east-1.prod.workshops.aws/workshops/b67b6665-f7a2-427f-affb-caccd087d50d/en-US
Workshop Studio
catalog.us-east-1.prod.workshops.aws
- AWS Batch on Amazon EKS는 배치 워크로드를 기존 EKS 클러스터로 스케줄링 및 확장하기 위한 관리형 서비스
- AWS Batch는 사용자를 대신하여 EKS 클러스터의 라이프사이클 작업을 생성, 관리 또는 수행하지 않으며, AWS Batch 오케스트레이션은 AWS Batch에서 관리하는 노드를 스케일업 및 스케일다운하고 해당 노드에 파드를 실행!
(실습 완료 후) 자원 삭제
# 모니터링 리소스 및 카펜터 네임스페이스 삭제
kubectl delete svc -n monitoring grafana
helm uninstall -n kube-system kube-ops-view
helm uninstall karpenter --namespace karpenter

# 위 삭제 완료 후 아래 삭제
aws ec2 describe-launch-templates --filters Name=tag:karpenter.k8s.aws/cluster,Values=${CLUSTER_NAME} |
    jq -r ".LaunchTemplates[].LaunchTemplateName" |
    xargs -I{} aws ec2 delete-launch-template --launch-template-name {}

# 클러스터 삭제
eksctl delete cluster --name "${CLUSTER_NAME}"

#
aws cloudformation delete-stack --stack-name "Karpenter-${CLUSTER_NAME}"

# 위 삭제 완료 후 아래 삭제
aws cloudformation delete-stack --stack-name ${CLUSTER_NAME}

긴 글 읽어주셔서 감사합니다 🤓
'k8s > CloudNet@' 카테고리의 다른 글
| CI/CD Study - 2주차 - GitHub Actions CI/CD (0) | 2024.12.15 |
|---|---|
| CI/CD Study - 1주차 - Jenkins CI/CD + Docker (0) | 2024.12.07 |
| [CloudNet@] AWS EKS Workshop Study - 4주차. (0) | 2023.05.21 |
| [CloudNet@] AWS EKS Workshop Study - 3주차. (0) | 2023.05.14 |
| [CloudNet@] AWS EKS Workshop Study - 2주차. (0) | 2023.05.07 |